Chasing Sounds: A Microphone Tell-All
Get familiar with a general understanding of the way sound travels, how to capture it, and practical applications of microphones for guitarists.
You’ve seen them, you’ve used them, and maybe you’ve even indulged in a knowledge-crazed, haze-driven deep dive down the rabbit hole of how and why microphones work—we love you for that kind of curiosity. For the sake of time and precious energy, we’ll focus mostly on practical applications and a general understanding of the way sound travels and how to capture it, as opposed to a roller coaster ride down the path of impedance variables and transduction physics… but don’t worry, we will cover the basics.
As mentioned in my last lesson, the most popular types of microphones are dynamic, condenser, and ribbon. They are named after their types of diaphragm, which is a varying material that vibrates when sound waves strike it, causing other components inside the microphone to also vibrate, turning acoustical energy into electrical energy. That’s it, simple as that. Since these vibrations are very micro, they’re measured in millivolts. Consequently, the electrical current they generate is small, which translates to quiet and is referred to as mic level. Most interfaces will have a line level or mic level option for each track. Since mic level is so quiet, this switch lets you communicate to your interface that it needs to amplify the signal you’re sending to it.
Tip: The wires inside an XLR cable work their magic, carrying that electrical energy through your interface, into your computer, and then out your speakers. It’s important to familiarize yourself with how to follow signal paths like this. It will help tremendously as you grow within recording. If you aren’t already, eventually you’ll be adding more stops for your signal on its way to your speakers, and it’s easy to get lost in the maze. Teaching yourself how to follow your signal path will help you to not only quickly troubleshoot, but to also think of creative and unique ideas for inventing sounds that are all your own.
Dynamic Microphones (Moving Coil)
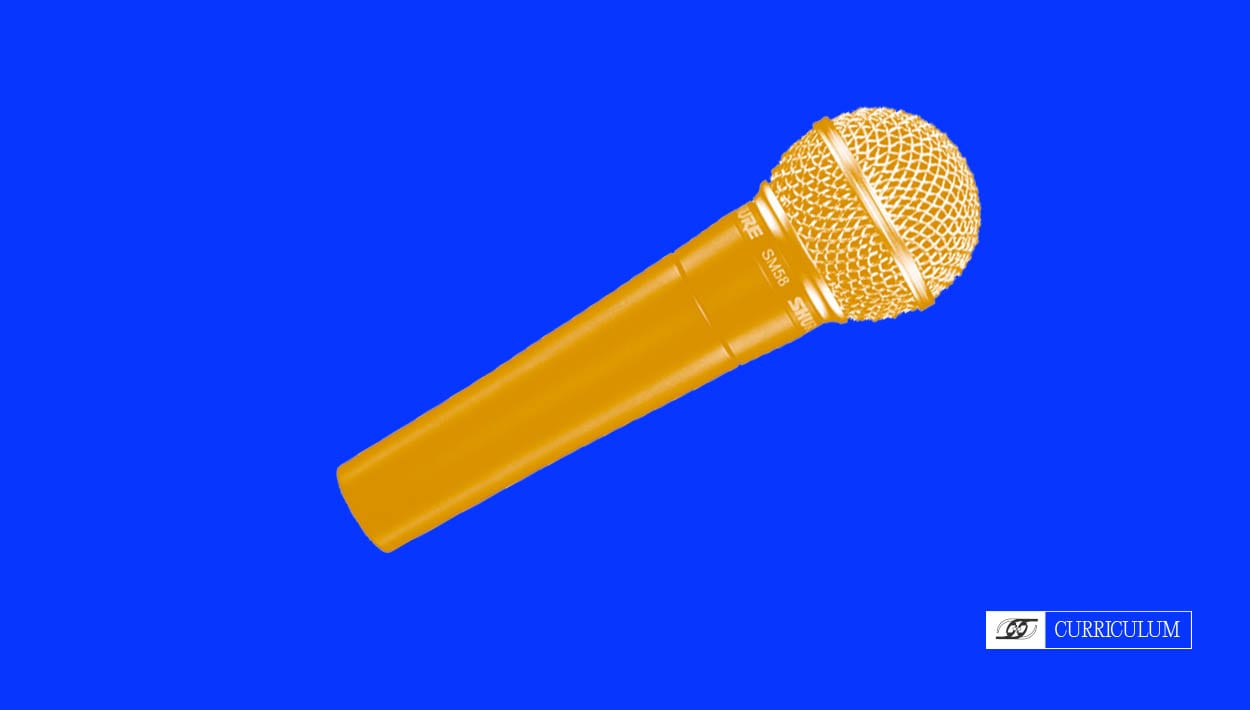
Dynamic microphones are great for general purpose. They don’t have the same flat frequency response as condensers so you’ll often find dynamic microphones tailored to specific instruments. These microphones are good for close mic’ing techniques.
The diaphragm is attached to a coil inside the microphone. When the diaphragm vibrates from sound waves, it moves the coil back and forth past a magnet. This generates the current that travels through the wires inside your cable. It’s kind of like those obscene “Shake Weights” you see with loads of spandex on infomercials: lots of shaking in place creates energy inside your body, except dynamic microphones are a better investment and do way cooler things (although not to your biceps).
Ribbon Microphones

Ribbon mics are a type of dynamic microphone great for careful, close and far mic’ing techniques. Instead of a coil, they have a very thin and lightweight piece of metal delicately suspended between the poles of a magnet. As the sound waves hit the ribbon, it vibrates between the poles creating the voltage. Since the ribbon is so lightweight, it’s held under very little tension. Because of this, its resonant frequency is less than 20hz, a range that our ear doesn’t pick up. To help understand, think of a guitar string tightened and loosened: the looser the string, the less it resonates after you pick it. Ribbon microphones are more crisp and clear than other dynamic microphones, because after the sound waves hit the ribbon, it doesn’t resonate (sending extra vibrations causing more information to pass through the wires) in a frequency that we can hear. This means that while the technology is similar to the dynamic microphone, ribbon microphones are more often sonically compared with condensers, the main difference being tones of the high end. Ribbon mics are described as darker, warmer, and even sexier.
Condenser Microphones (Capacitor)
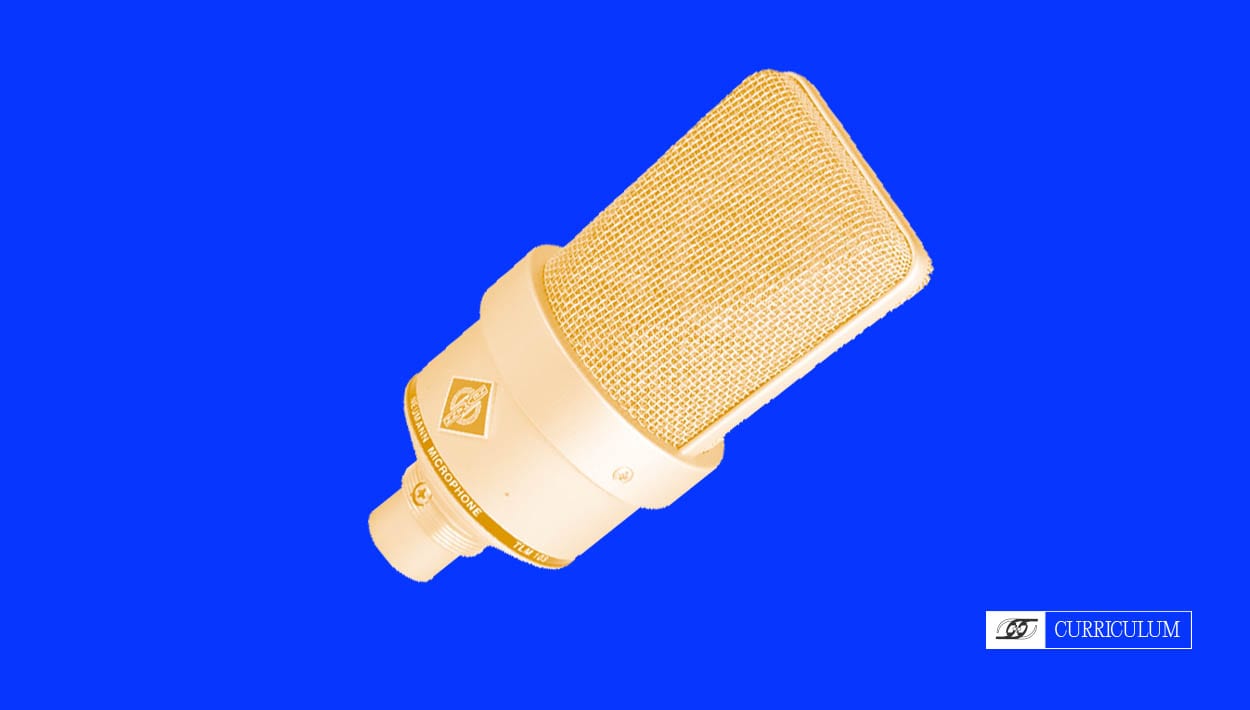
These mics distort easily when hit with high volumes, so they work best as room mics, overheads, and vocals. They are more sensitive to sound, allowing for more nuance to be captured. They also output a stronger signal level than dynamic microphones. This doesn’t make them better or worse, just different. They use a charged capacitor to convert the acoustical energy to electrical energy, which is why they require phantom power (or a discrete, unique power source in the case of certain microphones). A capacitor has two plates with a voltage in between, and the power source is what supplies the voltage. In condenser microphones, one of the plates is the diaphragm. As it’s hit with sound waves, it will move to and from the second plate, changing the capacitance. When the plate moves closer it increases the capacitance resulting in a charge current, and as it moves away it decreases resulting in a discharge current. Point is, lots of current and potentially the answer to time travel—pass the continuum transfunctioner, dude.
Directionality
Does your brain hurt yet? Good, let’s move on…
Maybe you want to be an engineer and build these things—do it! For everyone else, having a general understanding of how your mics work can help you make informed decisions when choosing the right microphone for the right application. Think about the volume of what you’re recording, the frequencies you want to capture. Put your ear (carefully) close to your sound source and find a position that sounds good; back up and see if it sounds different. Do you want to capture both? How many mics will you be using, and how can you pair them together to get the best tone? Something to consider when making these decisions is your microphone’s directionality. This describes the sensitivity of your microphone to sound coming from different directions. There are four directional patterns in microphones:
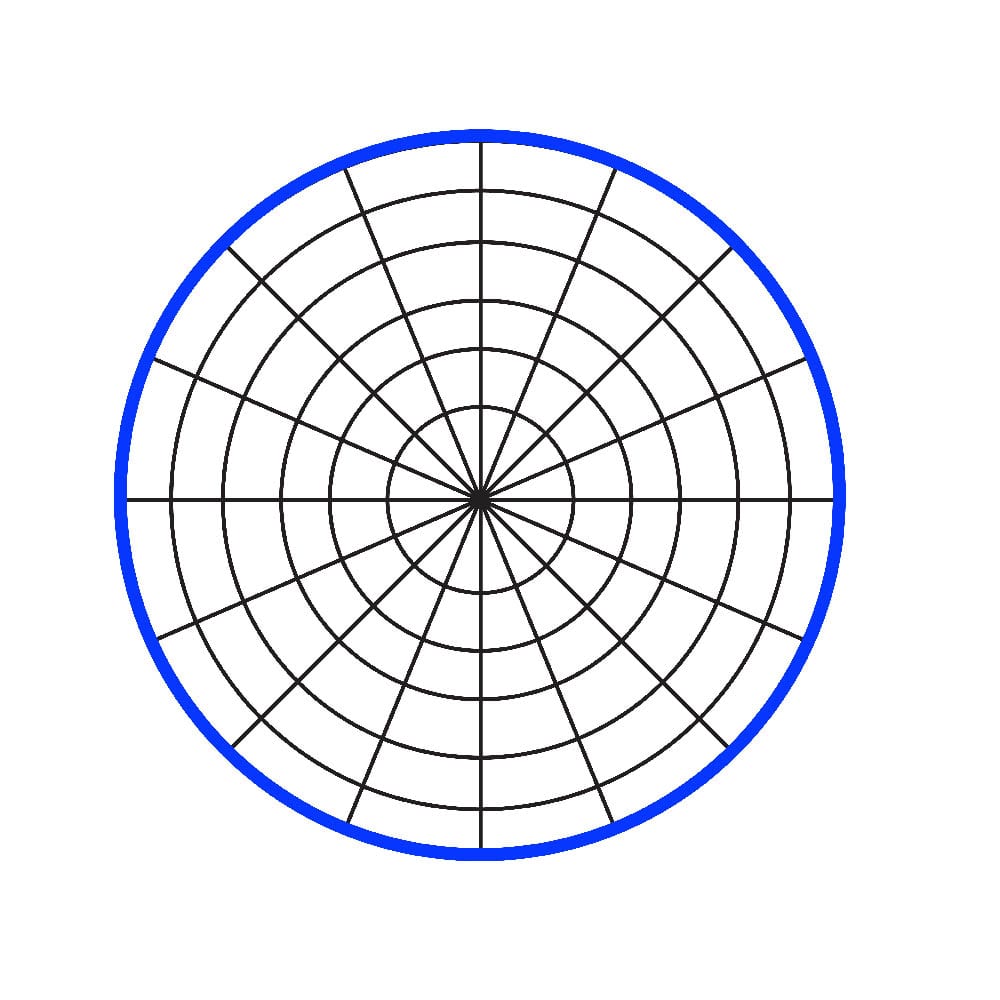
Omnidirectional: Picks up sound evenly from all directions.
Uses: Capturing ambient noise; situations where the mic must remain in place but the sound source is moving; setting where you only have one mic and the sound is coming from multiple directions; gang vocals, barbershop style.
Note: This can be a useful pattern, but isn’t going to be applicable in most settings. Omni sound is generally unfocused, so if you’re trying to capture a particular source, its subsequent reflections will be picked up by the mic, possibly overwhelming the direct sound you’re looking for.
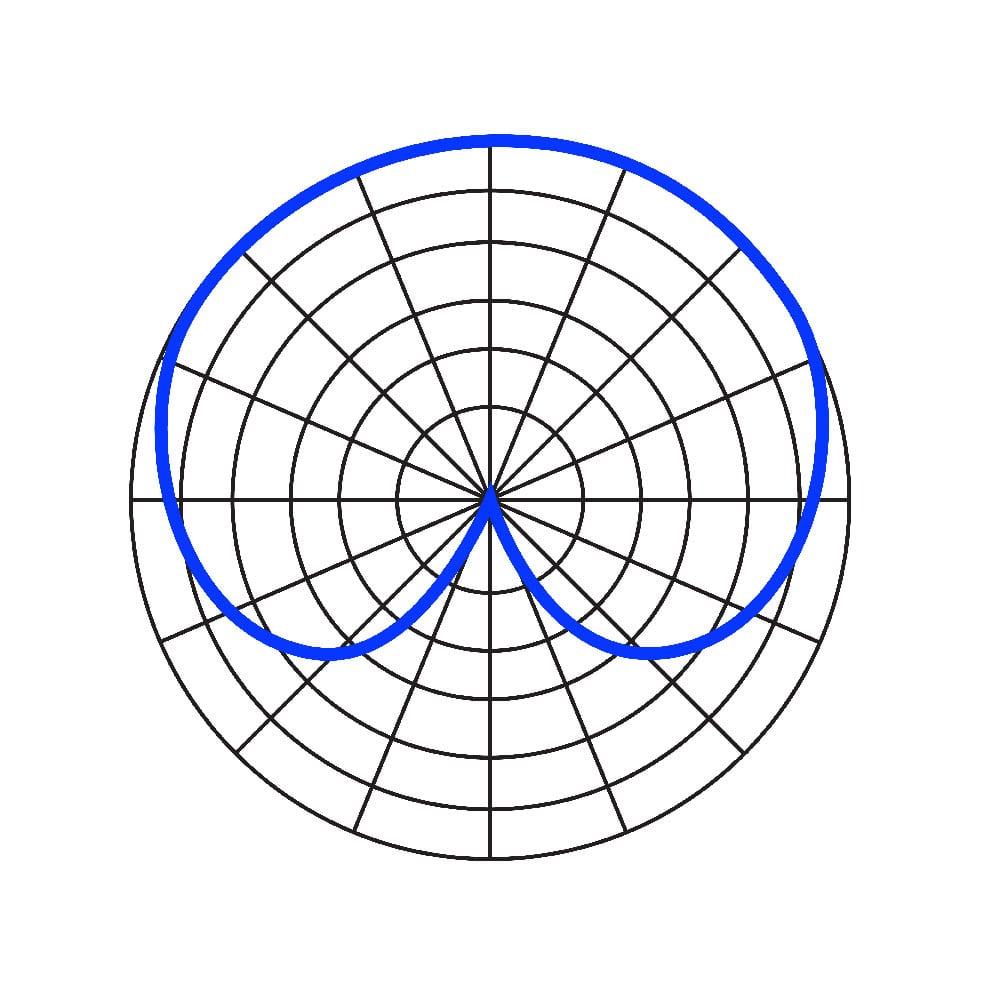
Cardioid: “Heart shaped.” A pattern that mostly picks up sound from the front, but also a little bit from the sides. Rejects sounds from the back.
Uses: Capturing a direct sound with still a bit of ambient noise. Probably your most versatile pattern.
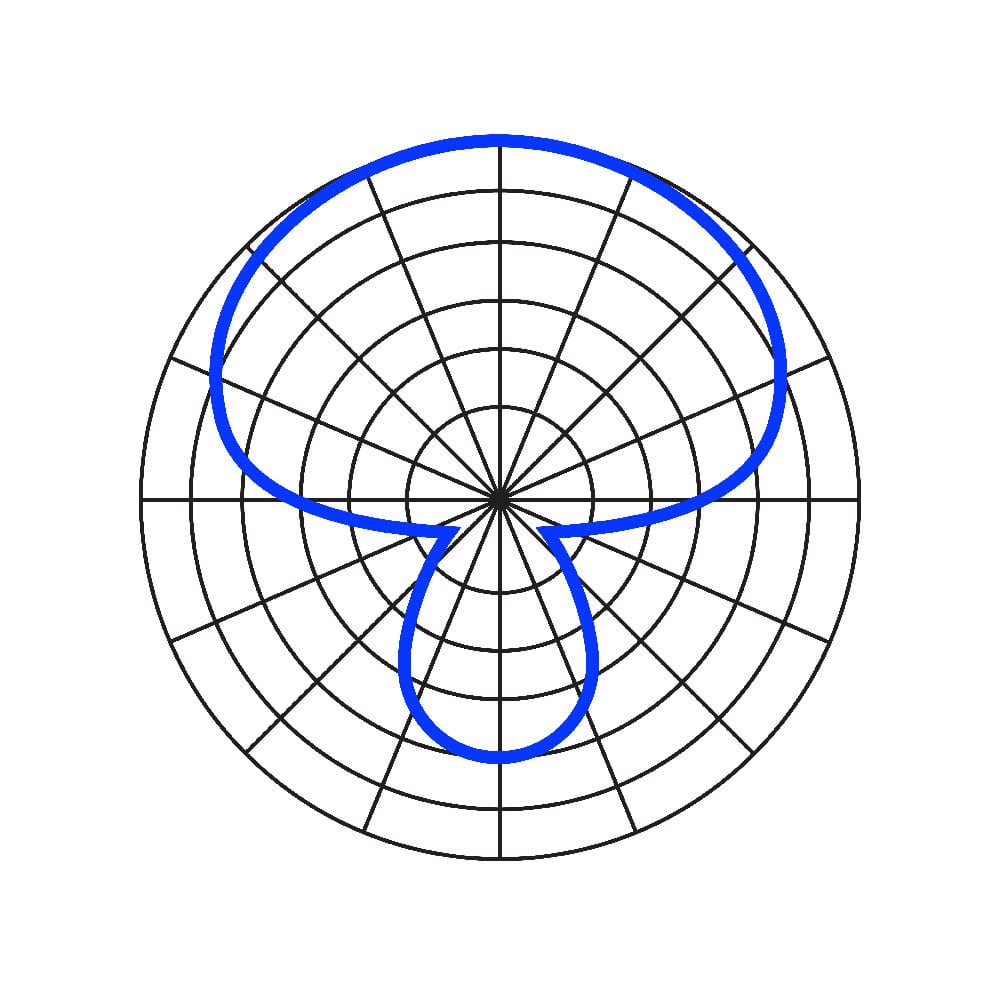
Hypercardioid: “Shotgun mics.” An exaggerated version of the cardioid. Super directional, eliminating most sound from the sides and back.
Uses: Isolating the sound from your source when there’s a lot of background noise. Shotgun mics are often used as live drum overheads. Capturing sound from far away.
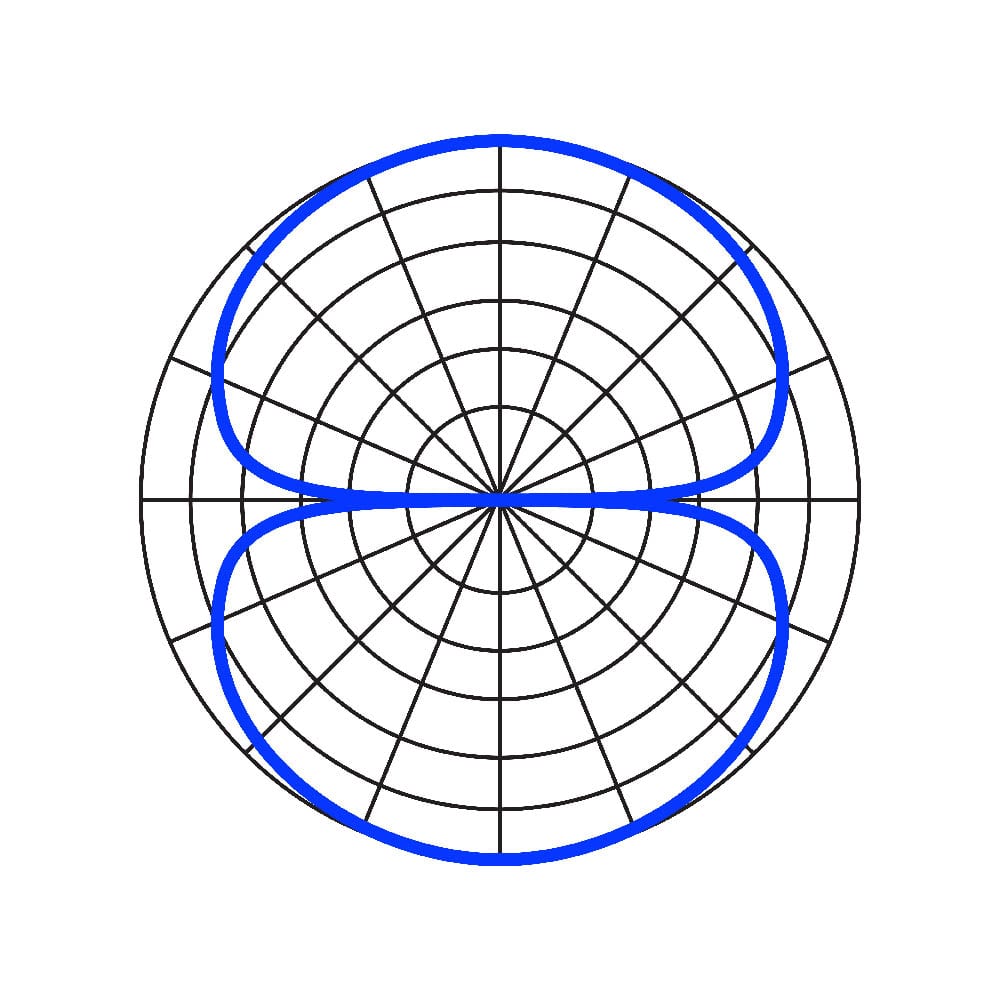
Bidirectional: “Figure eight.” Picks up sound equally from two opposite directions while rejecting sound from the sides.
Uses: Blumlein stereo configurations; anything you’d use any of the other ones for, just be aware it picks up from the front and the back and rejects the side.
Some microphones have variable directionality which means they have a switch to change between directional patterns. Bang for your buck, baby.
Exercise 1: Single Mic
The best way to learn about your mics and the different sounds you can capture is to play with them.
- Get your guitar and fire up your amp. If you only have one mic, set yourself up with a click track and record something really familiar.
- Place the microphone close to your amp and in the center of your speaker.
- Do it again but move your mic off center. Then move your microphone about four feet away from your amp.
- Compare all the sounds you captured. Then combine them. What do you notice?
- Take note of how the mic placement changes the feel.
Exercise 2: Multiple Mics
- Put a dynamic mic close to your speaker and a condenser mic about four feet behind it.
- Compare them and combine them.
- Do the same with a kick drum, piano, bass amp, acoustic guitar, violin, cello, pedal steel, harmonica, and so on.
- To save you time, for any acoustic instrument (with the exception of voice) you’re probably going to want to reach for a ribbon or condenser.
- Using a dynamic microphone will most likely be a style texture for these types rather than the main mic, but play with it.
Something to watch out for is *DUN DUN DUN* phasing, aka comb filtering. This happens when you’re using two microphones to capture the same sound. There are ways to help with phasing after the fact, but all the better to avoid it when recording. Phasing happens when mics are placed at different distances from a source resulting in the sound waves hitting them at different times. If you have two mics and played with them at different distances from your guitar amp, you may already have noticed something funny happening. It’s possible to place your mics so that they completely cancel each other out and you hear no sound. This would take the same amount of precision as it would to get two mics completely in phase with each other, so if you ever don’t hear a signal when you should, it’s unlikely that’s the problem, but you can never rule it out. Often it’s drums where you have to watch for phasing. The more microphones you use to record something, the more likely you’ll run into a phase issue. You can tell it’s out of phase when there’s something off about the combination of mics as you listen back. It could be as obvious as a drastic volume drop when combined or a loss of low/high end, or as subtle as something just sounding off or disoriented without being able to put your finger on it. Two mics on a snare drum, for instance, could result in a phase issue. You can correct it by making small adjustments to one of the mics by moving it closer or further away from the snare—you want them to be equidistant. You can take measurements if you really want to, but I usually just eyeball it and fine tune as needed.
Again, lots of information to digest and we’ve only scratched the surface. There are years worth of memorization, pop quizzes, and experimenting wrapped up into this guide. Use it as something you read and come back to, something you absorb and revisit as you lean in. I hope to have given you slightly more information than you want. There is a ton of technical jargon in the world of recording that might not even be relevant to what you want to do. Maybe you don’t care if you have phase issues, and maybe you shouldn’t. That’s the point: it’s all an art. But the more you know, the more intention you can have behind your decisions, and that’s where you’ll find freedom.
About the Author
Glenn Michael Van Dyke began her musical career in Jacksonville, Florida, playing in middle and high school bands and recording them in her older siblings’ bedrooms. Also a nearly collegiate level soccer player, Glenn opted to save her body from injury and pursue her passion for recording engineering at NYU’s Tisch School of the Arts in the Clive Davis Department of Recorded Music. While in NYC, she played in several bands touring both nationally and internationally for a decade before returning to her hometown in Florida. Currently in Jacksonville, where the water is warmer, Glenn has eyes and ears on helping cultivate the local music scene. She runs a record label, annual festival, and recording studio all under the name Winterland. She currently plays in a new band called Kairos Creature Club.

You May Also Like
No related posts
No related posts
More posts
-
By: She Shreds
-
By: Leila Sidi
-
By: Leila Sidi
-
By: Kinseli Baricuatro
-
By: Kinseli Baricuatro
-
By: Charlotte Friesen
-
Powered By: Reverb
-
By: Glenn Van Dyke
-
By: Jess Garland
-
By: Jess Garland






Comments
[…] of the time it’s something really simple and easy that you overlooked. I mentioned in “Chasing Sounds: A Microphone Tell-All” that a hot tip is to learn how to follow your signal’s […]
Pingback by She Shreds Media on September 28, 2020 at 10:22 amThe lesson, or to be more precise, the insight that I learned during my last trip is that you should not skimp on everything, and especially on your own comfort and safety. I recommend using the services of companies such as AtoB Transfer, including munich airport taxi. It will significantly increase the comfort of your journey from the airport to the hotel and relieve you of unnecessary stress
Comment by Marcus Fernandez on November 18, 2023 at 12:48 am