Lesson: The Basics of Improvising Solos on Guitar
Improvising on your guitar takes practice to sound effortless. Learn the basic steps to get you rippin’ solos out of nowhere!
This lesson originally appeared in She Shreds Issue #18, released in April 2019.
Improvising on your guitar can seem a bit overwhelming—and it’s no wonder. The misconceptions around the practice of improvising start with the dictionary definition of the word: “The art or act of improvising, or of composing, uttering, executing, or arranging anything without previous preparation,” according to Dictionary.com. This isn’t totally aligned with the reality of how people learn to improvise. And it’s particularly misleading for budding improvisers. In fact, it does take practice to sound effortless and fluid when soloing.
Anyone can learn to improvise, and if you know where to begin it’s possible to sound good in a relatively short period of time, regardless of your experience. While certainly not the only framework one can learn from, many guitarists start their improvising journey with the minor pentatonic scale played over a 12-bar blues chord progression. For this lesson, we are going to learn a fingering of the minor pentatonic scale in the key of A, and you will need a backing track of a 12-bar blues in A. While there are plenty of these backing tracks on YouTube, it can also be fun to play over a song you love; for example, “The Ice Queen” by Sue Foley is a great blues tune in A.
The Scale
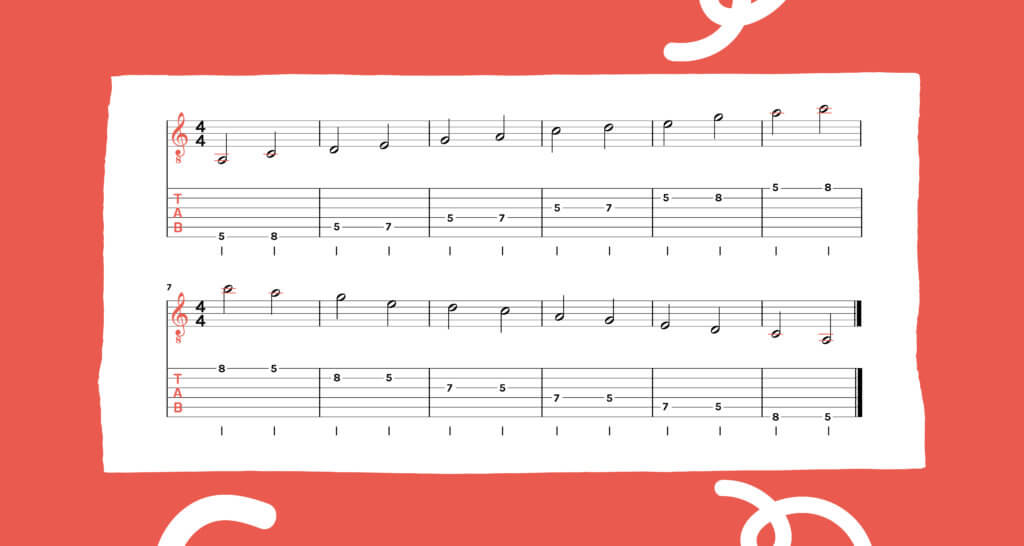
Let’s start by playing this fingering of the A minor pentatonic scale (see example below):
- 5th fret and 8th fret on your low E string
- 5th fret and 7th fret on your A string
- 5th fret and 7th fret on your D string
- 5th fret and 7th fret on your G string
- 5th fret and 8th fret on your B string
- 5th fret and 8th fret on your high E string
Play through the entire scale, both ascending and descending in pitch. It’s not enough to play through the scale once or twice; you need to develop muscle memory. The less you have to think about where your fingers go, the more fluid and creative you can be. Don’t leave out this important step. However, it’s important not to get stuck here.
Now, using this scale, start making music! This is where many beginning lead guitarists get overwhelmed. Here are some ideas and exercises that will make the process smooth and fun.
Start Small
Remember: you don’t have to play all of the notes in the scale within the same guitar solo. Start by soloing on one string. For example, if you choose to improvise on the high E string, just play the 5th and 8th fret. Play along to your backing track and try not to worry about how you sound. Once you feel comfortable, add the B string and solo on two strings. Then add the G string, and so on. Before you know it, you’ll be utilizing the entire scale in no time.
Get Rhythm
While playing on only one or two strings, you may find yourself getting bored. What are your options?
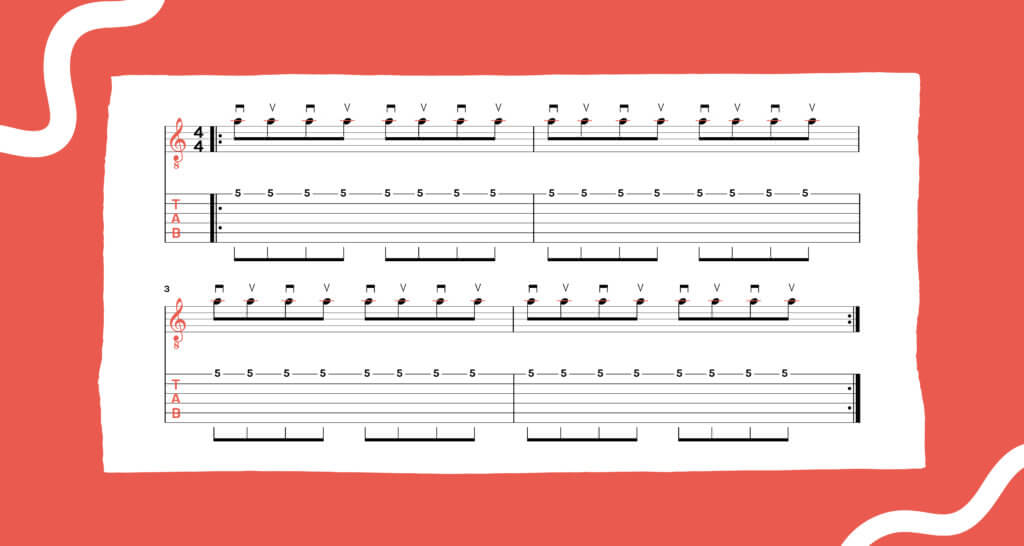
- Change up the rhythm. You can play some great solos with just one note if you make the rhythm interesting. While you can do the following exercises on any note in the scale, let’s begin by focusing on A (the 5th fret on the high E string). Start by playing 8th notes: one-and-two-and-three-and-four-and, etc.
- Use alternate picking. Play a downstroke on the downbeat (one-and-two-and-three-and-four-and) and an upstroke on the upbeat (one-and-two-and-three-and-four-and).
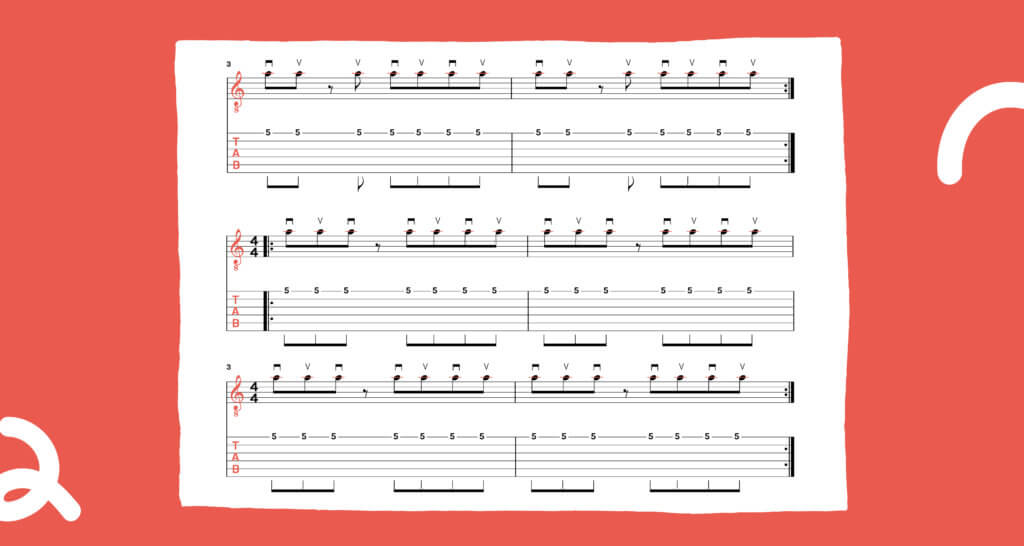
- Remove notes in this rhythmic pattern. For instance, you can try leaving out the first downbeat or the “one”: (one) and-two-and-three-and-four-and.
Go through each of the 8th notes and practice playing the A and leaving out one of the 8th notes. (See examples below.) As you get comfortable with this, you can practice playing these various rhythms and adding in more notes. It may seem like this exercise, which requires a lot of focus, is the antithesis of the off-the-cuff freedom of improvisation, but what you are doing is training your ears, hands, and brain to have a variety of different rhythms at your fingertips. Have patience with the process. It will make your playing more varied and interesting.
Timbre/Dynamics/Articulation
It’s not just what you play, but how you play it. For instance, you can vary the dynamics by playing loudly, and then softly. Changing the volume can create a huge impact.
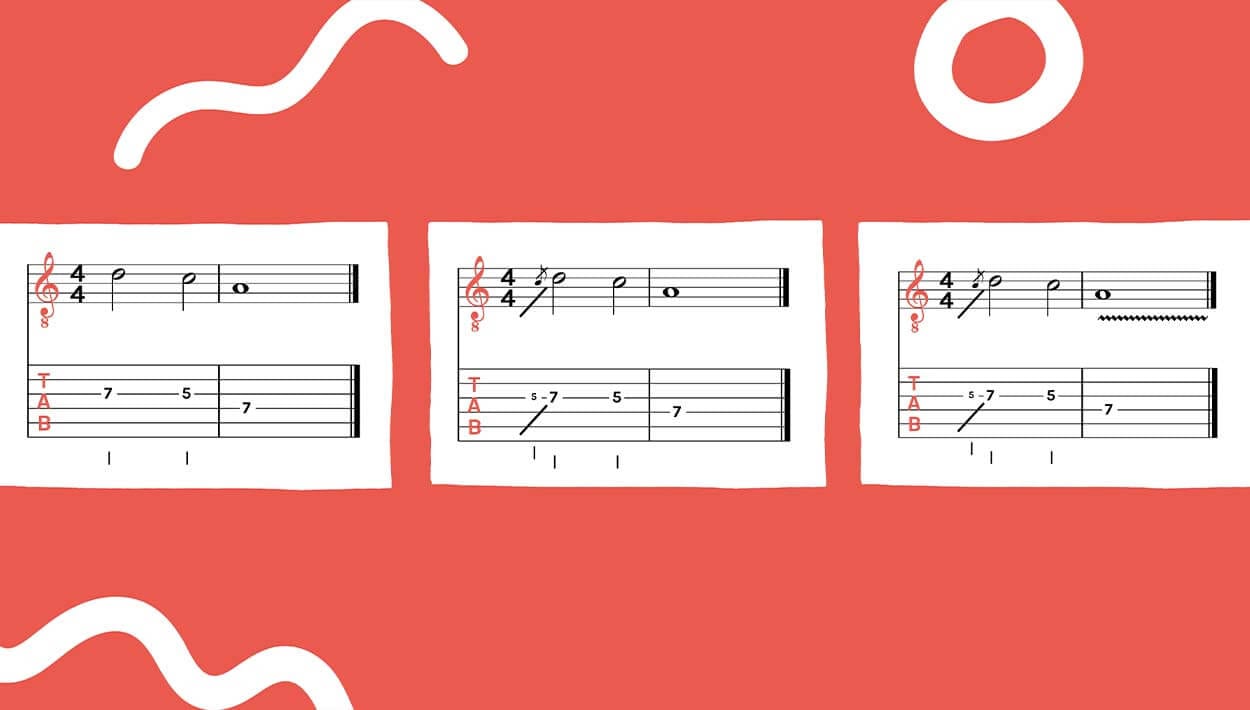
- Try sliding into some notes. While there are several different ways to approach sliding, we’ll just look at one. Place your third finger of your fretting hand on the 5th fret of the G string. Pluck that note and then slide the third finger to the 7th fret of the same string. The trick is to keep pressing the finger into the fretboard as you slide. If you stop pressing, you will lose the sound. Practice the slide until you can play it smoothly.
Let’s look at the three notes in the following examples:

Try sliding into the first note, as demonstrated in the example. Notice the difference in the sound between the two examples.
- Add some vibrato to the last note, as shown in the example above. To create the vibrato, you can use your third finger on the 7th fret of the D string. Place your first and second fingers directly behind the third finger, on the same string, to assist. Pluck the note, moving the string back and forth with all three fingers, down toward the ground and up towards your face. There are two important things to remember here. First, just like the slide, keep pressing your third finger into the fretboard as you move the string back and forth. Second, it helps to have the bottom part of your first finger, where the finger meets the palm, leaning against the guitar neck right around the 5th fret of your high E string. This acts as a way to stabilize your hand as you shake the note. Notice the difference in the sounds of the last few examples. It’s the same three notes, yet varying how you play a phrase can make your lead playing sound great.
- You can also experiment with where you pick the note. Your notes will have a different timbre depending on where you pick them: close to the bridge, close to the fretboard, or in between. Try playing the same phrase with the pick in different places and notice the differences in tone. One place isn’t necessarily better than another; it’s that they produce different timbres that can create variety in your sound. This is just as much a part of improvisation as learning what notes to play.
This is just a start to working on your improvisation. As you continue to practice, you will encounter more layers: different scales, playing over changes, landing on various chord tones and non-chord tones, and much more. Don’t try to learn everything all at once; it’s too easy to get so bogged down that you never even start. Trust the process, and with patience and dedication you will become an expert improviser!

More posts
-
 By: Cynthia Schemmer
 -
Powered By: Fender
-
By: Cynthia Schemmer
-
By: Cynthia Schemmer
-
By: Leila Sidi
-
By: Leila Sidi
-
Powered By: Reverb
-
Powered By: Marshall Amps
-
Powered By: Positive Grid
-
By: She Shreds


Comments
That’s great for my students. And me, I admit. 🙂 Thanks a ton for sharing this wisdom.
Comment by Gerd on November 15, 2019 at 11:01 amThanks for this lesson so much! I am planning to learn how to play guitar, so I checked this site https://samplius.com/free-essay-examples/ and decided to find out some special sites like this. By the way, I have read many free essay examples about new musician studies and saw the article here, it sounds too interesting to not read!
Comment by Nathan Mangold on June 28, 2020 at 9:28 amThanks for this lesson so much! I am planning to learn how to play guitar, so I checked this site https://samplius.com/free-essay-examples/ and decided to find out some special sites like this. By the way, I have read many free essay examples about new musician studies and saw the article here, it sounds too interesting to not read!
Comment by Lucy on September 25, 2020 at 12:23 pmEnjoyed this lesson. Simple, basic instruction.
Comment by Phillip on September 28, 2020 at 5:12 amThanks for this lesson! I like guitar so much, but I never have enough time for learning it, now I get so many writing assignments in college, so I can hardly find time to sleep. That’s why sometimes I order my writing assignments. To choose a good service, I can advise reading reviews on https://www.writingjudge.com/ they offer detailed reviews, with description of services, prices and ratings, so you can find a trustworthy service.
Comment by Richard on October 22, 2020 at 3:00 pmOnce I almost got caught by a company of swindlers who “supposedly write good works on all subjects”. Why in quotes, because after reading the feedback on the site best essay writing services realized that those guys are not cheaters, but do their job very, very long and the work comes in terrible quality with a large percentage of plagiarism.
Comment by palexiandre on November 2, 2020 at 12:41 amHi everyone! One year ago I stucked with my resume. I did not know how to make it worthy, essayedge.com/samples/graduate-personal-statement/ helped me out, they wrote down a guide for me on how to create a great speech. Now the company of my dread hired me. Now my personal growth increased and I am a CEO
Comment by Dilan24666 on November 25, 2020 at 2:21 amHere is an excellent service http://essaypapers.reviews/ where you can order essay.
Comment by Darel Aranovski on December 31, 2020 at 1:11 amIt’s so different to write essays; all of them are difficult to count. But turning to seasoned support teams now is the most reasoned thing. I’ve done so and now I know that when it came to my colleagues, my wisdom was better than just writing https://www.bestcustomwriting.com/ . It was poor, and even the grades were low. Then I met a writer who helped me quickly write such a document. Per day now, I use them.
Comment by Mitra Surik on May 13, 2021 at 11:16 amIt’s so different to write essays; all of them are difficult to count. But turning to seasoned support teams now is the most reasoned thing. I’ve done so and now I know that when it came to my colleagues, my wisdom was better than just writing https://www.bestcustomwriting.com/ . It was poor, and even the grades were low. Then I met a writer who helped me quickly write such a document. Per day now, I use them.
Comment by Gaven Rank on May 13, 2021 at 11:16 amSimple enough for a beginner, thanks you better than https://www.google.com/ would suggest
Comment by Rosie on May 20, 2021 at 1:42 amThis service can give one-stop solution to client’s writing needs…Assignment Help Online
Comment by Academic Papers on March 1, 2022 at 1:25 amIf you are seeking for service that is higher than other services, choose..Assignment Help USA
Comment by Academic Papers on March 1, 2022 at 1:26 am