Neck Tension and Truss Rods
A truss rod is a sturdy bar that runs through the neck of most guitars and controls the tension in the neck. They are usually adjustable, and truss rod adjustments can really impact the playability of your guitar.
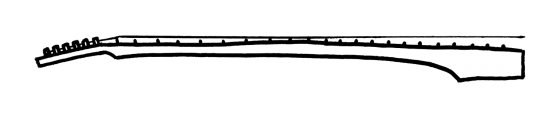
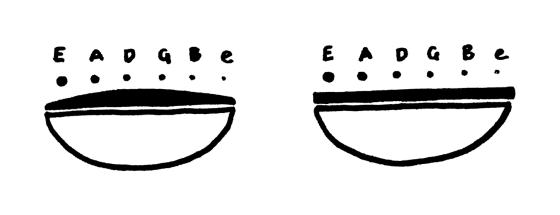
Neck Relief vs. Back Bow: How straight is the neck?
Sight the neck, looking down from the headstock toward the body of the guitar with it on its side. See if you can see any humps or a general bend in the neck.
Hold the guitar in playing position (not flat on its back!) and rest a straight edge on the fretboard. If you can rock it back and forth—headstock to tail—on a certain fret, the neck is in back bow.
Back bow often causes buzzing at certain frets, because it brings part of the neck closer to the strings. It can also affect the intonation of your guitar. It is almost never desirable.
Back bow is the opposite of relief, or up-bow.
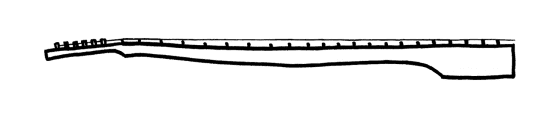
If you look at where the straight edge meets the frets and see a gap, there is some relief in your neck.
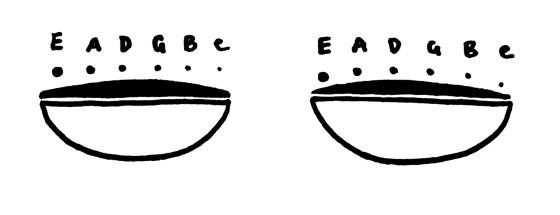
The question of “how much relief is okay” is subjective. Many players want a little bit of relief in the neck, but getting your neck flat is a good place to start.
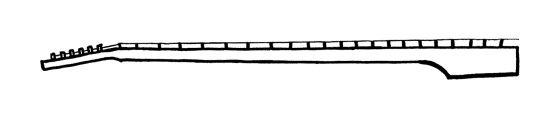
When your neck is flat, your straight edge will rest evenly across all the frets, no rocking back and forth, and no gap.
Essentially, you want enough tension on the neck to allow the strings to vibrate without hitting frets, but not so much necessarily high action (harder to play!) and can also cause intonation problems.
Truss Rod Adjustments:
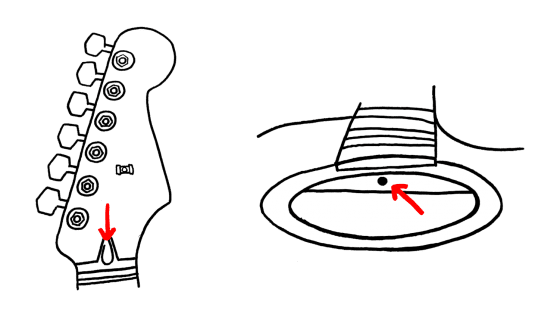
For most guitars, you will need a nut driver or truss rod wrench to make this adjustment. The most common sizes you’d need are 1/4”, 9/32” and 5/16”.
Action
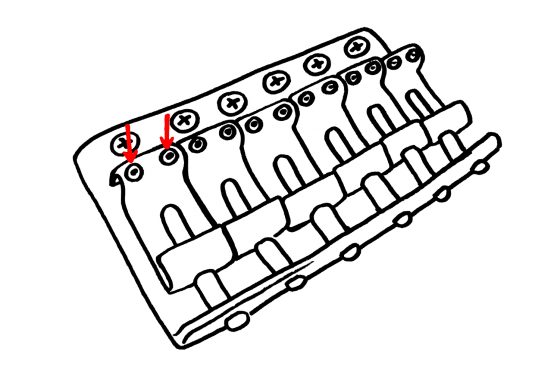
Action refers to how high the strings are off the neck. It is adjustable at the bridge, by raising or lowering the saddles. Some guitars have flat fretboards, but there is a wide degree of variation in neck radius, or how curved the fretboard is. A smaller radius means more curvature across the neck.
You can buy tools to measure the radius on the fretboard and then match string height to that, but you can also get pretty close by sight. Essentially, you want to adjust the height of all six saddles so that the curvature across the top of the strings matches the curvature of the fretboard – the action should reflect the radius. A common mistake is to give all strings equal action. This is terrible for playability! The first E string should be the same distance from the fretboard as the G or D string. The fretboard is convex: it is crests in the middle, under the G/D strings, and is lower at the edges, under the E strings. So, the middle strings will need to be higher than the outer strings.
If your action is too high, it will be hard to push the strings down; bar chords become especially difficult. If action is too low, you can get fret buzz and lose sustain. With a very small ruler, you can measure action at the 12th fret. A good place to start is 1/16 “ at the high E string and 3/32” at the low E string.
Some bridges only allow action adjustment at either end of the bridge, or are split with action adjustments for each half.
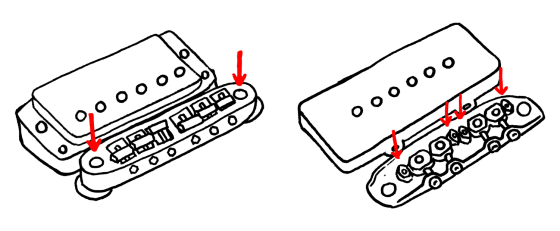
If your bridge has individually adjustable saddles, start with the E strings, then adjust the inner strings to reflect the curvature (radius) of the neck. Play and adjust to suit your comfort.
If you had been hoping to resolve a string buzz issue and none of these adjustments helped you, there may be a problem with the nut, the (usually whitish) slotted bar at the top of the neck near the headstock in which the strings rest. Sometimes nut slots need to be filled because they’re too deep; sometimes they need to be filed because they’re too shallow. There is an at-home fix for this involving baking soda, super glue and an X-acto knife, but I highly recommend seeing a professional unless you’d be okay without your guitar for a little while in the event that you mess up.
Bear in mind that players have different preferences for action and neck relief. I personally prefer a bit of relief, but that’s just me! Just maintain focus and patience when working on your guitar, and you’ll be surprised by how great of an effect a tiny adjustment can have on playability.
Six years ago, Young began writing solo guitar music, and developed a style of ethereal songs layered with complex, intricate riffs. Her recently-released second solo EP, “Acoustics 2,” further develops the style she introduced with her 2014 “Acoustics” EP, weaving through different time signatures, incorporating an assortment of techniques, and featuring several accompanying instruments including violin, piano, cello, harp, and banjo (all of which she played herself, except for the cello).
Young plays the acoustic guitar similarly to a piano, using fingerstyle and tapping techniques, so her right hand and fingers are just as utilized as much as her left. Tapping consists of hammer-ons and pull-offs on the fretboard from each hand, allowing for a lot of notes to be played quickly. The near constancy of notes in Young’s playing also acts as a metronome, maintaining each song’s rhythm and tempo. Her voice adds an airiness that works with the other instruments to create a floaty atmosphere, and the lyrics, written like a diary, are about hopefulness in recovery and feeling better.
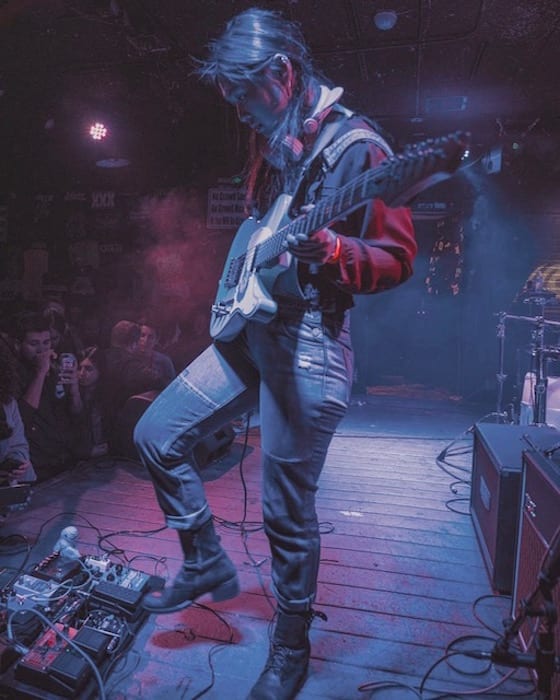 photo by Lyman Gillen
Young says she wrote the songs as inspiration struck, starting with a riff, expanding it, and later adding vocals and lyrics that went along with the feel of the music. This organic writing process is what allows for a more natural-feeling composition and flow. And although her music is complex, the focus is less on the complexities and more on the songs themselves. Her technical playing, such as her use of tapping, serves to add texture and dynamics, instead of being merely showcasing her skill.
When she’s not playing guitar, Young also makes visual art (including the artwork for all of her releases). This gives her a way to fully express each collection of music the way she sees it. She also paints guitars for clients and has even painted her own custom Stenberg guitar body with vibrant reds, blues, and floral patterns. “I usually have a form people fill out before they mail their guitar bodies to me,” she says. “Then I send them a sketch and when they approve I start painting. I usually livestream everything so people can watch the process!”
You might say Yvette Young is a jack of all trades, but she’s already mastered the art of being a true songwriter and shredder. If you’re interested in developing your tapping skills, check out some of Young’s tips for getting started. “Acoustics 2” is available now.
If possible, start on an acoustic – This will help build your finger strength, since it’s harder to tap on an acoustic than on an electric. If you can master this then you can tap on any guitar.
Start with your right hand first – You can start by holding down a chord with your left hand and tapping different frets with your right. After this you can start tapping with your left.
Explore the frets – See where you get the nicest tone and try to always hit that spot.
Use your fingers like springs – You can practice this finger articulation off the guitar, when you’re just sitting around. Practice the motion of tapping with each finger to build dexterity.
When practicing, always start slow – Don’t waste time trying to play everything full speed at first. Taking it section by section (chunking) and then building your speed is a great way to practice.
Don’t tense up! – Keep your hands and wrists relaxed to avoid carpal tunnel. It’s all in your muscle memory after all.
Try fingerstyle (using your right-hand fingers instead of a pick) – This is a great way to add multiple voices to a single melody. It can also be more economic for tapping.
When alternating between fingerpicking and tapping, pick right on the neck – This will make transitioning between the two a lot faster and easier, since your right hand stays close to where it will be tapping.
Practice without using a compressor – This will teach you to get a nice, even tone organically.
You don’t need expensive pickups or a fancy guitar for tapping to sound good – If you can make a shitty guitar sound good, you can make a good guitar sound great!
Use tapping to add texture to a song – It can be used to fill in blanks or add another dynamic. Just watch out for cluttering.
Your fretboard is your playground – You can always find new ways to make something flow.
Don’t get preoccupied with flashiness and technique – A song doesn’t have to be complicated to be good. You can write a great song with just a few notes, and any good song needs simpleness too.
The Way is She Shreds’ monthly series celebrating the full range of approaches to learning and playing guitar. Each episode showcases artists with diverse backgrounds, experiences, and perspectives on music who will teach us how to play an original song, sharing tips and giving us a unique glimpse into their musicianship.

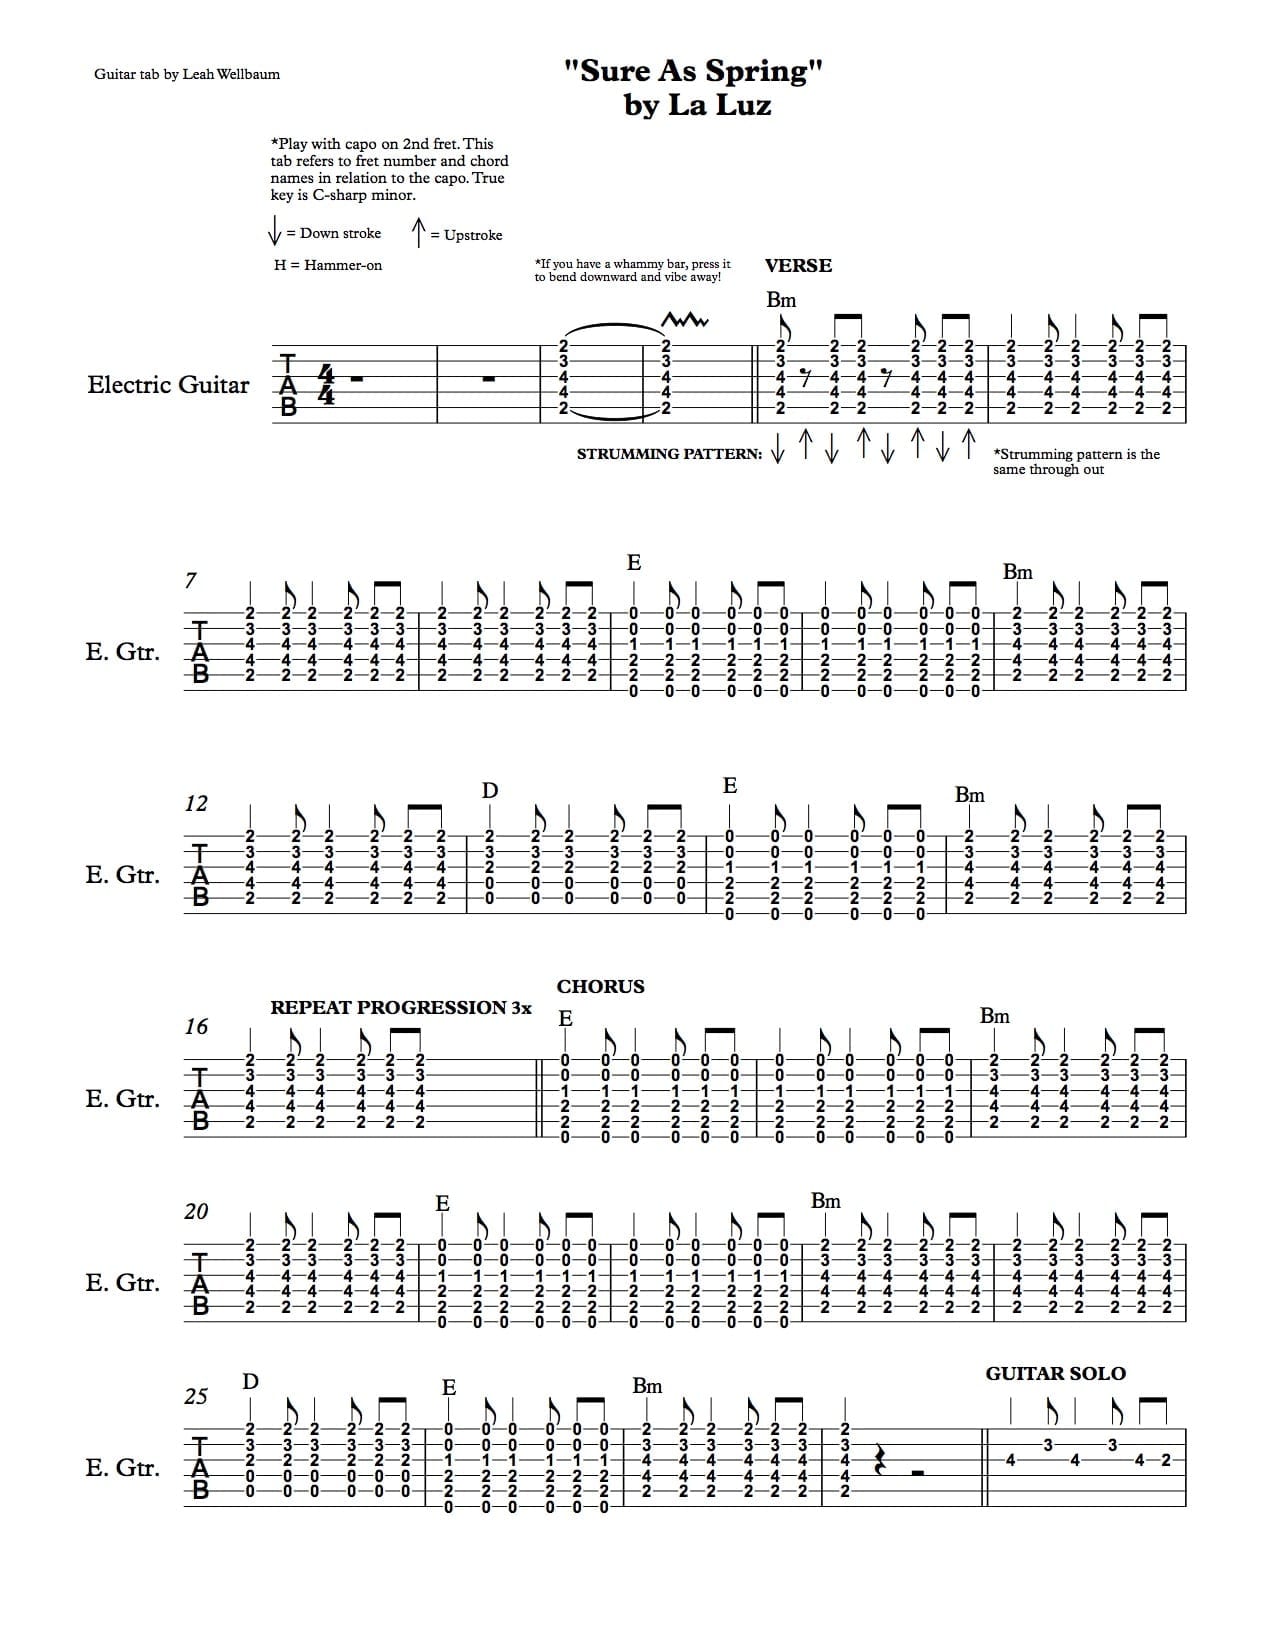
In our latest episode, Shana Cleveland, guitarist of LA’s surf-infused psych band La Luz and laid-back acoustic project Shana Cleveland & the Sandcastles teaches us how to play “Sure as Spring” from the La Luz’s 2013 album, It’s Alive (Hardly Art).
Watch out the video and follow the TAB below for further instruction.
Rather than get discouraged, she kept playing and began to forge a musical path on her terms. At age 19, as a member of Dischord punk band the Holy Rollers, she started learning about sound as a way to better communicate with sound engineers on the road, opening up both her creativity and another facet of her career in the process.
Today, Wachs is an in-demand audio engineer who has worked with the likes of Cat Power, M.I.A., St. Vincent, Deerhunter, and many others. She also works as a composer and sound designer, collaborating with fashion designers, filmmakers, and choreographers (most recently for Heather Kravas’ “Visions of Beauty” at On The Boards in Seattle) to create the perfect score for their artistic visions. In 2009, she stepped back into the spotlight herself, performing beautiful avant-pop compositions under the moniker Vorhees. Steeped in experimentation and improvisation, her music features an assortment of guitar, analog, and electronic instrumentation, which she manipulates and mixes live on stage.
Following a 7” (“The Orchard”) in 2012, and performances around the world (including appearances at Basilica Soundscape 2013 and Iceland Airwaves 2014), Wachs released Vorhees’ debut EP, “Black Horse Pike” in February this year. Written, recorded, and produced at her own studio (with drummer Greg Fox contributing to the final track, “Millie’s Pinkie”), the multi-textured music may run outside the types of boundaries her early teachers pushed, but it shows her instincts were right: by pushing herself and continuing to create, she developed a style all of her own. “It was only when I started playing on my own and started teaching myself, as well as when I was running sound and teaching myself how to run sound, that I became the musician that I am in the sense that I’ve developed my own style, and I’ve developed my own techniques, and I’ve learned more by being hands on,” she said.
With expertise from her own musical journey as well her work with others, we asked Wachs to share some tips to help other musicians hone in on what makes their style unique and how to develop it from there. “Black Horse Pike” is available now.
Be Free: First off, this is what works best for me. It all started when I saw a guitar player playing and they were so incredibly free about the notes and their fingering on the neck. There was nothing predictable about it and I thought, “wow, I hope I can be that free one day.” You know, there is a term if you’re a writer and you just need to get some words on the page: free writing. If you’re a painter, you’re splashing paint on a blank canvas, just to get the field to start. When I want to start writing a song, or if I just want to play, I just go as free as possible. I don’t think about notes, I don’t think about structure, I just start playing. It’s almost a warm up in a sense. Getting your own style starts with not playing covers, for example, but just finding out what sounds good to you.
Always Be Recording You never know never know what you are going to stumble upon and you might need to reference it. I have hours and hours of [recordings] of just noodling, or playing with effects, just exploring.
Don’t Get Caught Up in Labels One of the things I like to do—bringing my sound engineering into my composition—is I like to play with hardware that is not necessarily geared towards me. For example, I use a KORG Electribe 2 (the newer one), a piece of hardware that is marketed towards DJs and dance music producers. It definitely isn’t something that you would associate with something I would use for ambient guitar tracks, but there are so many nice little features that I do use. I can plug my guitar directly into it and I can modulate the guitar as if it was a synthesizer, and cross the sound differently there… It’s not letting the narrative, or the marketing of what the gear is geared for prevent you from using it. That’s been my biggest boon, really, playing with things that maybe weren’t meant for how I use it. Why not? There are no rules.
Learn Your Technology: I prefer no “rules,” but a general suggestion for every musician is once you start finding your style, get a solid background on the technology you are using. If you’ve been using an Electribe, playing around with it, ignoring the manual to just find your own way around it and develop your own sound, NOW look at how it actually operates and use that to your advantage. It will make your workflow a lot faster if you really understand the equipment you are using. I learned how to do sound when I was touring at 19 and I had no idea how to communicate to the sound engineer how to get better monitors on stage. Once I learned how to do sound, it immediately elevated my relationships. It’s like a chef learning knife skills. It’s only going to help. It is a technical talent, but once you know it you can work right through it and focus on the creative.

Ask Questions I’m self taught as a sound engineer. I learned by asking questions. There is no shame in trying to educate yourself that way. Don’t be afraid to have a dialog. Again, when you’re making music or doing sound, there is no one absolute way of doing things. People will develop their own style and techniques. Even if you are doing something different than another person, it’s going to open a lot of techniques for you.
Know There is Always More to Know It’s about attaining the confidence to finalize your style, but also not putting yourself in a box… When I’m onstage performing as Vorhees, I mix myself. I have my own console up on stage and I’m sending things, sending vocals and guitar to different pedals and electronics, and feeding things into each other. It’s a constant search for that sound. The only way I’ve been able to really embrace that is by knowing everything I can possibly know, while also knowing there is more to learn. It’s that confidence of having that foundation and knowing it’s a true foundation. It didn’t come from a book. It didn’t come from one source, it came from many different sources. Once I got that, it just opened up all of my songwriting. I’ve also been doing it for 20 years—it might be a longer road than the traditional education route, but I feel that it is a very unique road.
Experiment: I want to encourage people to experiment as much as possible. Experimentation is the key to new music. A lot of people say it’s all been done before, but there can be new interpretations. Maybe new technology will bring in a whole new way to bend notes, or there’s just so much still out there, I believe, that experimentation is the only way we’re going to get to a new place with music.
What I’m doing with Vorhees is not even that challenging, really, but all of this, I apply across the board to Vorhees to my dance scores, to anything else I end up doing. I’m no longer afraid to try anything. And if it fails, that’s ok too… you can learn a lot from failure as well.
“I play through two guitar amps, and I have them set up through a YBA pedal so they both run at the same time,” she said. “Our nerves were already there because it was our first show with them. The sound check was all good, we went on stage, everything is good and then part way through the first or second song I heard a huge drop in the levels from my monitor and I’m just like, “Oh, shit! What’s going on?” In a lot of my songs I’m constantly singing, so there isn’t time to take a second to look around and see if something got unplugged or what happened. [This time] it turned out one of the amps just totally blew.”
If you’ve ever performed in a band, you know that you can be as prepared as possible and life can still get in the way of a perfect set. When that happens, you have two choices: you can totally freak out, or you can roll with the punches as they come until you find a solution. In this instance, the band, which has been around since 2010 and has seen their share of stage mishaps (their own and others), played through the song and thankfully the venue’s sound person was on their game to help out. “At that point, you have to put a lot of trust in whoever is doing sound in the front of house because if they don’t notice that something is happen, they’re not going to be able to remedy the situation. It’s happened to me a couple of times. Running two guitar amps, one of them will go, and the front-of-house person will notice and just double up on my other amp and fill the sound. Because there is nothing you can do, right? You have 30 minutes to play a set and you don’t have time to really do much troubleshooting on stage. You just have to wait until it is over and figure out what went wrong after the show, and hopefully get it fixed before the next one.”
Mobina Galore is currently on their own tour of North America, in support of their recently-released LP, Feeling Disconnected (New Damage Records), and once again they’ve found themselves facing technical difficulties. “My amp head just blew the other day and I’ve been borrowing gear from other people,” she said. “It’s pretty annoying because you get used to your own sound and the tones coming from your amps, specifically, but at the same time it forces you to manage and make it work, and it’s been alright for the last few shows. I’ve been able to borrow an additional amp from one of the other bands and just make it work because there’s always something that goes wrong.”
With that in mind, Priestner shared some tips for troubleshooting or lessening the impact of unexpected gear issues while on the road. Feeling Disconnected is available for purchase now.
Stay Calm: To stay calm, I usually touch base with my drummer [Marcia Hanson]. We both usually know if something has gone wrong, if one of us has messed up, or a guitar gets unplugged or a cymbal falls over. We touch base with each other and give a quick glance that says, “Don’t worry about it. Don’t let it stress you out.” Make that eye contact with your bandmates to make sure they know it’s all good, you can get through this, and it’s not a big deal. You need that support and you need to be able to communicate without actually communicating.
To Err is Human: When you see a show and you see the band bickering on stage, it’s the worst. You have to stay positive and laugh it off, or it gets worse. That’s the thing about live music. Something is going to go wrong at some point, and you need to remember that you are just a human and you are playing music live. Just wait until the song is over, find out what is wrong, and try to fix it. Sometimes I’m jumping around and I’ll unplug one of my cables. If people are engaged and they are watching me, they’ll see exactly what happen and they’ll say, “Oh my god, that was funny!” When people mess up, it just makes everyone human. It’s about staying calm and knowing if you look nervous or freak out about it, the audience is going to see that and then they are going to be wary of you throughout the show. So stay calm and laugh it off.
Find Support Offstage and in the Crowd: Onstage, you’re relying on stagehands, or people in the audience depending on the venue you are playing. It’s a constant thing for us that the mic stands are really crappy and worn out, and they’ll slowly start falling. If someone out there in the audience happens to be a musician, they’ll hop on stage and help you out. I do that all the time when I see bands play. That’s the thing—just getting the crowd engaged in the show so they really want to be part of it. When they want to be part of the solution it’s really awesome. Everyone wants to be on stage, so if some kid gets to jump up and save the day they kind of feel like a hero, and it makes everyone else in the audience feel more like they are a part of the show.
Be Organized: I do a lot of band management stuff and I am a very organized person. That’s important because if you don’t have an actual manager you need someone in the band who will take over those duties… I’ve got a dropbox folder, “Mobina Galore promo,” that I update every year with our band bio, stage plot, band photos, everything that a promoter or an agent or a sound tech needs so when we’re on the road we’re not scrambling to pull over and find wifi to shoot a press photo to someone. We have a link we can send them to instead.
It’s about managing your time well. If people ask I can say, “Go to our website and you will find everything you need on there.” I always carry hard copies on me as well. We just have a bag we carry around to shows and stuff with paper copies just in case. It’s kind of being overly prepared for something going wrong and having a preventative measure for something in place to hopefully solve the problem quicker than being, “Oh my god, what do we do?” Putting stuff like that up on your website is so easy to do, but a lot of people are lazy, or don’t think it’s important at all. If I was running a venue and I saw that, I’d think, “This is great! I don’t have to email them for anything.”
Do Your Research (which includes playing more shows!): When you start out, everything’s a learning curve. When I was just starting out I was Googling things like, “What’s a stage plot?” “What’s an input list?” and stuff like that. For an artist who is starting out, it takes a while to find out all the assets that you need, but once you start learning, it starts being easier for you. And knowing what exactly what you want to hear on stage is a matter of playing more shows. The only way you’re going to learn it is to keep playing shows. Every stage is different. An outdoor show is going to sound different than a smaller club. Some places have crappy monitors, and even though you know what you want you might not get it in your sound. The only way to get what you want is to play more shows, to ask properly, and to not be an ass on stage. So many people you see playing shows and saying, “I can’t hear myself.” All you have to say is “can I get more vocals in my monitor?” Just be polite. Everyone there is doing a job.
Cultivate a Strong Social Media Network: Social media makes it is so easy to reach out to people. Like when my amp head blew the other day, initially you would panic a little bit, but now you can look at your schedule and post, “Hey, does anyone in Milwaukee know a good amp repair shop?” It takes a while to get your friend list growing, but I put a lot of stuff out on social media. “Do you have a guitar I can borrow at tonight’s show?” Guaranteed, like I said earlier, someone will want to be the hero. They’ll show up at the show with a guitar, you’ll put them on the guest list. Social media is huge! Just getting the word out there. Everyone wants to share and help out. We’ve even needed to get people to run our merch at the Against Me! shows, and we just reached out on Facebook. Friends of friends of friends will just want to help out. It’s pretty cool. There is a lot of garbage on social media, but if you use it to your advantage then it is super beneficial.
Tuite is also a great resource for anyone looking to deepen their fuzz explorations. Any fuzz fanatic knows it takes hours upon hours of experimentation to figure out which fuzz effects to use in different contexts, what order to use for multiple fuzzes on one board, which fuzz to drive when you have more than one, and a dauntingly long list of other tone questions and concerns that come up among the infinite possible combinations of guitar/pickups, pedals, and amps.
She Shreds recently spoke with Tuite about her process in crafting the perfect tone. If you’re looking to maximize your fuzz potential and gain confidence in what exactly to expect when you kick on any fuzz on your board, this one’s for you.
KNOW YOUR FUZZ: SOME ARE BEST FOR LEADS, OTHERS FOR TEXTURE.
Grab a guitar and run it through one fuzz at a time, holding all other settings constant. Take note: Which one has the richest, warmest sound? Which ones bloom with a slow attack, and which ones sputter and zip? Which one gives the best boost? If you want to fill up a room with harmonic texture, go for the thick, warm fuzz. Don’t want your volume to drop too drastically between a fuzz section and a clean section of your song? Avoid a fuzz that boosts too much; save that one for when you do want to be extra loud, like a lead. A sharper fuzz with greater attack can be great for choppy “rhythmic blasts” and leads alike.
“I love my Big Muff for textures. I add my OCD if I need something to come through for a lead.…The Fuzzgod I use more for rhythmic blasts, and I use my Clementime feedback looper similarly, but for a prettier, more harmonically rich sound,” Tuite says.
SOME FUZZ EFFECTS INTERACT DIFFERENTLY WITH DIFFERENT PICKUPS…
Try doing a shootout: systematically run each of your pickup settings through each of your fuzzes, one at a time. In general, the neck pickup will have a warmer tone and the bridge pickup will be brighter. If you’re going for a blooming, room-filling fuzz, you might have the best luck on the neck with the pedal you’ve chosen for the job. If you want to slice through the mix with a more pointed tone, see what happens when you bring the bridge pickup into it. “My Redwitch Fuzzgod is really responsive to different pickups: I find that on the neck pickup I get a warmer, fuller, synthy sound. On the bridge I get kind of a dry, splattery sound. Both sound awesome,” Tuite says.
…OR WITH OTHER PEDALS IN YOUR CHAIN.
Fuzz on Fuzz: If you have two fuzz pedals, try changing up the order of one that you like for rhythm and the one you like for leads. A fatter, super dirty fuzz before a cleaner one (like a Big Muff before a Tube Screamer) will give you a smoother sound, while the reverse order tends to yield more of a boost and a crisper breakup. In Tuite’s experience, “the biggest change that I have noticed with fuzz or overdrive orders is switching the Big Muff and Tube Screamer in my chain.”
Fuzz on Reverb: “Placing reverb before fuzz creates a sound that is very lush and heavy,” Tuite exaplains. “There is a beautiful mushy goodness that cannot be achieved the other way around: the fuzz slowly tears apart the reverb, creating a huge wall that blooms into chaotic sonic bliss. When placed before the fuzz, the verb does not add room ambience to the sound, how it usually would if were placed after the fuzz. It produces a way nastier sound—the best kind of nasty.”
Fuzz on Delay: “Delay before fuzz sustains much more than delay after fuzz, even with the same settings. A delayed signal is going into your fuzz produces crunchier, more dramatic delays. I prefer this order because it makes the delay sound more controlled and natural”
GAIN VS. SUSTAIN.
“Gain can be thought of as how loud the source (in this case the guitar) or effects are going to present themselves. Sustain can be thought of as how long the guitar or effects are going to drag on after completing their initial task of affecting the source signal.”
“Gain and sustain interact in a very interesting way, and can change your sound either quite subtly or to an extreme. High gain and low sustain yields a strong and sudden attack of sound that dissipates quickly. Low gain and high sustain creates a less intense initial attack, but the tone will linger and take longer to decay.”
GET COMFORTABLE WITH GAIN STAGING.
“If the second fuzz’s gain is higher, it’s amplifying the first fuzz. You can say you’re ‘driving’ the first fuzz. The sound is articulate and biting, with a strong attack. If the second fuzz’s gain is lower, it’s diminishing the power of the first fuzz for a more textural effect. You get less articulation and more of a round sound when you drive the second fuzz.”
DON’T FEAR THE FUZZ.
“Just kick on the fuzz and experiment. It’s awesome: you can’t not have fun. Try different settings. Experiment with getting a mild breakup to a full blown wall of fuzz. Get in front of your amp and experiment with feedback, too. You can get some of the prettiest sounds that way. Don’t fear the fuzz.”
Proper timing leads to a steady flow throughout a song, cohesion and synchronicity between bandmates, and if necessary, it can mask small flaws such as a dropped note. The absence of timing is often the first thing listeners will pick up on about a performance, even on a subconscious level.
But while timing is essential to every musician, the fact that it comes more naturally for people than say, scales, intervals, or songwriting, makes it all too easy to overlook during practice sessions.
With that in mind, we asked professional bassist, guitarist, and music educator Yonit Spiegelman to share some advice for players looking to improve their sense of rhythm and timing.
Born in Israel and now based in Brooklyn, New York, Spiegelman is an incredibly versatile musician with a range that spans jazz, rock, R&B, singer-songwriter, and a plethora of international sounds. She currently works as a session musician, composer, and teaches lessons via the online platform Lessonface, when she is not busy creating her own music as leader R&B/jazz/world music ensemble Foreign Hues or with all-woman traditional music collective Banot, among others. In addition, she has launched a solo project and is co-producing a full-length debut with Latin Grammy-nominated producer/engineer Marian Villota that is slated for release in 2017.
Spielgelman shared tips for timing below, and you can check out more advice for musicians her online series of video tutorials.
1. Always work with a metronome. When you work on your music alone, phrases and pieces that are hard may deceive you. You are likely to play in changing speeds due to complexity in certain places of the song. Don’t be lazy and turn on the click. Feel free to check out my tutorial for Time and Feel for Bass to see what else to do with the metronome to make it even more challenging!
2. Make time to practice time! It’s important to embrace this in your day-to-day routine. It might seem less rewarding than other parts of your practice since it’s not about speed, technique, or impressive chops, but your rhythm section will thank you for it.
3. Practice with other people! Practicing alone is awesome, but great time also means knowing how to play with other musicians. Sync yourself in the right place between the drums and the guitar or keys so that you’ll sound as one body. That takes practice, too!
Getting a good groove in a band is up to the entire rhythm section, not just one person. You can still use the metronome here but in a different settings; either have the drummer play with a metronome in their headphones or in-ear monitors to make sure you stay in the right BPM, or count off a song based on a metronome to make sure you start the right speed.
4. Now that you are practicing time, don’t rely on the drummer! The best musicians are those who take responsibility for their own time. You have the power to get a drummer to speed up or slow down, but always make sure you both are communicating; When speeding up or slowing it down, don’t push too hard so it won’t be too obvious, and communicate with the drummer by making eye contact, and if possible a hand gesture implying what you want to do.
5. Always subdivide when counting-in. What do I mean by that? Every song, in 4/4 , 3/4, 6/8 or 6/4 has an internal subdivision. Funk usually is based on sixteenth-notes, rock on eighth-notes, swing on swing-eighths, and so forth. When you count a band in, try to count 2 bars with the appropriate subdivision (for example instead of 1-2-3-4, count 1, and a 2, and a 3, and a 4). That’ll do magic and everyone will kick off the groove way more focused.
6. If you’re playing a song and you’re not sure what’s the appropriate subdivision, groove, or feel, take close notice of the drummer’s hi-hat. That’s going to give it away. Drummers will usually play 16th, 8th, swing 8th, or triplets, and whichever it is, that’s probably the subdivision. If you want to be completely synced with the drums, it’ll also be a great idea to play a line that couples well with the bass drum. If there’s no drums in a piece, the subdivision will appear in the rhythm guitarist’s strumming or… the bass line!
Though many musicians have a natural knack for differentiating and connecting sounds and rhythms, developing listening skills through ear training can help anyone become better at their craft, regardless of prior formal training or experience level.
“Ear training is the practice of listening closely in order to identify different aspects of music like pitch, intervals, bass lines, melodies, chords and musical qualities like rhythm, timbre and tone,” says Nashville-based experimental pop/folk artist Ariel Bui. An accomplished musician who formally trained in piano and piano pedagogy, Bui began teaching herself guitar as a teenager, and has been playing ever since. In 2012, the Nashville-based artist founded Melodia Studio, where she teaches lessons to students of all ages.
We recently asked Bui to chime in on how ear training can positively impact guitarists and bassists and some tips for musicians of any level to improve their skills:
Why ear train?
Musicianship… By developing keen listening skills, you can learn what it is you like about your favorite songs so that you can develop your own voice and your own style. Ear training is essential to musicianship, whether it be while playing guitar, performing, or songwriting. Music is an art form that relies on the essential act of listening, so when creating or performing music the ultimate goal is to be able to replicate, execute, or create sounds intentionally, expressively, and musically for yourself and others to listen to.
Guitar playing… I taught myself how to play guitar by ear, so ear training impacted my guitar playing in a huge way. Ear training allowed me to learn guitar parts, picking patterns, strumming patterns, chord progression structures.
Songwriting… My ear training has affected my songwriting because I listen to the way songs move from section to section, how many times each section repeats, how and when they change, when main musical ideas return, how the tonal center moves and modulates, and more.
Performance… Learning to critically and objectively listen to yourself comes with time, and once you develop the ability to hear yourself and/or your band, the better you will be able to confidently perform live or in the studio, especially in situations where you can’t really hear yourself on stage that well, or when you are under pressure and nervous. Also, the ability to critically listen to your favorite performances allows you to learn and draw inspiration for how you would like to improve your own style.

Ear Training Tips and Exercises:
Learn Covers: Learning covers is my favorite way of improving my skills. It isn’t until you try to replicate something that you will catch details about the music you probably would not have realized without actually trying to play it. I teach myself songs by using a combination of tablature and learning by ear… Even when using tabs, I will defer to my ear, taking the tabs as a suggestion and figuring out if there’s a more comfortable chord placement, or any wrong notes or rhythms. Learning covers by ear is how I learned to play guitar and essentially how to write songs.
Start Simple: I would recommend starting out by listening to songs that don’t have a lot of other instrumentation on them to be able to hear your instrument of choice more easily. I started out with songs like Led Zeppelin’s “Babe, I’m Gonna Leave You” that have just guitar and singing at the beginning.
Find main pitches and melodic lines: From there I would listen for a distinct line, usually a bass line or sometimes a melody, and try to figure out the starting note or pitch. If the bass line or melodic line has too many notes, I will just listen to the first few seconds or minutes of the song to hear what note seems to be recurring and sticking in my head the most. This usually ends up being the key or scale that the song is in. Try to find it on your instrument. From there, it can be like playing a game of Simon Says. The first note is this, the second is that. Okay what’s next?
Keyboards and pianos are handy: If you are having trouble with identifying pitch, keyboards and pianos are always handy to have around because they should hopefully be in tune and can be a less cumbersome tool to feel around with for matching pitches. At a piano, you don’t have to worry as much about your guitar technique which can be especially challenging for beginner guitarists.I would highly recommend doing something as simple as quizzing yourself with pitches, listening to a tone and seeing if you can match it. If figuring out melodies or bass lines is difficult, I would also practice being able to identify when notes are moving up or down in the scale, or in other words, being able to hear if the notes are moving higher or lower, and eventually what the intervallic distances are between the notes.
Listen for different voicing within chords: First, I’ll try to follow the bass line (and if you are playing the guitar, remember, guitars have their own bass lines, too). I played a lot of finger picking music to start off with, with folk music or classical guitar music performed by Andres Segovia, so it was important I isolate the thumb’s picking patterns before trying to add in all the other notes.
After identifying the bass line of the guitar part, you can start isolating perhaps a middle line (similar to an alto line in a choir) and then a higher melodic line. By listening over and over, I usually will isolate one line within the guitar chords at a time, to hear the melodic and chordal qualities of the song. It’s also helpful to listen for open strings (more resonant sounding) versus strings that are fretted, so you can figure out a chord’s placement on the fretboard.
Listen for chord quality: You will eventually want to not only listen for the specific notes within a chord but for the chord quality. Does it sound like a major chord (often described as happy sounding), minor (described as sad sounding), or something else like a 7-chord, augmented, diminished, etc.
Get Rhythm: When it comes to strumming chords, it’s also good to be able to listen for strumming rhythms and patterns. Does it sound like a series of strumming down? Or does it go down-down-up-down? Do you strum all the strings or only some? Do you do a combination of picking and strumming? What rhythmic patterns are present in the picking and/or strumming pattern? Listen for overall tempo and tempo changes, if any.
Record Yourself: This way, you’ll be able to hear when you sound awesome and why. You can pinpoint areas where you can improve. In the case of songwriting, I recommend recording your ideas so you can step out of yourself a little bit and see the forest for the trees. Listen to your song structure or transitions, chord changes or tone, or whatever it is you feel you need to work on. Recording myself was especially helpful to me in the case of singing while playing guitar, and singing in general.
Educate Yourself: Though it is not necessary to be formally educated in music, it is so helpful to learn as much as you can about the subjects that you love. For example, I never received a formal education in guitar theory or performance, but studying piano, voice, music theory, and so much more, really have helped me to understand different aspects of music I may have guessed at before but couldn’t put my finger on.
Listen to what you love and keep playing: When it really comes down to it, ear training begins with listening to music! I like listening to whatever I’m into over and over again, simply because I love it, and because I realize there’s something I want to learn from it.
Once you start learning parts from songs with fuller instrumentation, it is really important to be able to distinguish the timbre, or distinct sound, of different instruments (which one is the guitar, the bass, the drums, the back-up vocals, the main vocals, etc). This way, you can more easily hear details about what each instrument is doing and how the instruments are interacting with each other. There are plenty of ear training tutorials on the Internet, but I assure you, you can still learn all these listening skills without it, if you want. Just keep on listening and figuring out what you like about what you love! And keep on playing!
After collaborating with DJ Harry on the song, “All My Life,” which soon appeared on TV shows including Veronica Mars and House and releasing a four-song, self-titled EP in 2007, she went on tour opening for Lenny Kravitz and soon signed with Fat Possum Records for her label debut, Why You Runnin. Since then, she’s released three critically-acclaimed albums starting with her 2009 breakout, Catching a Tiger (Columbia), which went gold in the UK.
In February, Lissie released her latest album, My Wild West (Lionboy/Thirty Tigers), where she explored her recent move to an Iowa farm following several years of living on the West Coast. For its lead single, “Daughters,” which was inspired by Liberian peace activist and Nobel Peace Prize winner Leymah Gbowee, she partnered with charity:water, an organization focused on bringing clean and safe drinking water to people in developing nations. As part of a “pay what you want” promotion for International Women’s Day, Lissie raised over $4500 for the cause and was invited to perform the song on CNN International to raise further awareness.
In addition to My Wild West, 2016 will also see the release of Lissie’s first live album, Live at Union Chapel. “For years I traveled with a band and while I really loved that dynamic, I wanted to get back to solo acoustic shows for a bit,” she says. “I started out as a solo act and missed how much space it allowed my voice! Going into last year’s solo European run, I had it in my mind that we should record the London show. It was at this beautiful church venue, Union Chapel with great acoustics and a cozy, intimate setting…It’s obviously different from my studio albums & band shows too. It’s really just nice to switch it up!”
Along with going from band to solo, she also “switched it up” when it came to the gear she chose for the tour. “I keep my old vintage guitars off the road and save them for the studio. I have a ’74 Thinline Telecaster, a ‘56 Epiphone Casino and 50s Gibson acoustic that sound gorgeous on recordings. Unfortunately I can’t risk traveling with them. On the road, I use a reissue Fender Thinline Tele and a small-bodied acoustic from their new Paramount Parlour guitars line. Fender hooks it up for me. I also use weird dynamic drum mics on my voice in the studio. You wouldn’t think they would work out but they do!
Just before the album’s physical release on November 25, Lissie shared a few tips for musicians looking to record their own performances. “I want to preface my tips by saying that in the past I’d hoped to record more of my full band shows,” she says. “Unfortunately, we were never in a position to get it quite as mic’d as we’d like for recording and would end up with board mixes that we didn’t ever mix or release!”
Even with a hollow or semi-hollow body electric guitar, you can be sure that the bulk of your volume isn’t coming from resonance within the guitar.
If you’re a detail-oriented person, or a science nerd like yours truly, demystifying what’s going on with the electronics of your guitar might be a useful and manageable first step on your path to tone mastery. You can get really deep into this stuff (and there are links at the bottom of this entry to help you start exploring if you like), but we’ll try to keep it practical here.
When you strum your guitar, each string vibrates at the frequency you’ve tuned it to, creating a repeating disturbance of the space around the string that continues as long as the string keeps vibrating. You probably know this – great! All the while, you’ve got one or a couple of magnetic pickups in your guitar. This is where the science happens: the construction of your pickups what allows mechanical string vibrations to be converted into an electrical signal that can be processed by the rest of the electronics in your guitar, pedals and amplifier.
Pickups.
The pickups in your guitar consist of a permanent magnet (a material that has been conditioned to produce its own persistent magnetic field) wrapped with a coil of thousands of turns of copper wire. Copper is a conductor, meaning that electric current may flow through it relatively uninhibited.
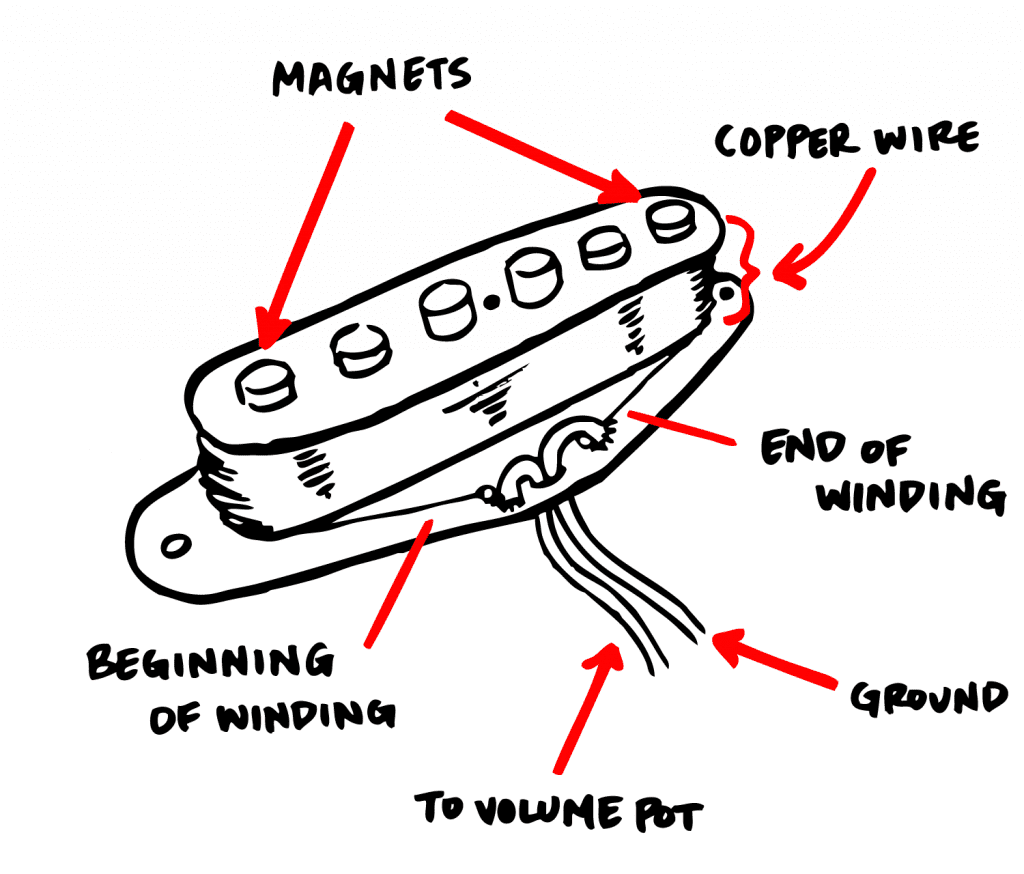
A magnetic field is a complicated concept. For now, it’s enough to know that it refers to the force that affects the space and electricity around and within a magnet in a consistent fashion. Because of this, the repeating vibrations of your guitar strings disturb the field, which in turn generates a voltage in the copper wire. Voltage is a difference in electrical energy between two points. This is what allows an electric current to move through your wire, since current tends to move from a point of higher energy to one of lower energy.
The fact that someone thought of this, and that it works, is pretty wild. You definitely don’t need to understand the physics behind magnetic fields to enjoy and excel at playing guitar, but it’s sure cool to think about, and the hope here is that the more you know about your instrument, the more comfortable you’ll be with it—especially when your electronics are giving you trouble.
So you’ve got a current going, now what?
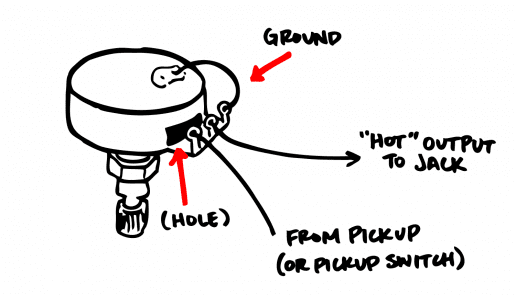
Now that we’re in the realm of electric current, everything moves through wires. The current generated by your strumming is the signal you want to hear coming through your speakers. Essentially, it will make its way first to your volume potentiometer (or volume “pot”) and then to your output jack.
The volume pot works by allowing you to dictate how much of your current you want to allow to bleed to ground. “Ground” refers to a common metal point to which all of the electronics in your guitar are connected, such as the control plate or tail piece. One of the functions of grounding is to absorb any undesirable/stray frequencies your pickups are sensitive to that you don’t want to make it to your output jack or amplifier.
 Turning up means less current escapes to the ground and more current goes on to your output jack; turning down lets more current escape.
As you know, when you plug a cable into your output jack, your signal can flow to the other end of that cable, which plugs into your amp.
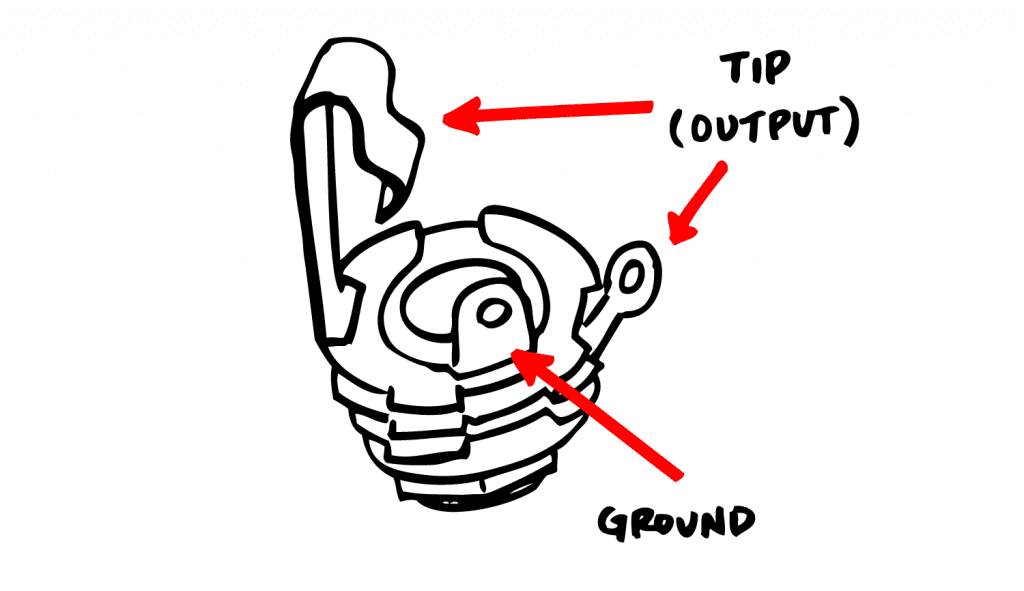 The lug labeled “tip/signal” is where your guitar signal enters the jack. It is continuous with the actual “tip” of the jack. When you plug in a cable, a connection is made with the tip and the current (your guitar signal) flows into the cable and on to the amp.
You may have heard someone say of a buzzy guitar that it “probably has a grounding problem.” This means that some of those buzzy frequencies aren’t bleeding off to ground like they should be, and instead are traveling along your signal wires with the frequencies you want to hear. Much of the time this is because of one bad connection in your guitar’s wiring, which is a quick and easy fix if you know how to solder – a very learnable skill! The same is often true of a connection on your output jack if your signal is cutting in and out and you’ve ruled out amp problems.
Meanwhile, if you’ve got a “scratchy pot” (scratching sounds come through your amp when you turn the knob) your problem is often just dirt. You can definitely fix this yourself using a can of contact cleaner with a straw attachment:
Below is a diagram showing one way in which all the parts we’ve discussed can be connected. You should be able to follow both the ground wire and the path your signal would take in a continuous path through pickups, volume pot and output jack.
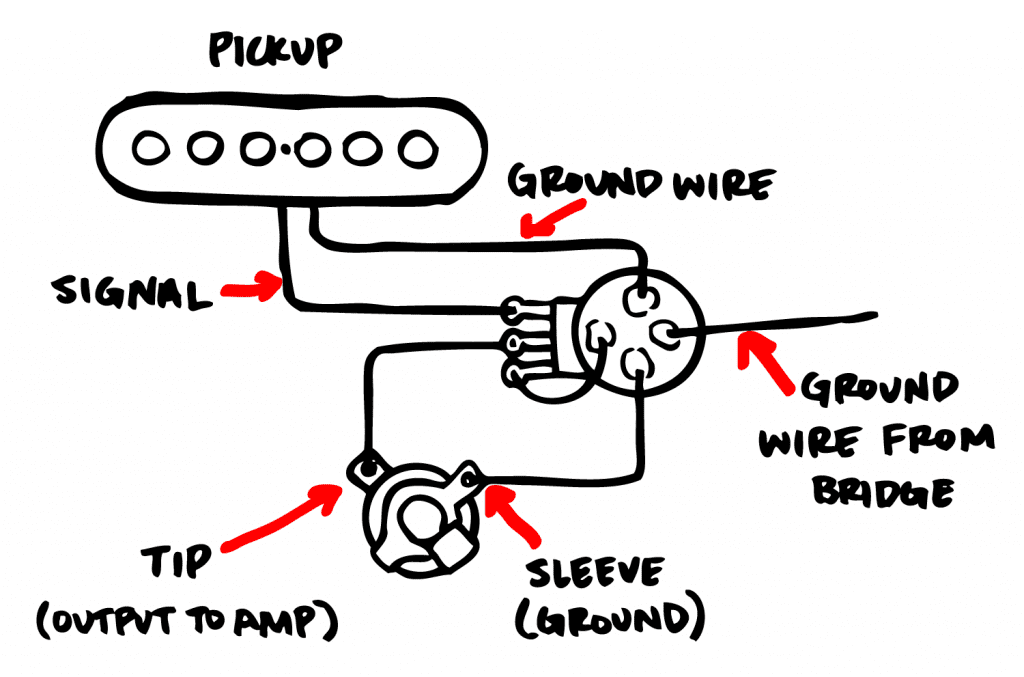
Note that this diagram does not include a tone knob or pickup selectors. Briefly:
This is a lot of technical information, but the point is this: an electric guitar converts mechanical string vibrations to electric current or “signal.” This happens by way of magnetic pickups, from which point your signal flows through a series of relatively simple electronics in the guitar, onto an instrument cable, and into your amplifier. An amp does a lot of things, but mainly it takes a what is still a very weak signal leaving your guitar and turns it into one that’s strong to be audible (depending on your amp, of course, “audible” may be a huge understatement).
Not magic, just physics.
Want to learn more about the science behind all this? Khan Academy offers some great tutorials, linked below!
More on pickups:
Pickups 101 from Seymour Duncan
Four years later, Black Table’s first full length, Obelisk, generated a strong buzz among metal circles long before its release on October 14, and with its bleak, expansive atmospheres, provocative lyrics inspired by ancient civilizations and mythology, and guitarist/frontwoman Mers Sumida’s tortured vocals, it surpassed expectations of many fans and critics alike.
Recorded at New Jersey’s Backroom Studio with legendary producer Billy Anderson (Acid King, Swans, Melvins), Obelisk showcases Black Table’s relentless, raw energy, and ambitious songwriting that intricately weaves together elements of black metal, post-metal, and sludge (among other heavy sounds) into an emotive mass. The band’s time in the studio only magnified the power and intensity of the music, and according to Sumida, showing up prepared and ready to work, and checking egos at the door helped ensure their recording success.
Check out more of Sumida’s tips for before and during your recording sessions below. Obelisk is available for purchase now through Silent Pendulum Records (US) and Moment of Collapse Records (Europe).
5 Tips to Prepare Before Heading Into the Studio:
Remind yourself that this is an incredible moment and you better make it count.
 Mers Sumida by Claire Donner
5 Tips for Getting Through a Studio Session with Flying Colors:
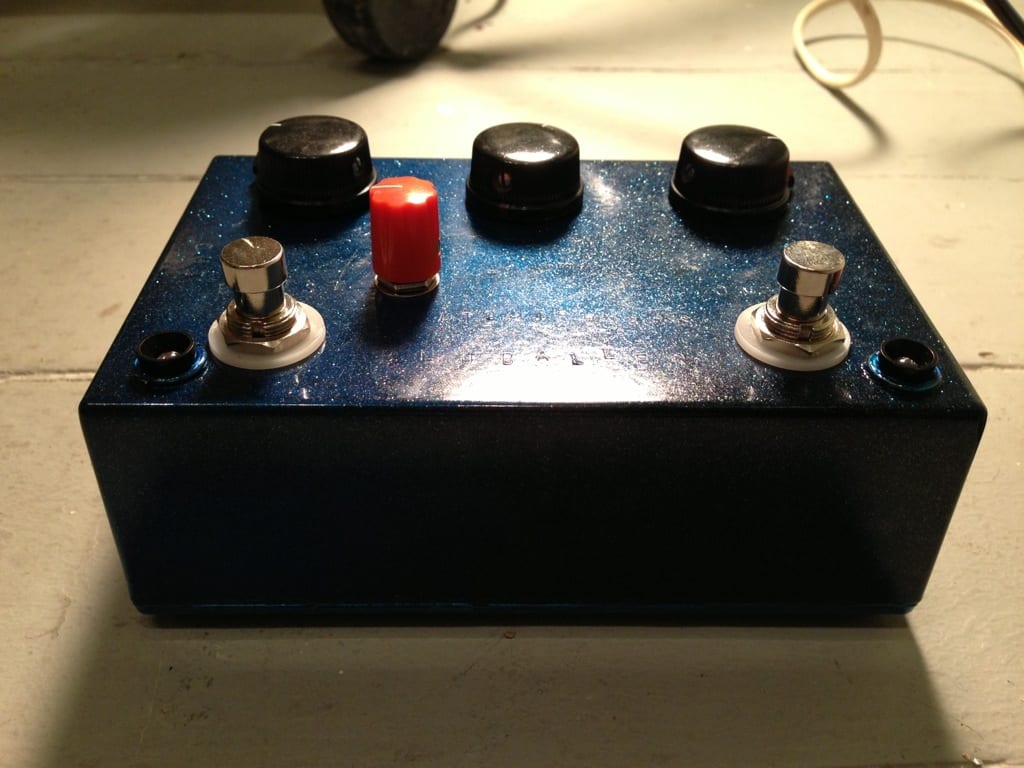
We reached out to a few boutique pedal companies, owned and/or operated by women, to ask about their experiences and to offer advice to demystify the world of designing and building.
Louise Hinz / Dwarfcraft Devices
dwarfcraft.com
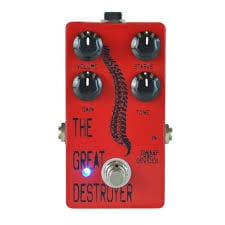
Ben Hinz started Dwarftcraft in 2007. He couldn’t afford his own gear, so he took the DIY route and engineered his own. The company exploded as guitarists caught wind of their flagship product The Great Destroyer, a heavy fuzz pedal with rhythmic oscillation. When Ben couldn’t keep up with building, his wife Louise stepped in.
Gear forums were particularly helpful to Louise when she began. “The problem for a woman is that forums are tremendously unfriendly,” she says. “It’s really hard to not be intimidated, because the place you go to learn is intimidating all on its own.” She says that new boutique companies are way more supportive and want more women involved.
Advice: “Read forums about building. Get kits and schematics and keep trying. If you want to design, work on an idea that is original, because that is how you rise to the top. You need armor with the bullshit that is going to come at you. ”
Adrienne Wisok / Red Panda
redpandalab.com
Red Panda may not be owned by a woman, and the pedals may not be designed by one either, but this company is all-lady. Curt Malouin, founder, is currently the only male. “We joke around that we should do reverse sexual harassment, like putting up Playgirl calendars,” says Adrienne Wisok. She mentions that there are a lot of women in the music industry who work behind the scenes and always have, but you just don’t hear about them as much.
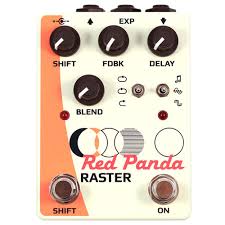
Adrienne was initially hired to do the final assembly—after the circuit boards were programmed she would assemble them into the metal enclosures, attach hardware, and make sure they were ready to go—but she has since started taking on more extensive roles, including prototype soldering. Red Panda’s most notable pedal is the Raster, a digital delay with a pitch shifter integrated into the feedback loop.
Advice: “If you want to know what a pedal does, crack it open, take it apart, and look up what the parts do. People are going to assume that you don’t know what you’re doing, but being underestimated is really valuable.”
Tara Pattenden / Phantom Chips
phantomchips.com
In her solo noise project Phantom Chips, based in Bristol, UK, Tara Pattenden builds all the devices and wearable instruments she performs with. She also works as an assistant for the audio device company BugBrand, and has built her own drone pedal, the Lerango, that she sells on her website.
In 2014, Pattenden co-hosted the workshop Infinity +1 for teen girls alongside multimedia artist Kate Geck. Participants developed many things, including a soldered oscillator, knitted stretch sensors, and a costume-based instrument. The workshop was developed when the two were brainstorming ways to get girls more involved with electronics and sound. “I think there are often less expectations for girls to become good at certain technologies,” Pattenden says. “It’s just part of a much bigger picture, but one we wanted to change by demystifying electronics.”
Advice: “Ask lots of questions! Take some workshops to get hands on experience soldering. Learn to read schematics and experiment with a breadboard. Take a practical approach.”
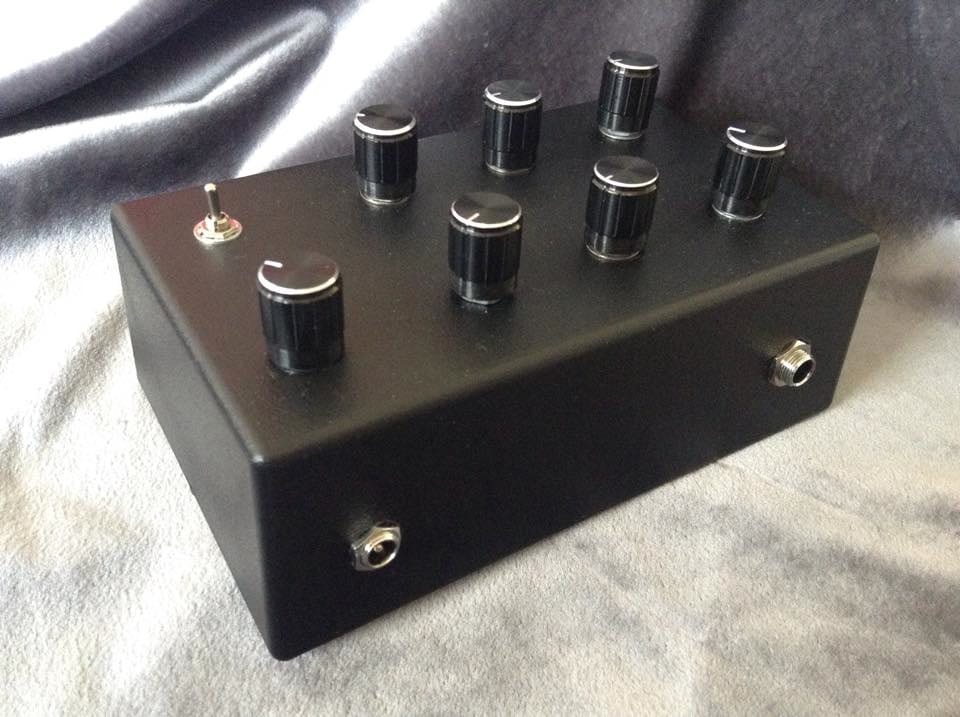
Carissa Spatcher / Snatchtronics
snatchtronics.com
Ten years ago, Carissa Spatcher started taking apart broken pedals. She found herself fixing them and learning what all the components did. Shortly after, she started doing repairs for a local music store in Massachusetts and someone asked her to clone a very popular boutique pedal at the time—she did, and realized that building was something she could do.
Spatcher started Snatchtronics in 2004. Currently based in Brooklyn, NY, the company is known for its Ovadrive pedal and it’s bass brother Bluballer. As far as women in the pedal business go, Spatcher says, “I think the more women who follow their technical inclinations, the more there’ll be.”
Advice: “Find someone who knows a little about electronics and have them show you something they know. Then you can build your confidence and know that it is possible to build your own effects or fix your own gear.”