On an electric guitar, this is a pretty easy fix. It’s part of a standard setup, and you can do it at home.
To check your intonation:
Gather your supplies. Ideally, you will want to use a strobe tuner for this. Strobe tuners are very precise. They’re pretty pricey, but they can be worth the money if you want to be able to do all your own setups. However, a chromatic tuner and a good ear will suffice.
You’ll also need a screwdriver—make sure it matches the heads of your saddle screws.
Get to work!
Tune your guitar
Strum your open high E string, and make sure it is perfectly in tune.
Play the high E string at the 12th fret. It should be exactly an octave higher than the open E string, and exactly the same pitch as a harmonic played on the 12th fret. If it is sharp or flat, the intonation is off.
Repeat for each remaining string. This should give you an idea of what you will need to do.
Some tips:
To fix your intonation:
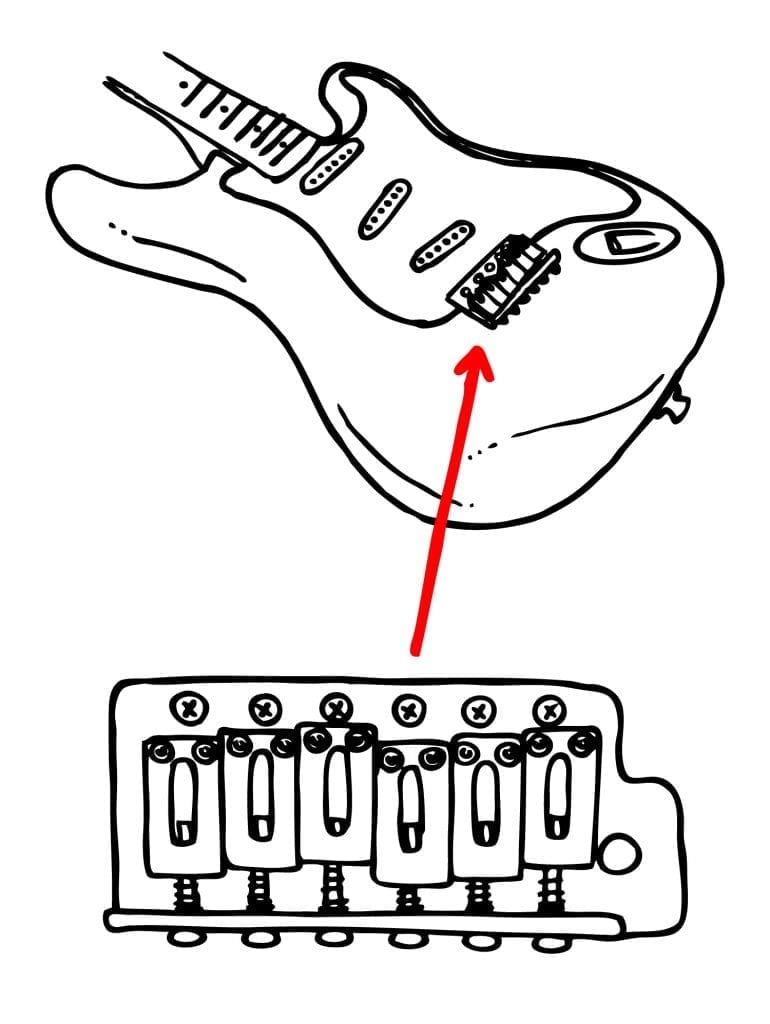
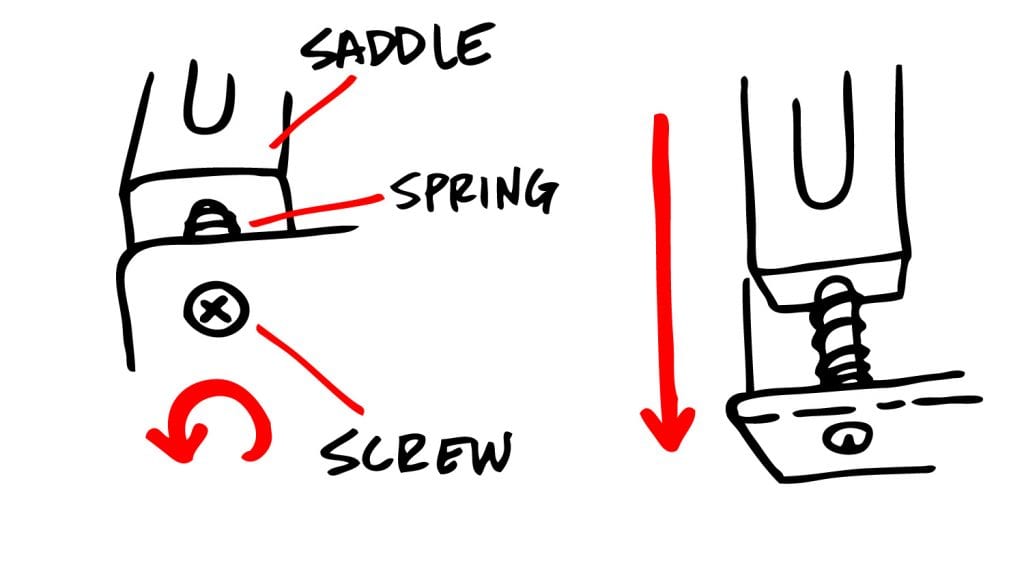
On the bridge of your guitar, unless you have a fixed bridge (like a Hard-Tail bridge or a Tune-O-Matic), you will see six saddles with a string sitting in each one that are each independently attached to the bridge via a screw with a spring around it.
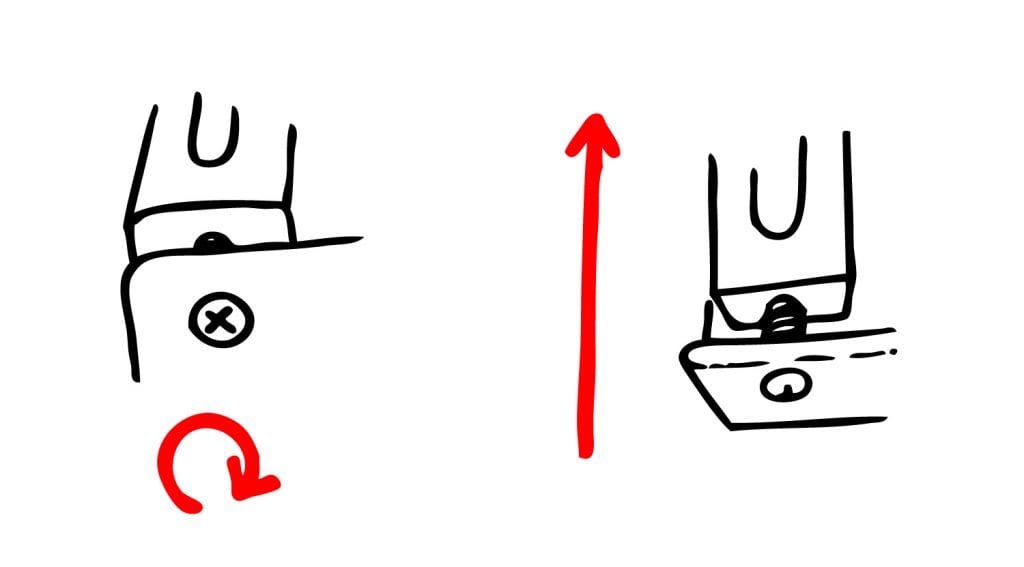
Look from the tail of your guitar across the top towards the headstock. You should see six screw heads. Essentially, if you turn the screw clockwise, it will pull the saddle closer to the tail of the guitar by shortening the spring between the tail end of the bridge and the saddle. If you turn it counterclockwise, it will push the saddle towards the neck.
If a string is sharper than it should be at the 12th fret (but the open string is in tune), you need to turn that saddle’s screw clockwise, moving the saddle closer to the tail and increasing the distance between nut and where the string hits the saddle.
In general, the pitch of a string is controlled by its length and tension. When you bring the saddle towards the tail and increase the length of string between nut and saddle, you are increasing string tension and sharpening the pitch.
After you do this, your open string will ring sharp and you will need to tune it back down to pitch. Make sure it is perfectly in tune. Then, you can fret at 12 again and see if that pitch is now a perfect octave above the pitch of the open string, matching your harmonic on 12.
If you’ve gone too far and the 12th fret now plays sharp, you can re-loosen the saddle’s screw slightly, lowering the tension. You may have to go back and forth a couple times; the less you have to do this the better because it does leave small kinks in the strings, but it’s no big deal. The more you do this, you’ll develop a better sense of how far to move your screws to get the change in pitch you need.
Likewise, if a string is flatter than it should be at 12 with the open string in tune, you’ll need to start by to loosen its saddle screw, pushing the saddle towards the neck and decreasing the distance between nut and saddle. The rest of the process is the same.
Once you’ve intonated all six strings, you’ll want to go back and check each of them again. Usually you’ll find that pitch is still not perfect on all of the strings, and you’ll have to make small adjustments until it is. When you think you’ve finished, before you put everything away, plug in and play and make sure it sounds good.
Intonating can be a time consuming process, especially at first, but it’s a great skill to have. Imagine never again having to scramble for a setup before a gig—such freedom!
Comprised of of bassist Dana James, guitarist Ben Verellen, and drummer Hozoji Margullis, the band takes an egalitarian approach to its music, with each member contributing to songwriting and vocals. Together they have released four albums in less than a decade, starting with its powerful 2008 debut Night Terror up through their most recent LP, Stillicide. Adding to the magic are the rich, velvety tones that flow out of the band’s gear from Verellen Amplifiers, the boutique amplifier company Verellen has run since 2007. James plays her bass through a Verellen Meatsmoke and uses a pick because, as she says, “I play bass like a guitar.”
On Stillicide, Helms Alee has continued its mergings of intricate twists and textures with crunchy rhythms and hooks, a tactic that has resulted in what are arguably their most compelling songs to date. “Half of our brains want it to be something that is relatable, but the other half of our brains want it to be something that sounds interesting and weird. When we write songs it’s usually a mash of technical and feeling,” James explains.
Given those polarities, it seemed like James might have some words of wisdom to share with other musicians when it comes to working through difficult parts of song development. When we met up with James before the band’s recent show at Chicago’s Beat Kitchen, it turned out she did.
Check out her tips below. Stillicide is available now through Sargent House Records.
Most musicians and artists have developed their own set of techniques and tricks to find inspiration and get their juices flowing again, but sometimes it helps to borrow one from a friend and try something completely new.
With that in mind, we asked Sara Landeau, who plays guitar with the New York-based five piece The Julie Ruin (the band fronted by Kathleen Hanna), runs the Brooklyn Music Studio for Women and Girls, and teaches at Girls Rock Alliance, NYC to share her favorite tips for breaking through creative ruts. We also found out more about the gear and studio techniques she used on the band’s second album, Hit Reset, which was released July 8 on Hardly Art Records.
Check out Landeau’s words of wisdom below, and go see The Julie Ruin when they play a town near you!
She Shreds: What guitar and gear did you use on Hit Reset?
Sara Landeau: For Hit Reset, I used the same 1970’s Fender Twin Amp as our first record, but a whole new slew of pedals and guitars. There’s a Wildkat Epiphone, Gretsch Pro Jet with a Bigsby, and a 1991 Fender Telecaster. Also assorted Fuzz pedals, Big Muff with Tone Wicker, Big Muff Pi, OCD [Fulltone Obsessive Compulsive Drive], Line 6 DL4 Delay Modeler, some no-name brand pedals someone gave to me, and to recreate some of the noise on the album, a Reuss Roland S. Howard RSH-03, which I’m really excited about.
Did you try out any new techniques in the studio this time around?
There’s more sustain and noise on these songs, and for the melodies, I toyed with placing clean lines over choppy “Au Pairs” type triad chords. I thought a lot about textures and how they work. I also watched some master classes by Nile Rodgers and was inspired by his chord shapes and how he weaved guitar through a bass part. For “Mr. So & So” I put the bass line in Pro Tools and spent a day soloing over it, until I finally came up with the riff I play throughout. Other influences were Elvis Costello’s early band The Attractions, and their surfy low end riffs. But mostly I played with noise and feedback this time with tons more improvising, something I didn’t normally do.
Can you share your Top 5 tips for musicians to work through a creative rut?
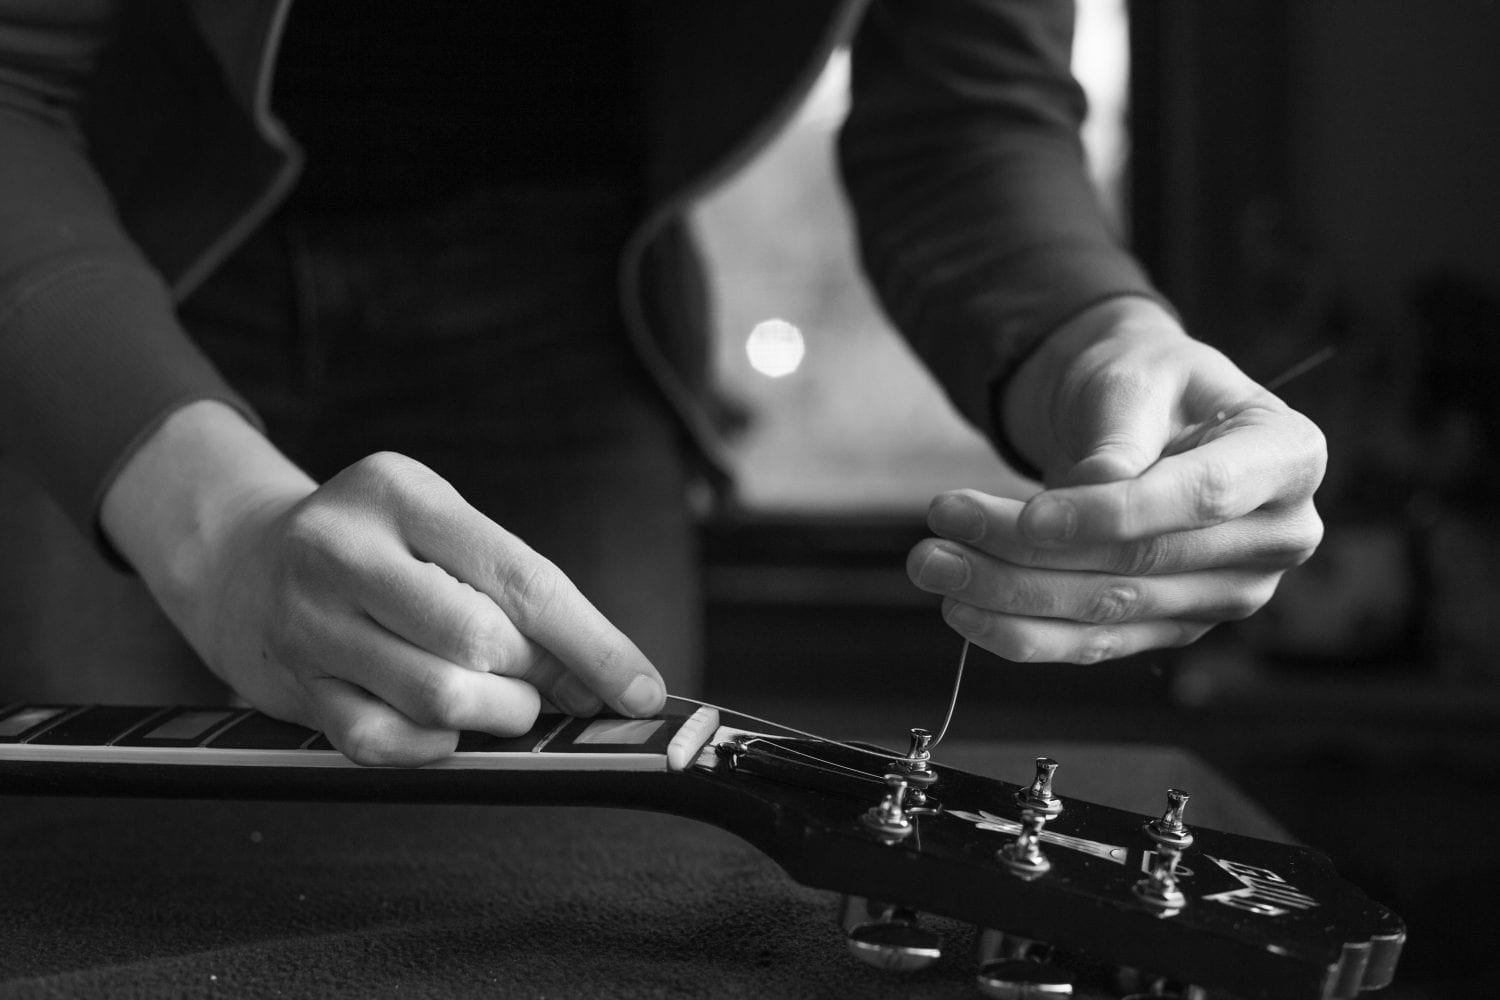
There are just a few subtle differences in how you’ll get new strings onto your guitar, depending on what type of guitar it is and, if it’s electric, what type of tuners it uses. Note: for a steel string acoustic guitar you will follow the instructions for an electric guitar with Gibson style tuners, and disregard the note about saddles.
Classical Guitars. Classical guitars use nylon strings. Changing these strings involves wrapping the string around itself first at the bridge and then at the tuning post to keep it in place.
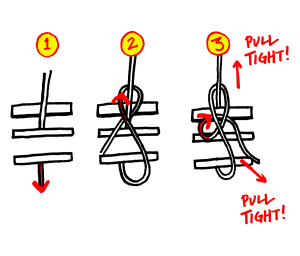
Fig. 1
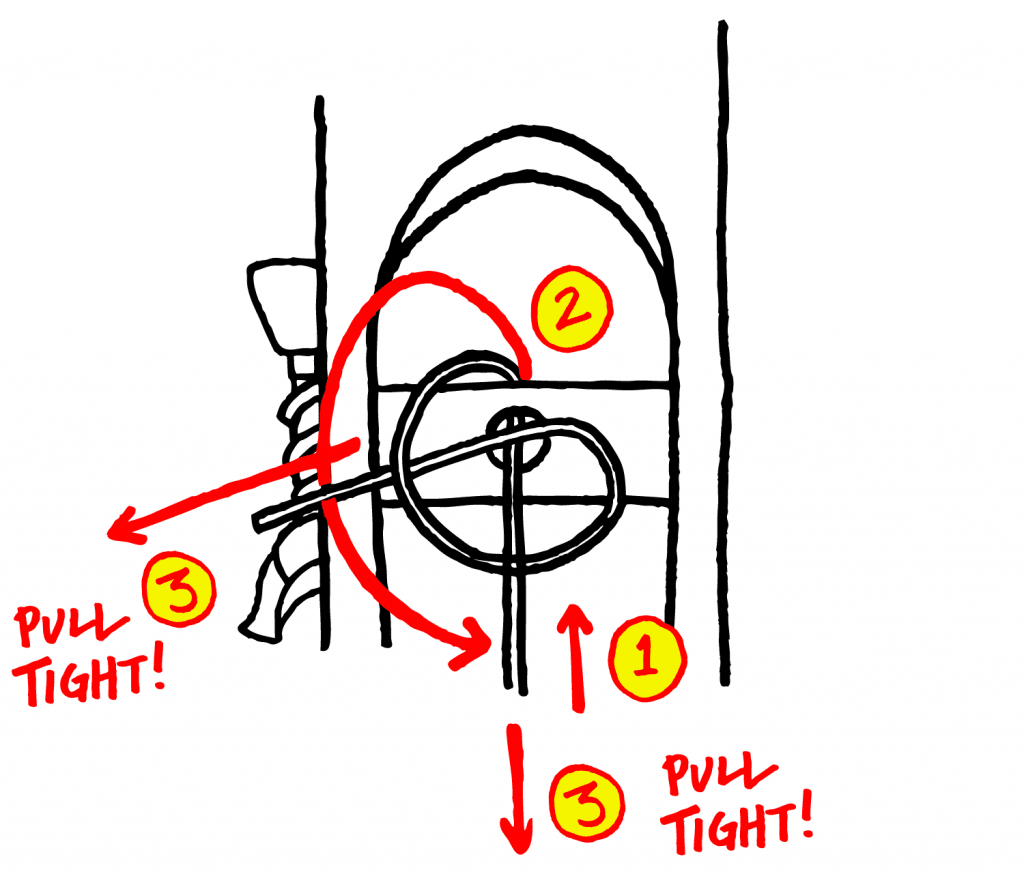
Fig. 2
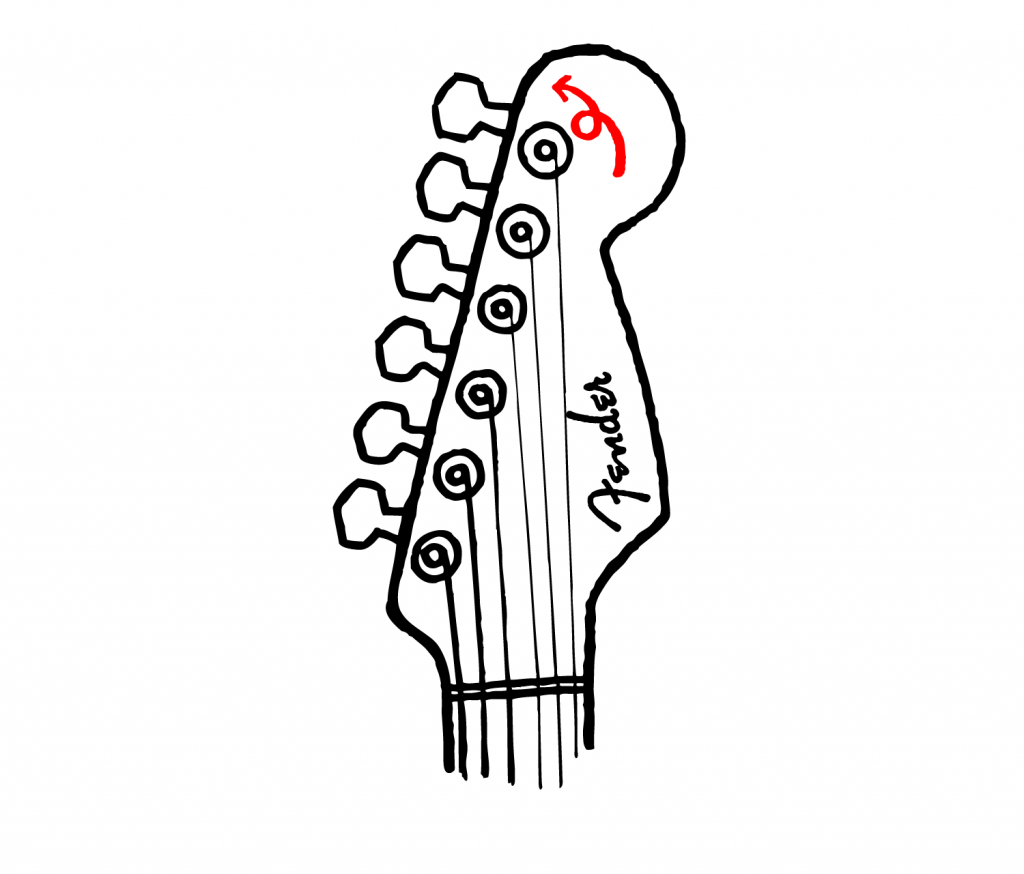
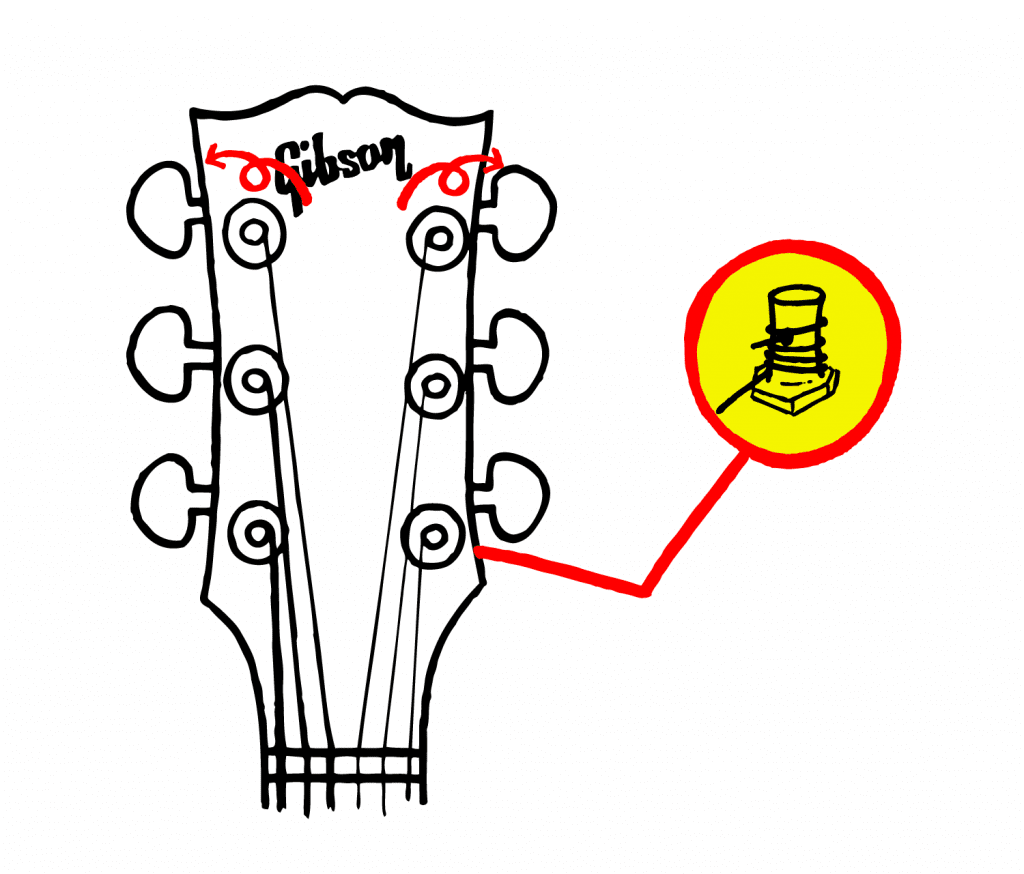
Electric Guitars. The two types of tuners you’re most likely to encounter here are Fender style and Gibson style. Fender style – also called “open slot” or “vintage style” – tuners are all on the same side of the headstock and the strings are inserted directly into the head of their tuners’ screws (down into the posts, into “open slots”). Gibson style tuners are 3×3: three tuners on each side of the headstock. With these, you’ll push each string through a hole in its tuner’s post. See fig. 3 and 4 for illustrations of guitars strung with Fender and Gibson style tuners, respectively.
The first few steps are the same for both types of tuners.
Fender style
Gibson style
Bass Guitar
If you’re a bassist, the electric guitar instructions above will apply, except that you should leave about 4-5 inches extra when you cut your string. This is because bass strings are longer, thicker and heavier than guitar strings. As such they require more tension (measured in pounds!) to be held firmly in place and stay in tune; the thickness of the strings means that more length is needed to wrap around the tuners and ensure this security.
Helpful Tips:
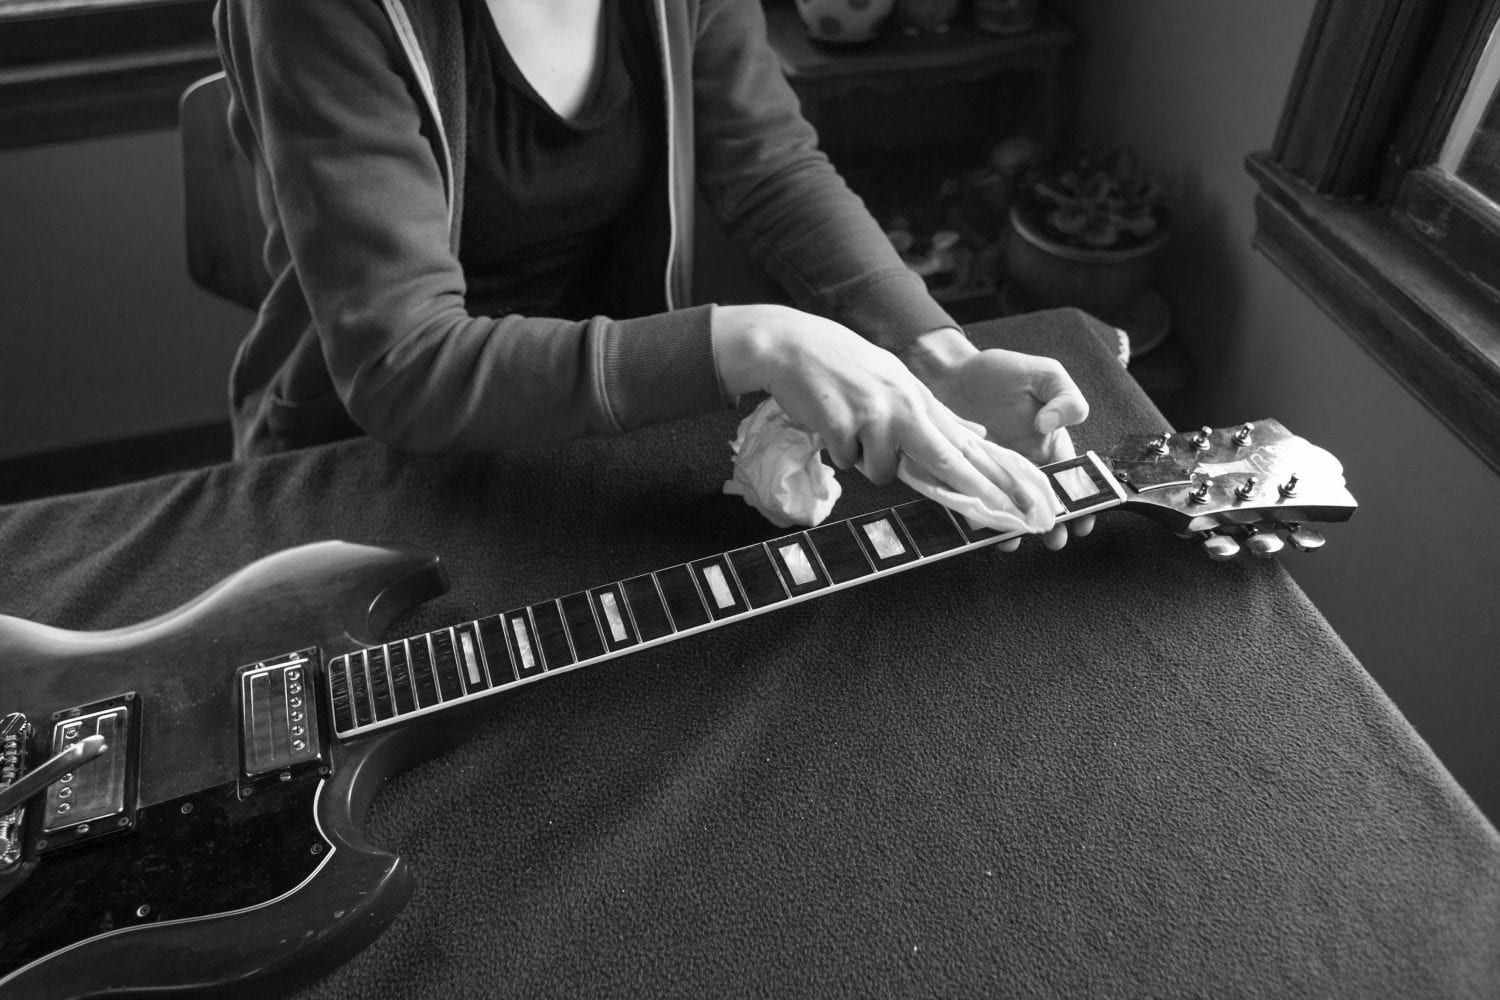
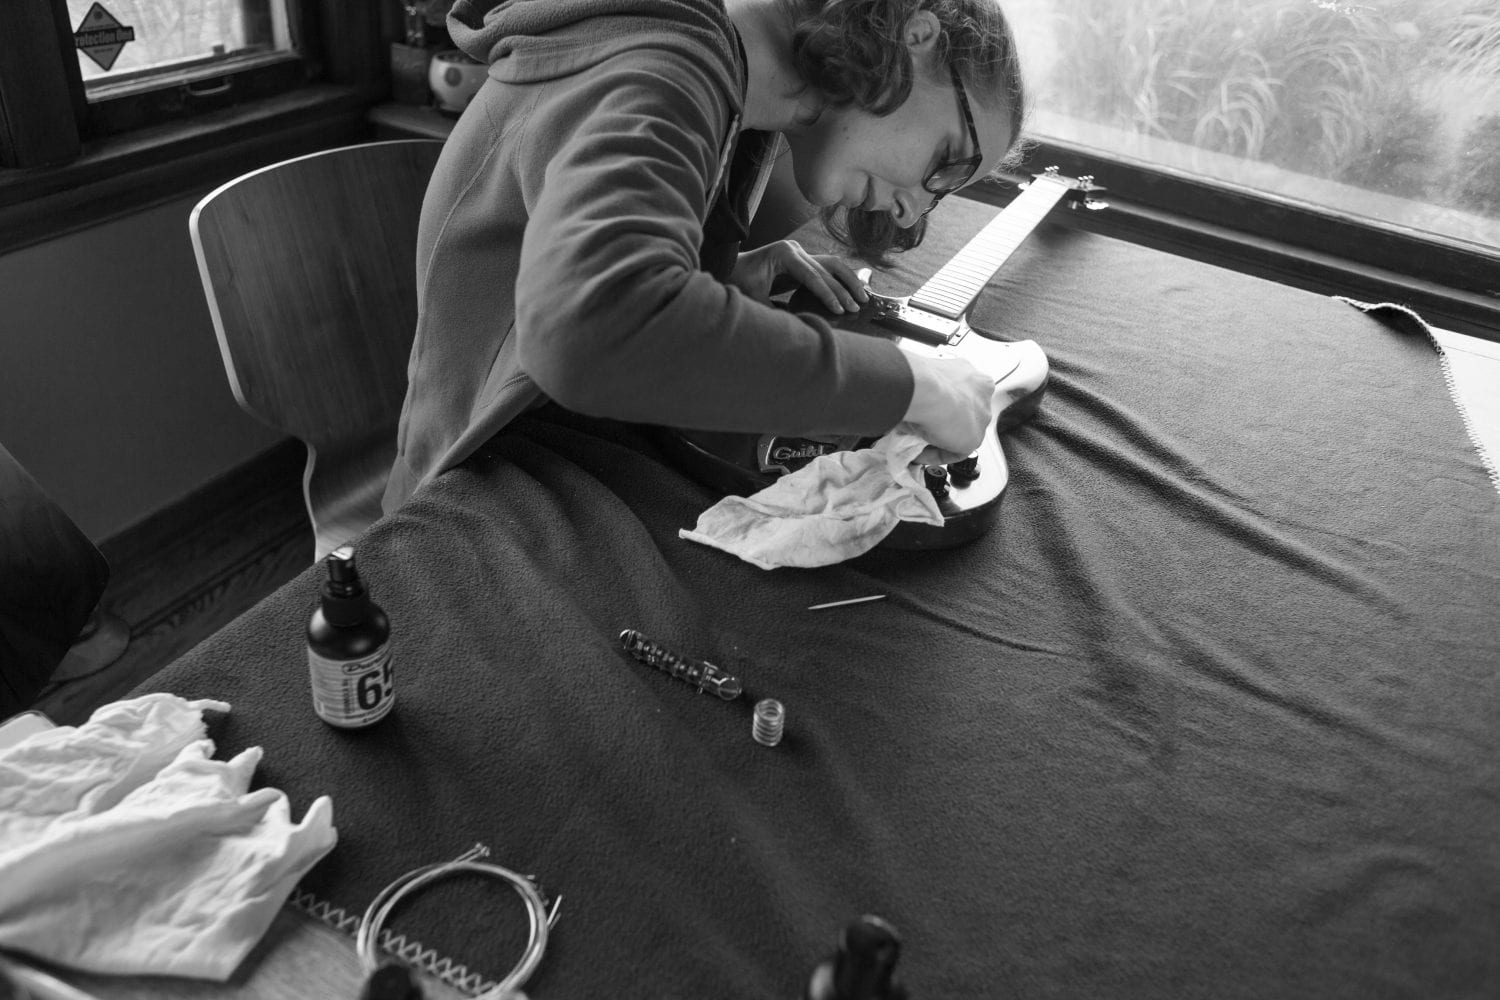
On Saturday, June 25th 2016, She Shreds hosted a workshop in Portland, Oregon that taught you how to set up and maintain your guitar. An essential follow-up to these lessons is the restoration process. Over time, you may have noticed that your guitar isn’t looking as bright and youthful as it once did. If you play regularly, it doesn’t take long for the natural oils and dirt from your hands to start to collect on your instrument. You’ll notice that the fretboard wood has started to look dry, grime is collecting around the frets, and the pickups don’t shine like they used to—it’s easy for these conditions to sneak up on you! With a little TLC and two to three hours to spare, your guitar can look as good as it did the day you bought it.
Why Should I Restore?
While restoring your guitar may seem purely aesthetic, maintaining the cleanliness of your instrument can greatly prolong its life. Guitars are primarily made from wood, which can dry and crack over time. Regular maintenance can keep the wood in the best shape possible and reduce the risk of discoloration and cracks. Keeping your frets free of corrosion will also keep your string bends nice and smooth.
When Should I Restore?
There is no hard and fast rule for how often you should clean and condition your guitar, and it depends on how often you play. A couple times a year is a good suggestion, and it’s easiest to do when you change your strings.

These instructions use Dunlop’s line of cleaning products. There are many product lines that offer great alternatives.
** Tip! Take before and after photos! You’ll be amazed how nicely your guitar cleans up and you’ll want to show off your work!
1. Remove your guitar strings.
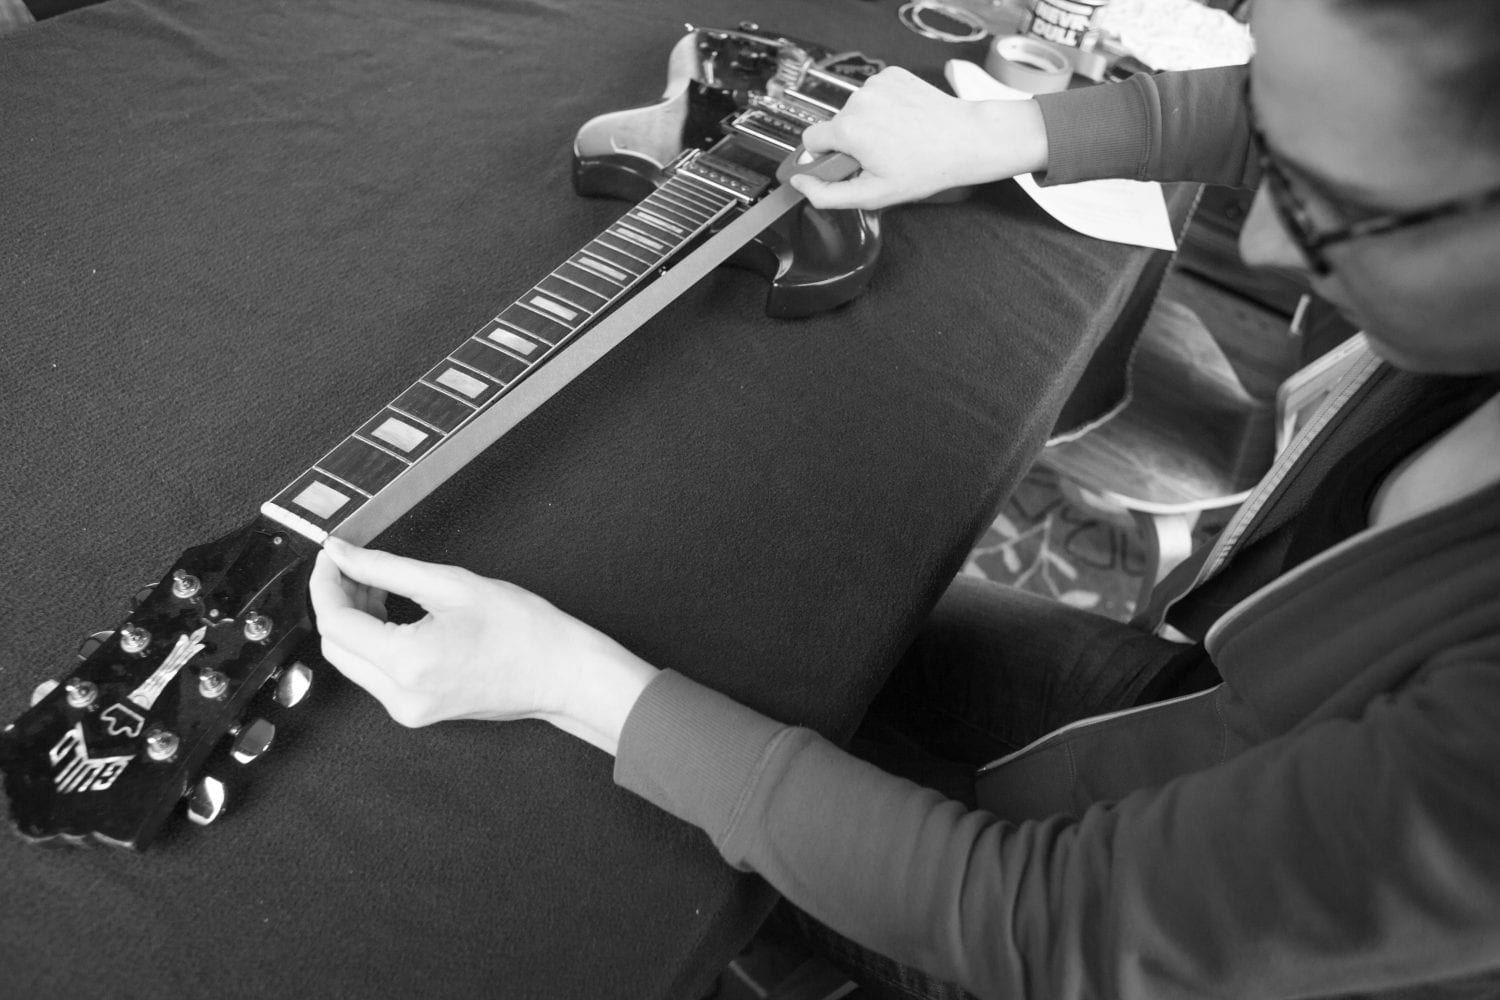
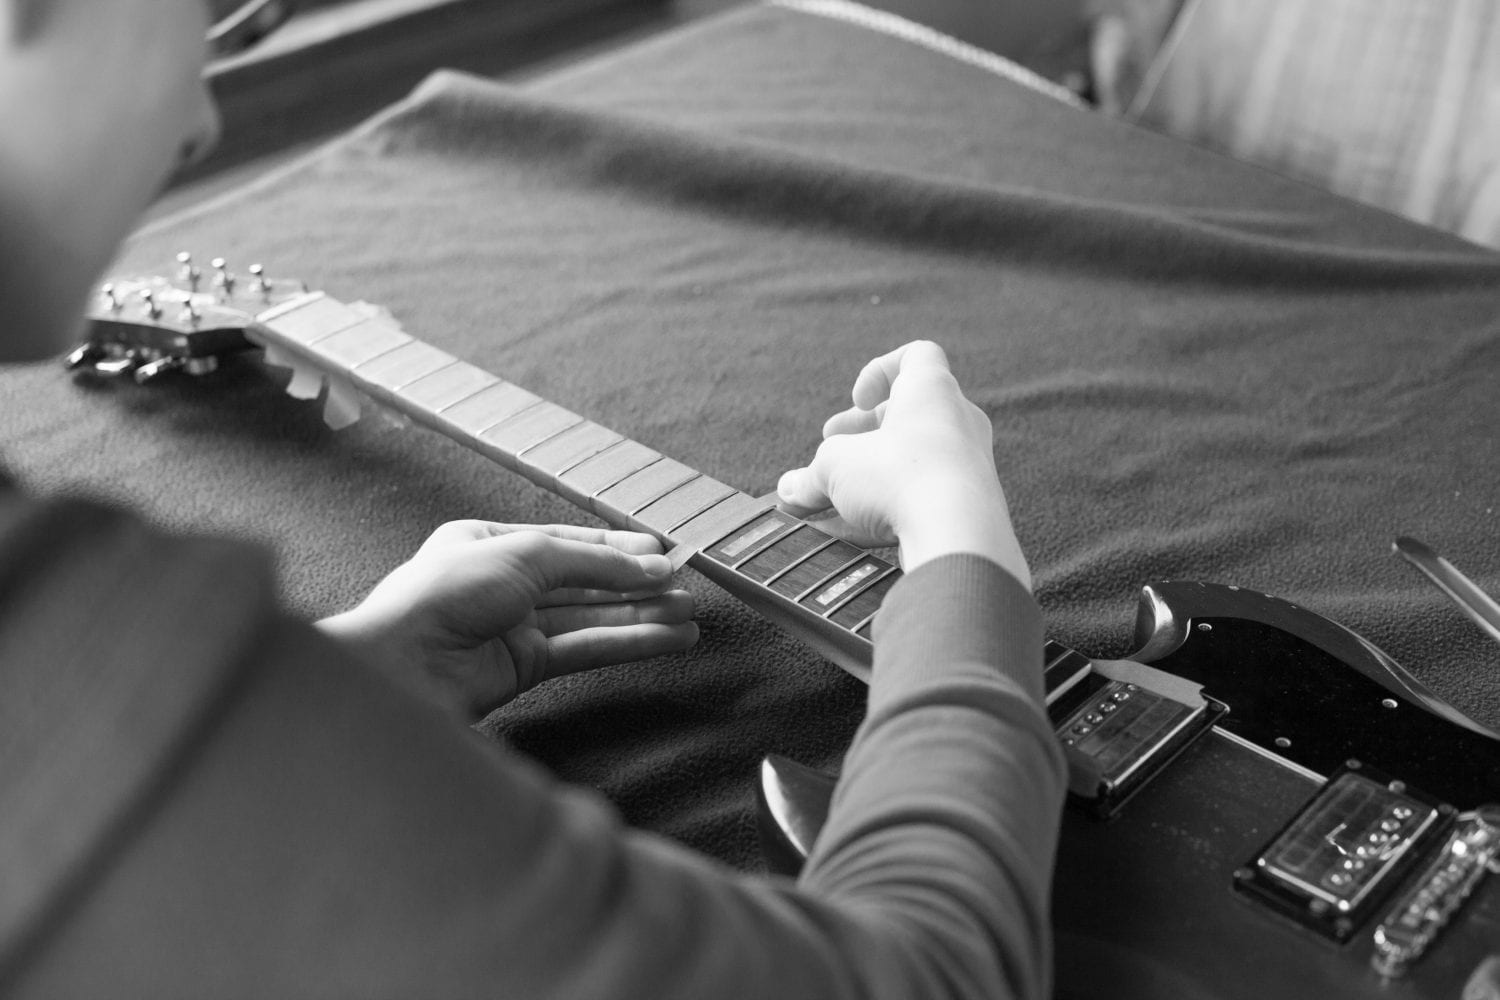
2. Tape the fretboard with painter’s tape leaving the frets exposed, but fully covering the wood to protect it while you polish the frets. This can get tough on the high frets once the tape is wider than the space between the frets. If the tape is too wide, cut it in half lengthwise to fit.
** Tip! Before you start taping across the fretboard, put a strip of tape along each side of the neck from the headstock to the body. When you remove the tape later, you can start from this long strip of tape and remove it all at once!
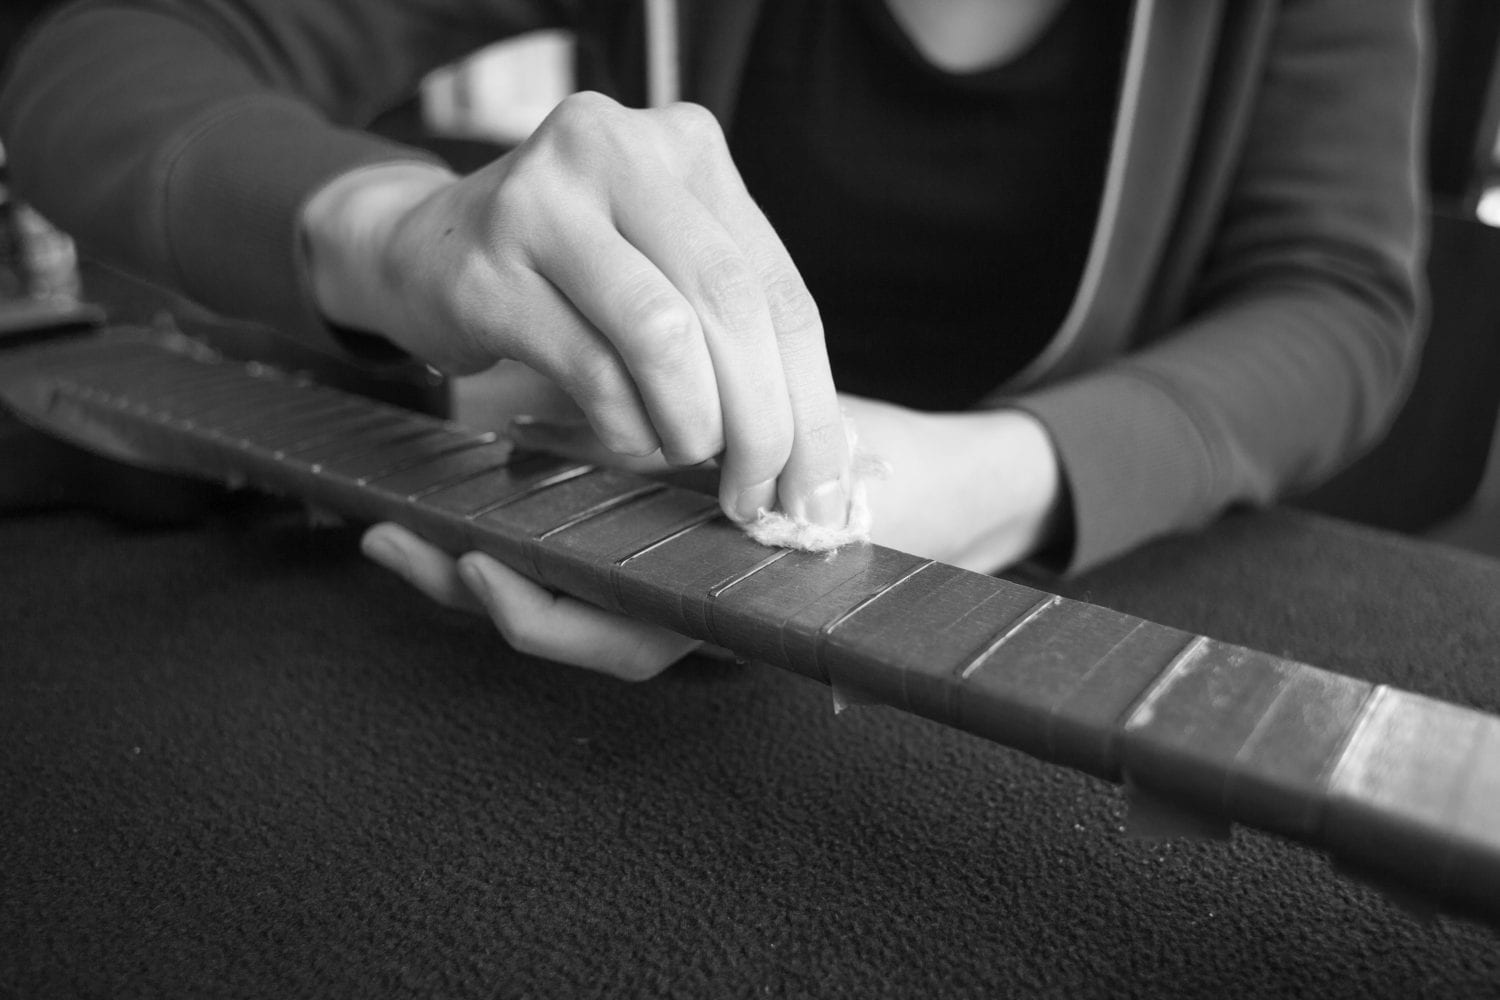
3. Rub the frets and other metal material (tuning knobs, pickup covers, etc) with a small wad of Nevr-dull to remove corrosion. Once applied, polish off with a dry, lint-free cloth.
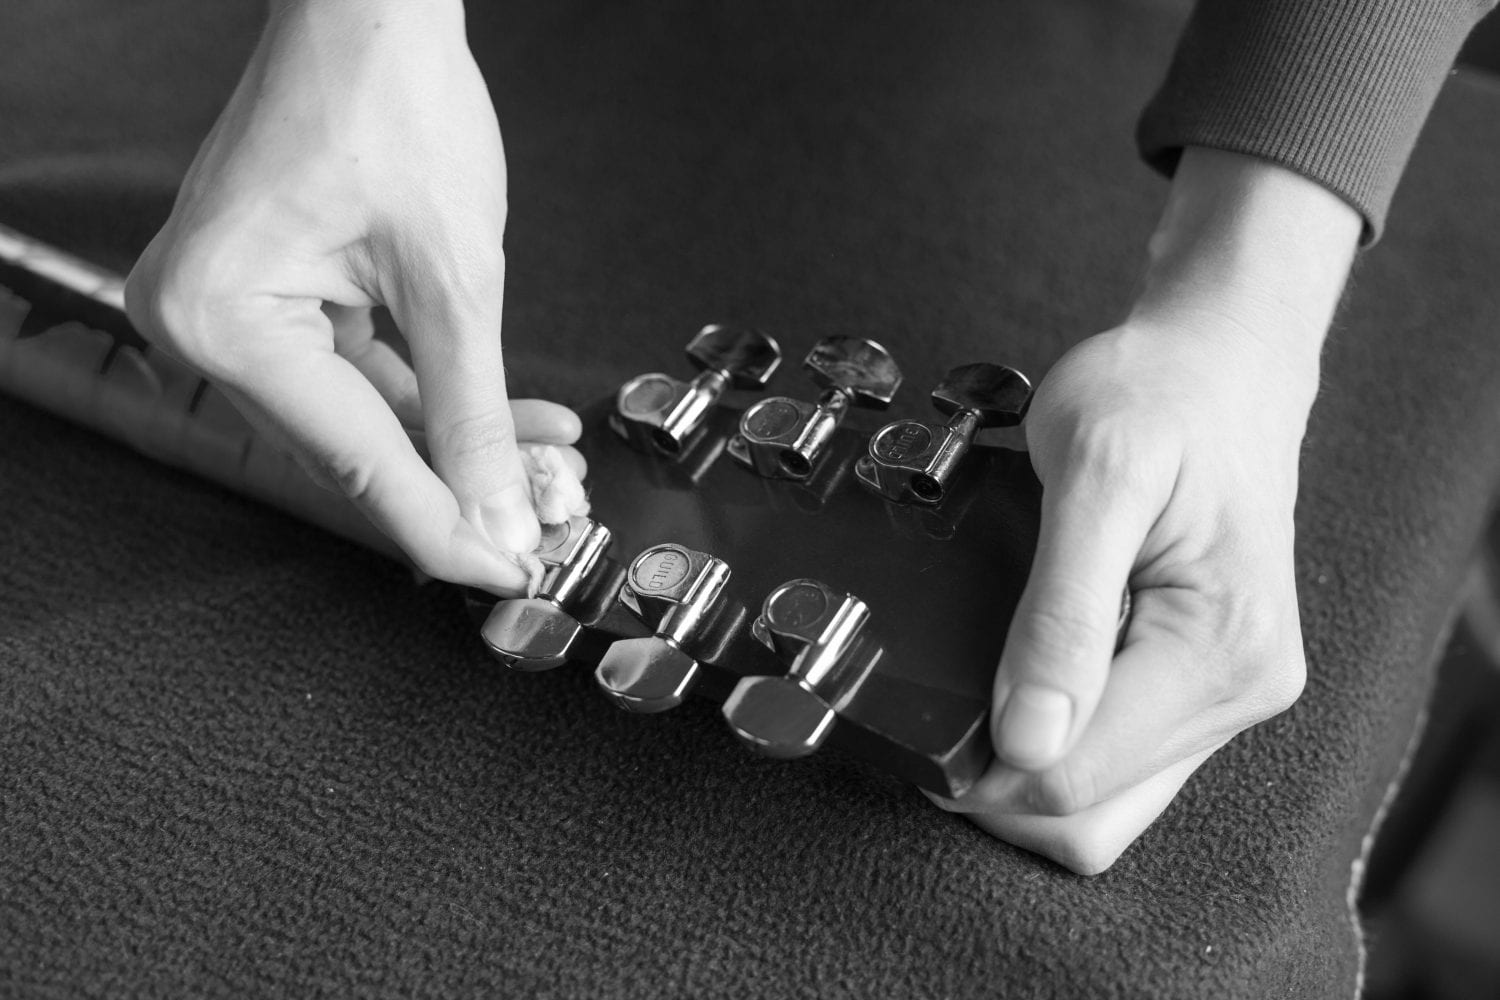
4. Carefully remove the painter’s tape.

For Finished Wood Fretboards (e.g. Maple)
1. Gently wipe down the fretboard with a clean, damp cloth.
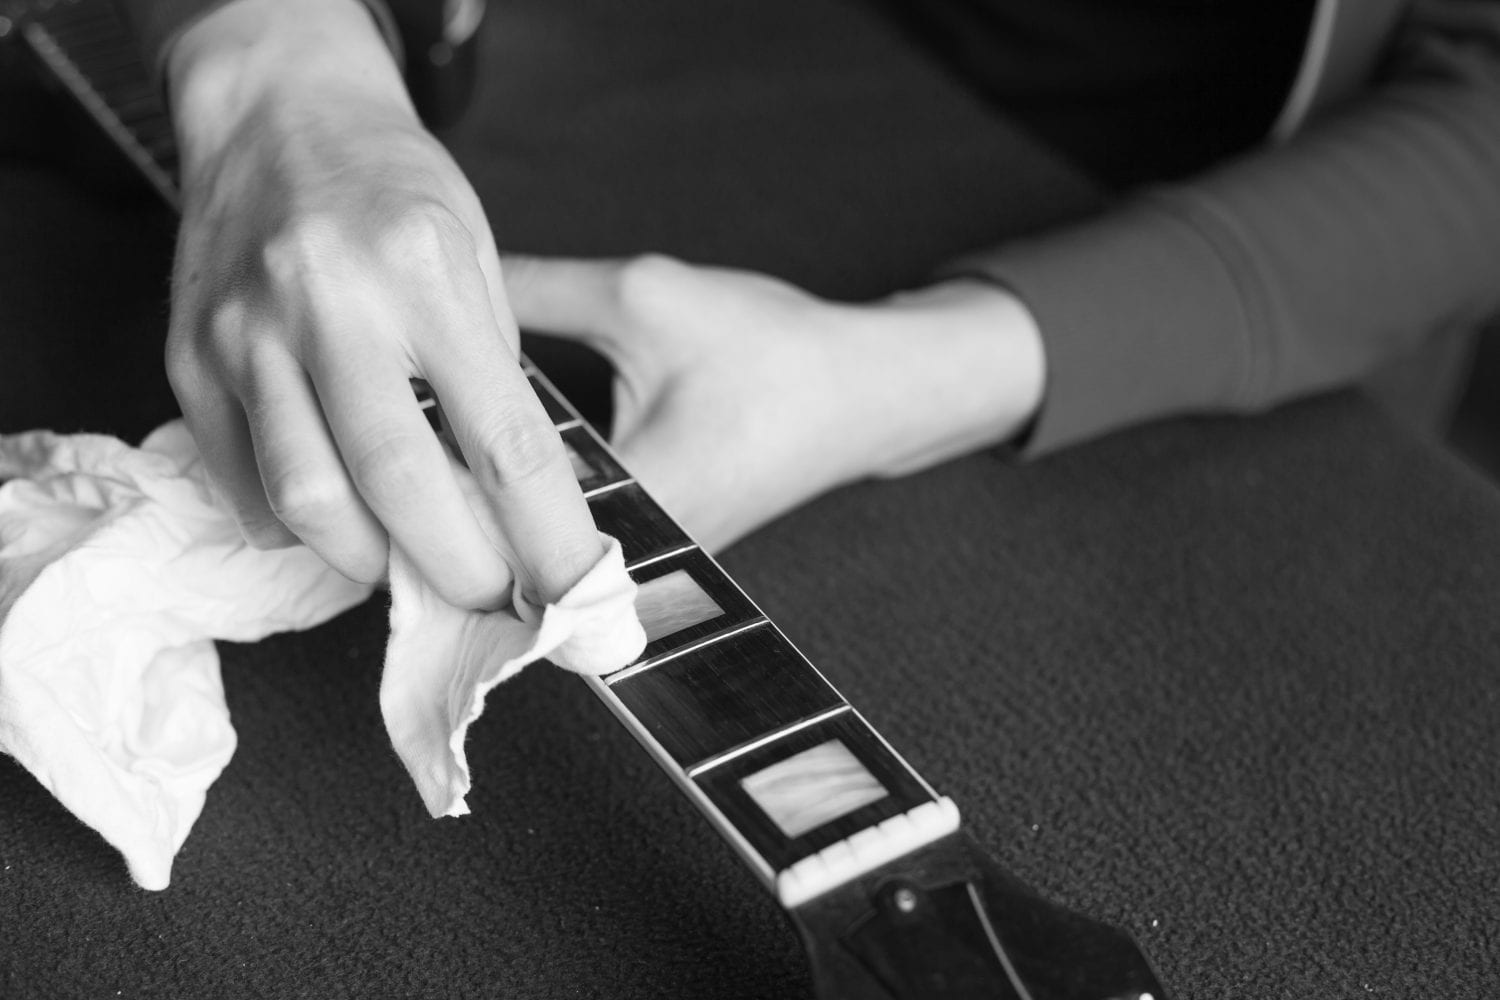
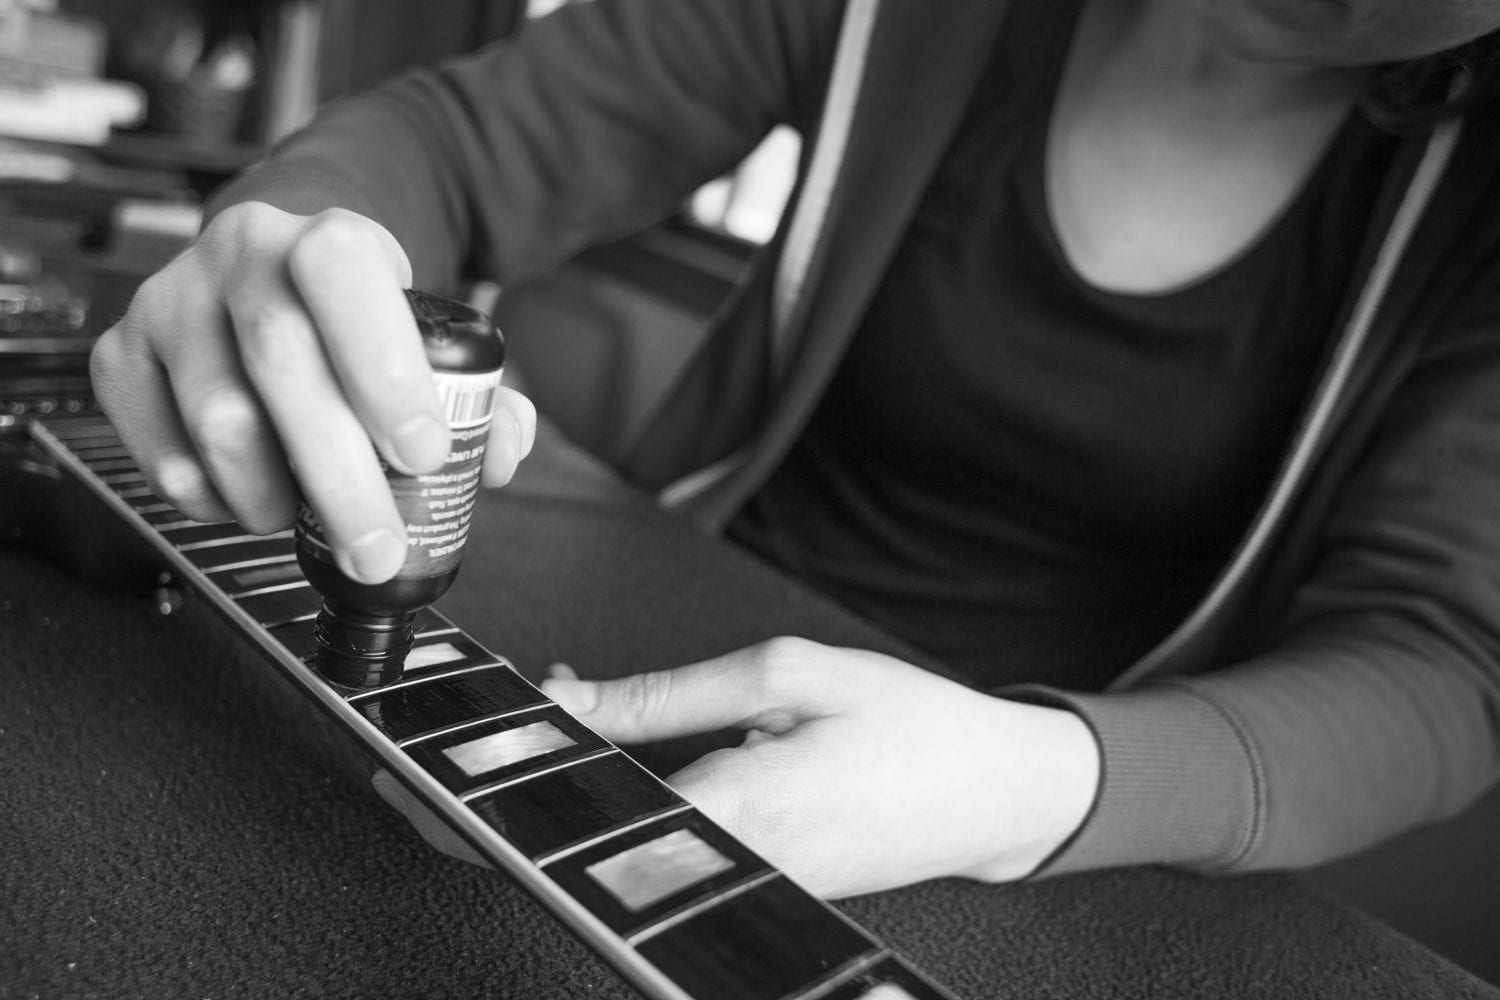
For Unfinished Wood Fretboards (e.g. Rosewood)
** These steps will make a HUGE difference in the beauty of your guitar!
1. Apply Dunlop 01 Cleaner & Prep to a dry, lint-free cloth and use it to gently clean the fretboard. You may need to do this a few times in heavily soiled areas (e.g. right around the frets).
2. Using the dry, lint-free cloth, apply Dunlop 02 Deep Conditioner to the fretboard. After applying to the entire fretboard, wipe away the excess oil with another dry end of the cloth.
If your guitar has a glossy finish:
1. Apply Dunlop Formula No. 65 Guitar Polish & Cleaner to a dry, lint-free cloth and gently wipe down the body, back of neck, and headstock of your guitar.** Tip! A little bit goes a long way! Don’t over apply as it can become difficult to remove if applied in excess.
2. Apply a small amount of carnauba wax to a dry, lint-free cloth and apply to the guitar finish in small circular motions.

3. Allow the wax to dry. This usually takes about 30 seconds.
4. Remove the wax with a dry, lint-free cloth by polishing in a circular motion.
5. Install new strings.
GLOSSARY
Octave: Many musical scales in the West use eight notes. The distance between the first and eighth note is called an octave.
This octave distance can be broken down into 12 semitones (on a guitar, each fret is one semitone.) You can hear an octave by playing the open 1st string (high E string) and then the same string at the 12th fret: that note is also an E, but an octave higher. Also: playing any note an octave higher will double it’s frequency vibration rate.
Octave Pattern: The shape created on the fretboard when you locate a note and find its closest octave on another string.
WHY LEARN OCTAVES?
– The fretboard will be less intimidating when you play or write a solo, riff or fill.
– Playing a melody in octaves creates a sonic change—the notes get thickened up. This can raise the energy in a song or solo. You can also emphasize a melody this way. Try using an effects pedal for even greater contrast.
– If you want to learn scales, knowing where the octaves are makes it much easier to learn and remember them.
– If you’re not big on scales, you can instead improvise around the notes of the chords you’re playing. The octaves can be really helpful guideposts.
– It helps you break away from just playing open chords and barre chords. It lets you easily locate smaller chords (on fewer strings). Smaller chords can open up space in a song arrangement, make for more creative guitar parts, and better complement the bass, keys, or other guitars.
THE FIVE OCTAVE PATTERNS IN C
Grab your guitar. We’re going to locate every C on the guitar with the five octave patterns. Some patterns include two C’s, others three C’s. Notice which strings are included in each pattern. Some have a two-fret distance between the C’s (use your index finger and ring finger to play them); others a three-fret distance (use your index finger and pinkie). Once we’ve played through all five patterns, they’ll repeat again in the same order until we run out of frets. Notice how all five patterns overlap each other.

Here’s a list of the more popular and general types of pedals, in the conventional order that they go in your signal chain (the order from guitar input to amp output). However, don’t let convention hold you back! And definitely don’t be afraid to experiment until you find your signature sound. Let this glossary be a reminder of what happens to your guitar signal when you turn a given pedal on.
EQ pedals shift and filter the tone (how the guitar sounds) of the incoming signal to emphasize certain frequency ranges. These pedals make your guitar sound more bassy, trebly, or mid-range.
The WAH pedal looks similar to a kick pedal, and instead of just turning on a button, you’re actually moving the foot treadle up and down. The pedal forward (more flat) makes your sound more trebly, as the pedal moves up, sound becomes brassy and thick. Back and forth gives you that ‘wah-wah’ sound (think the opening of Liz Phair’s Supernova).
COMPRESSORS even out your volume to create a smoother, thicker sound. If you test out a compressor, your guitar sound may not seem so different, but the pedal is increasing the sustain of your notes, cutting down any sharp strum sounds, and outputting everything you play at the same volume.
OVERDRIVES give you that crunchy sound like a tube amp is about to get blown out.
DISTORTION is very similar to overdrive, but with a harder crunch and more sustain. Distortion pedals vary a lot, so be sure to test yours out before purchase.
FUZZ pedals have a thick, ‘fuzzy’ effect which mirrors distortion, but without the hardness (Big Muff pedal is the classic example). This is a fun one for solos.
CHORUS pedals create a doubling effect for a rich and thick sound, used often in rhythm playing.
PHASERS are groovy and swirly like a B-3 Leslie Organ.
FLANGERS are on the more extreme side of the modulation spectrum, creating a swishing and swooping sound by speeding up and slowing down your signal.
TREMELO modulates volume (loud to soft / soft to loud / repeat) and makes your sound all spacey (think the Twin Peaks theme).
VIBRATO raises and lowers the pitch of your notes as if you were pressing the whammy bar on a guitar. Your notes can sound a little out of tune with this pedal.
Time based effects are similar to modulation, but sound more natural and less manipulative of the signal.
ECHO pedals make the guitar sound like you’re playing in a cave.
DELAY splits your guitar into two identical signals, and then holds one signal back for a bouncing, doubling, delayed effect, which can be exaggerated depending on your settings.
REVERB, ever so popular, thickens your sound as if you’re playing in a large empty room, but without the pronouncement of an echo.
Want to read more from Issue #3? Head over to shop.sheshreds-staging.jzck3hem-liquidwebsites.com and order your issue today!
Des Ark recently slayed at She Shreds’ SXSW event with Punctum Records at Studium and you can find a full interview with Argote in our November issue. Click below to follow the tabs while learning tricks and special instructions from the lesson above!
Thankfully we have Los Angeles-based rockers Deap Vally here to coach us through even the most trying moments. Since the duo comprised of guitarist/vocalist Lindsey Troy and Julie Edwards, emerged out of Los Angeles with their breakout album Sistrionix in 2013, they have played many, many festivals, including Glastonbury, Reading, and Bonnaroo and as a result have much advice to share with the rest of us. If you’re even thinking about playing a festival at some point you would be wise to check their list of “Festival Dos and Don’ts for Musicians.”
Deap Vally kicks off the She Shreds x Punctum Records Party at Studium on March 17, and we hear that soon after SXSW 2016 is over they will be releasing the details of their highly anticipated sophomore LP, which was produced by Nick Zimmer of the Yeah Yeah Yeahs.
Deap Vally’s Festival Dos and Don’ts, by Julie the drummer:
When I was a late teen I decided festivals were “fest-evil.” I swear. You can read my diary from 1997 stating as much. I had gone to the V Festival in England by myself. Green Day and The Verve headlined. There was a sponsored tea tent. There was a large expanse of soggy grass. There were people. There was complicated public transport. I was a grouch about it. Which brings me to my first Do and Don’t:
DO make new friends, be open to people.
DON’T go without friends if you’re just going to be a negative nancy.
Have you ever been pulling your stage costume on and suddenly you hear your band being announced with much fanfare, followed by an awkward lag during which you struggle to finish dressing and hurry to the stage? Deap Vally has.
DON’T be prematurely announced.
DO wear stage clothing that changes quickly.
Things are already going good because you’re in Denmark, and they only get better if you’re lucky enough to be at the Northside Festival, which by the way has the hygge-est (that means something approximating ‘cozy’ in Danish) artist areas at any festival. Then things get crazy good when you find out Portishead is about to play. No one else chilling in the perfectly amenable backstage area is motivated to go out into the crowd and kneel before the effortless gods of trip hop with you, so you just go out there by yourself and relive some of your best moments of 1998 and even cry a little because they are just so damn good. SO. DAMN. GOOD.
DON’T wait for consensus among your group.
DO go by yourself to see the bands you love.
One time Lindsey and I were kicking around Hurricane Fest in Germany with the guys from Kasabian, who were headlining one of the stages. We all decided we wanted to be side stage for Beck or something (don’t quote me on that– the memory is foggy and morphing as I type). We all headed confidently up the temporary metal stairway to the first platform backstage and were abruptly stopped by a security guard who told us we didn’t have the clearance to be there. Kasabian explained that they were Kasabian, a headlining artist at the festival. The security guard didn’t give a fuck. We were all turned away, and totally turned off, so these last Dos-Don’ts are for all the security guards out there:
DO familiarize yourself with the headliners of the festival. In all likelihood they are selling the most tickets to the event and therefore providing you with an income opportunity that weekend, regardless of what your credentials cheat sheet says.
DON’T ever let Deap Vally side stage no matter what. They are a security risk.
Get a little taste of Deap Vally’s upcoming album with their single, “Royal Jelly”
The Way is She Shreds’ new monthly series that investigates multi-faceted approaches to learning and playing guitar, by showcasing artists from varying backgrounds who will share their tips, tricks, and teach us to play their original songs the only way they know how.
In our first episode, L.A. based guitarist/singer/songwriter Holly Miranda teaches us how to play “Everlasting” from her self-titled album on Dangerbird Records.
Check out the recorded version for reference:
She or he may use four microphones on a single guitar amp, but ultimately those four tracks will be mixed together so the listener hears one recorded sound.
Whether you’re brand new to mixing or have hundreds of albums under your belt, there are several things all mixers should keep in mind:
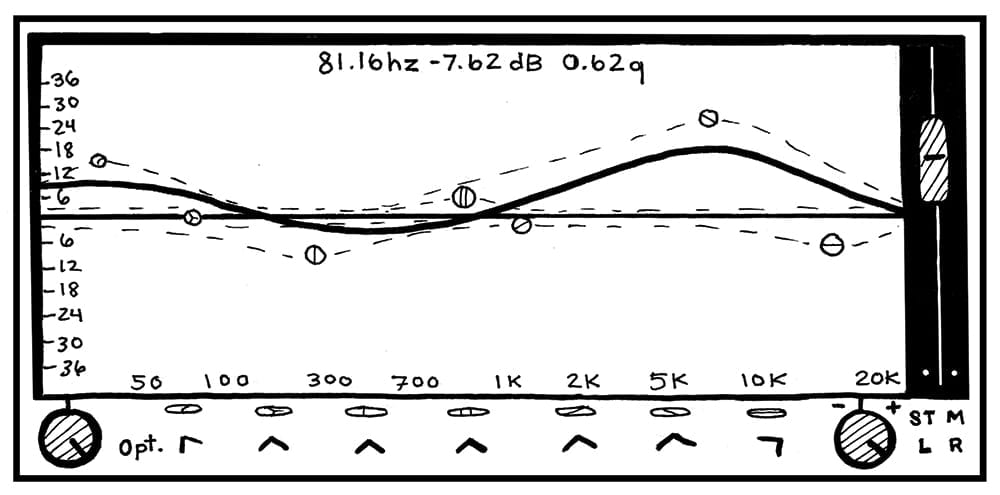
Sound is made up of many different frequencies which is measured in hertz (hZ). The range of human hearing spans from 20 hZ (almost inaudibly low) to 20,000 hZ (almost inaudibly high). Equalization, called EQ for short, is the process of balancing these frequencies within your recorded signal. Many EQ plugins are presented with the range of frequencies on the X-axis and gain on the Y-axis. Subtractive EQ means lowering or removing frequencies from a recorded signal. If your guitar signal has too much high end hiss, scoop out some of the high end (often between 10,000 and 12,000 hertz) to get rid of it. Additive EQ means increasing frequencies within a recorded signal. If your kick drum sounds too thin, boost the low end (around 100 hertz) to give it a deeper tone.
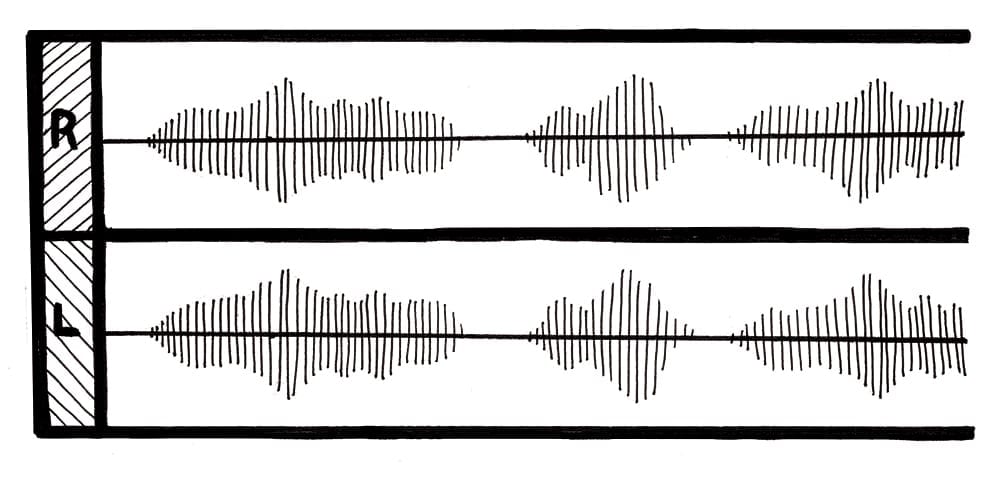
Panning is the spread of a sound within the stereo field. A mono audio track means it consists of one channel and was recorded with one microphone. If you pan a mono track entirely to the left, you’ll hear it in your left headphone only. If you pan a mono track entirely to the right, you’ll hear it in your right headphone only. A stereo audio track has two channels panned fully left and right. Panning can add clarity to mixes by allowing each instrument to be heard more concisely and helping to create a wider stereo image. Some engineers pan the parts of a drum kit from the drummers’ perspective, meaning the snare and rack tom are panned slightly to the left and the floor tom is panned roughly halfway to the right.
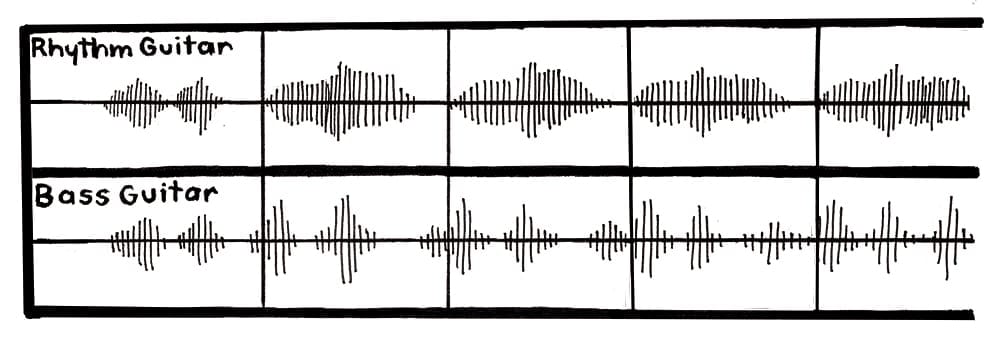
Compression is the process of decreasing the dynamic range between the loudest and softest parts of your tracks. In a nutshell, compression boosts the quieter signals and attenuates the louder signals. Compressors come in several different varieties but all have a few common denominators. The threshold of a compressor decides how loud a signal needs to be before compression is applied. If the threshold is high, the signal will need to be loud for the compressor to activate. The ratio of a compressor lets you choose how much compression is applied to your track. The attack of a compressor decides how quickly the compressor will work once it has been activated and the release will determine when the compressor stops working after the signal has dipped below the threshold. Keep in mind compressing the dynamic range is not synonymous with making a track quieter. Many compressors allow you to add makeup gain for what may have lost while lessening the dynamic range.
After you mix a song, listen back in as many different places as possible – on headphones, speakers, your laptop or in your car for starters. These are just a few basic mixing tools but they can take your tracks a long way. There is no right or wrong way to mix tracks which means the process can be simultaneously daunting and liberating. Practice often and you’ll naturally hone your ears to what sounds best for your project.
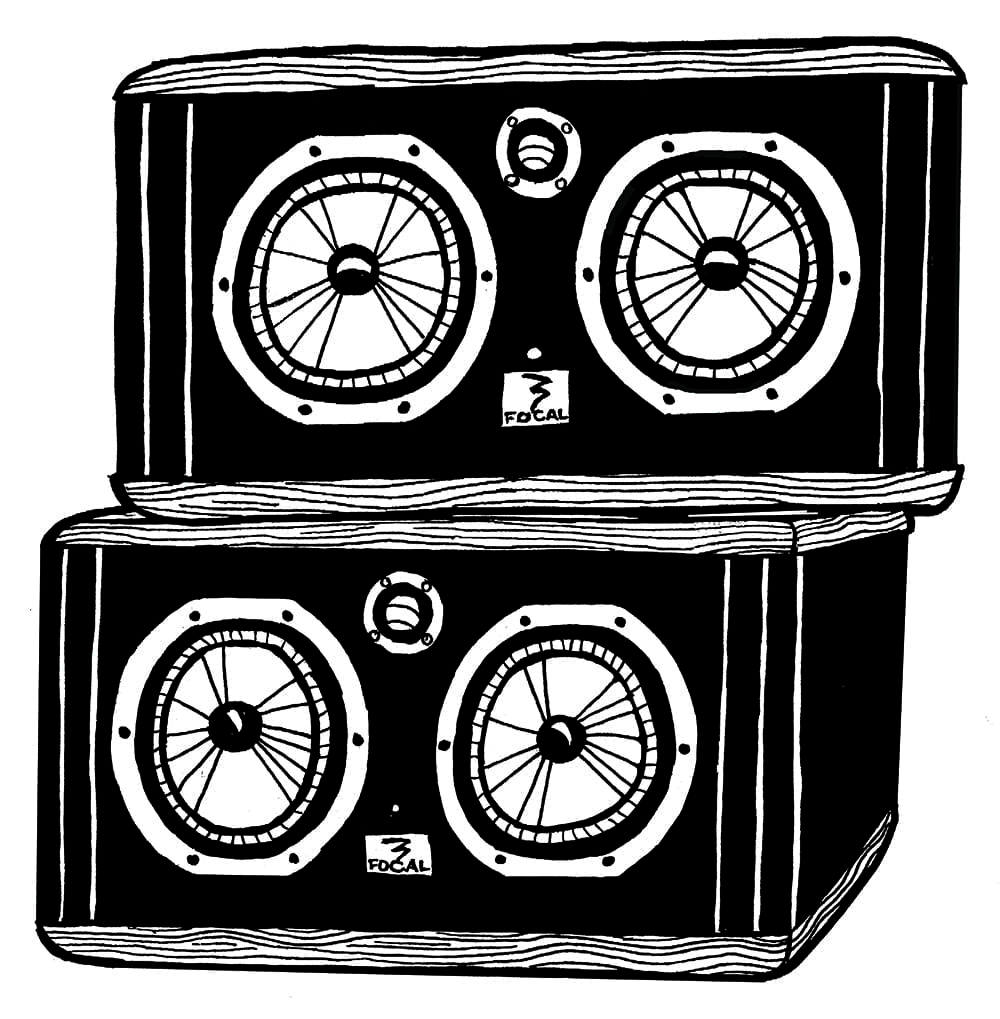
Speakers come a variety of shapes and sizes. Some are small enough to fit in your cell phone and others are powerful enough to fill an arena with sound. Consider the electric signal of a recorded sound to be a snapshot of what that sound looks like. The purpose of the speaker is to make that picture much larger without negatively affecting the quality of the image.
In order to translate an electrical signal into an audible sound, speakers contain an internal electromagnet – a metal coil that generates a magnetic field when current flows through it. This electromagnet sits in front of a permanently placed magnet. As signal passes through the coils of the electromagnet, the direction of the magnetic field changes rapidly allowing it to move towards and away from the magnet, causing vibrations. A cone made of thin material, often paper or plastic, attached to the electromagnet amplifies these vibrations and pumps sound waves into the air for you to hear. The frequency of these vibrations determines the pitch of the sound. If you listen back at a loud enough level, you will be able to see and feel the cone of the speaker moving back and forth.
All speakers, regardless of size, make or model, fall into one of two categories: active and passive. Active speakers contain a built-in amplifier. They are often more expensive than passive speakers, which require a separate external power amplifier. Power amplifiers connect to speakers by speaker cable, which can handle more signal than a standard 1/4” instrument cable.
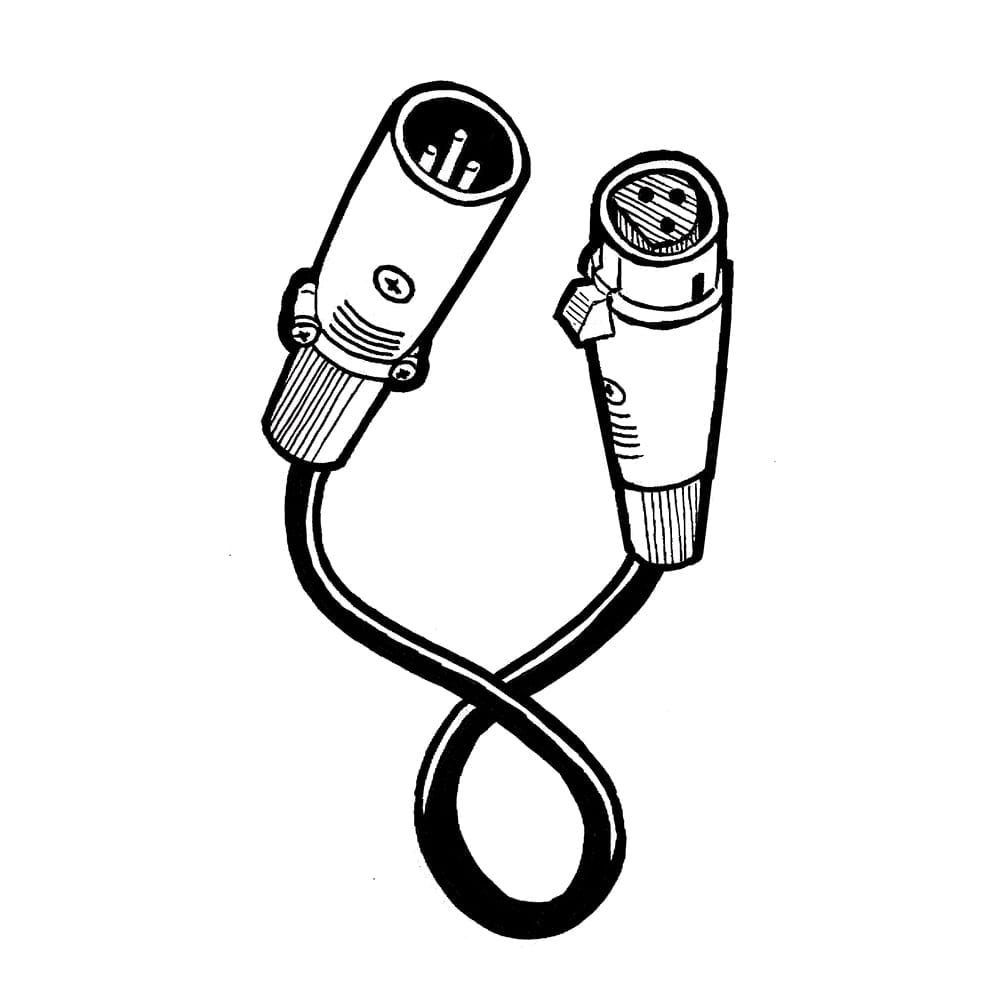 XLR Cables
There are a few basic cables commonly used in the studio. Balanced three-pin XLR cables, also known as mic cables, are most often used to connect a microphone to a recording input. These three pins correspond to the three wires within the cable: a positive leg and a negative leg, which carry the same signal in opposite phases to one another, and the shield, which protects the audio signal from external noise and interference.
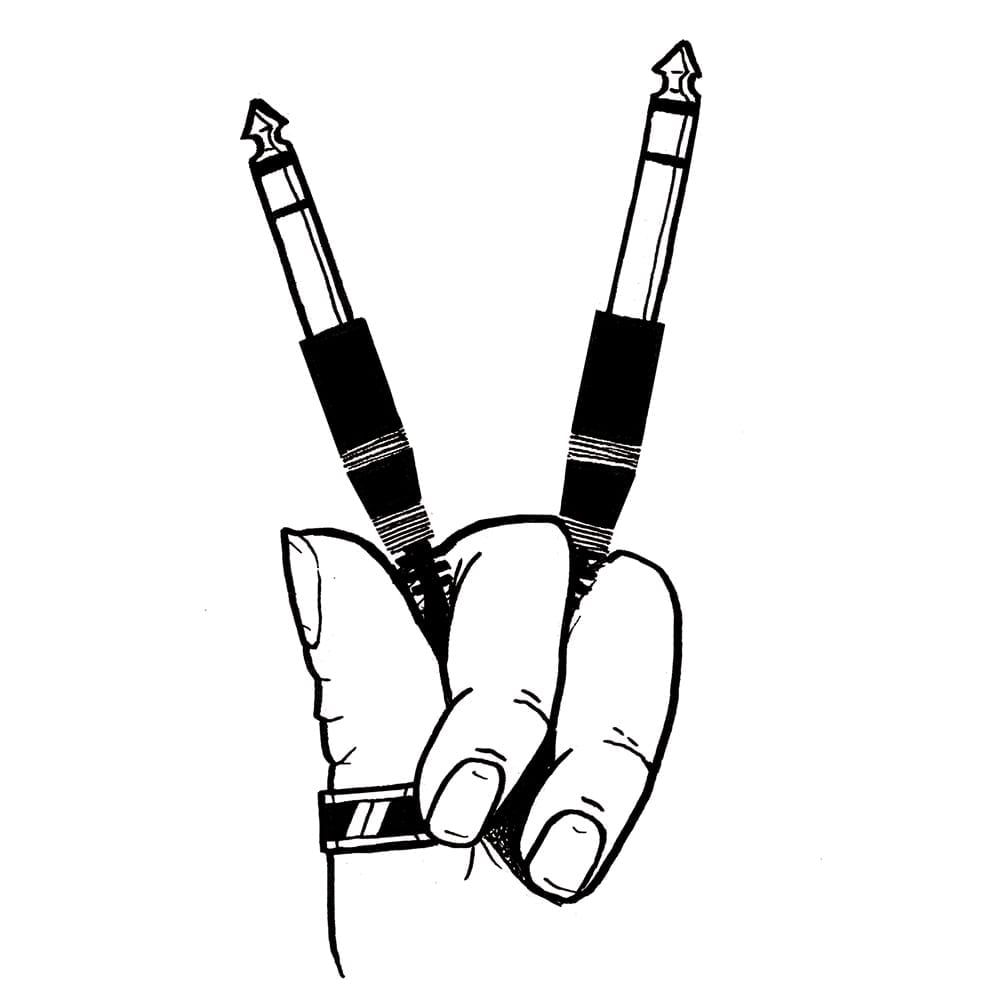
There are two different kinds of 1/4” cables. Tip/Sleeve (“TS”) cables have two internal wires: one inductor carrying the signal and one acting as a shield. This is considered unbalanced. You can identify this by looking at the end of cable to see that there is one ring around the connector. These cables are often used to connect a guitar or bass to an amp. Tip/Ring/Sleeve (“TRS”) cables have two conductors carrying signal plus a shield. This means they’re considered balanced and have two rings around the shaft of the connector
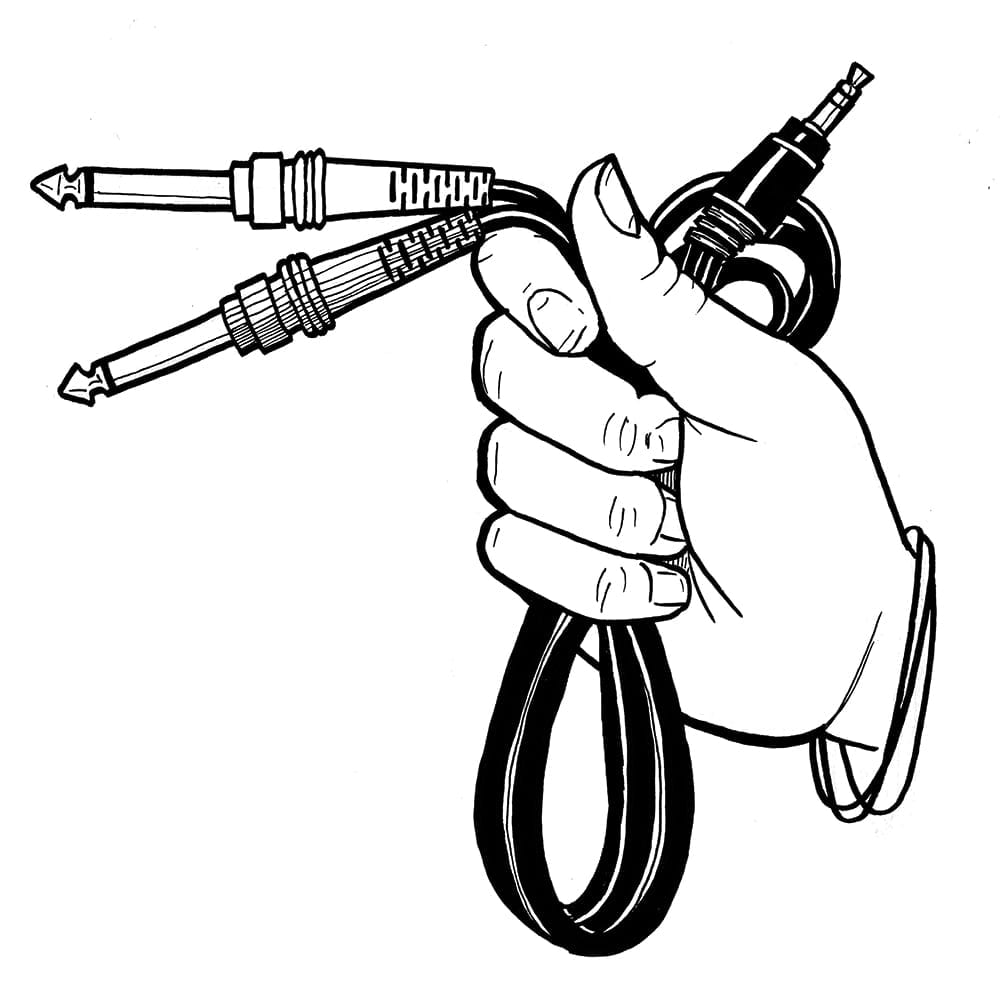
There are several combinations of connectors and adapters that can be used to hear your sounds through various devices. Use a mono 1/8” to stereo 1/4” cable to connect your phone or iPod directly into speakers or an amplifier. RCA to 1/4” cables allow you to connect the RCA outputs of a record player to speakers that may not have RCA inputs. Every speakers is different, so take a look and figure out what kind of inputs and outputs your equipment has. You’ll likely be able to find any kind of connection cable at your local music store.