
Lesson: Practical Strumming Tips with Tone in Mind
If your tone isn’t quite right, it could be a result of how you hold your pick and/or strum. We’ve laid out some practical strumming tips that could help!
When first learning how to play the guitar, you might want to learn your favorite songs. Maybe you’ve learned the strumming patterns for those tunes but are still puzzled about why they don’t quite sound like the recordings. Or maybe your original songs are lacking clarity in the chords and you’re not sure why. Here are some practical strumming tips to get the best sound!
Know How To Hold ‘Em

The way you hold your pick can make a significant difference in your tone. Hold it too loosely and you lack control while also tending to hear the sound of the pick hitting the strings as much as the actual notes themselves. Hold it too tightly (as most people tend to do) and the sound ends up being harsh and buzzy while building up unnecessary tension in your strumming hand. Experiment with how you grip your pick, and try to find the happy medium between too loose and too tight—let your ears be your guide.
The angle of how you hold the pick makes a difference in tone:
- Act like you’re about to shake someone’s hand with your strumming hand.
- Then, gently curl your fingers in, holding the pick between your thumb and index fingers. The thumb should be relaxed, not bent. There is a tendency amongst some guitarists to bend the thumb knuckle, but this builds tension. Try bending that knuckle without a pick in your hand, and notice how certain hand muscles engage.
- Now straighten your thumb. Feel those muscles relax. The more one relaxes, the better your technique and tone will be.
- Lastly, try not to have too much of the pick sticking out from the thumb and index finger. A general guideline would be to show about a third of it. You’ll find you have more control over your picking if you don’t show a lot of the pick.
Remember: these are only suggestions. Try and see if they work for you. Your goal is to create a good tone in a relaxed fashion.
Practical Strumming Tips
Be Clear
If all of the notes in your chords are not clear, it will show in your strumming sound. Achieving clear-sounding chords can be a challenge, but it’s easy once you get the hang of it.
Start by plucking each note in the chord individually. Is each note clear? If not, find out why. Usually, there are a handful of possible reasons that this could be happening:
- You are not pressing down hard enough to achieve a clear tone.
- Your finger is not right before the fret. This varies from guitar to guitar, but let’s say that you want to play the 2nd fret of the A string, and your finger is actually closer to the 1st fret—you may hear an unpleasant buzz. Just move right before the 2nd fret, and you’ll find this slight shift will create a much nicer tone!
- Your fingers are not arched enough. If the fingers of your fretting hand are not bent properly, they tend to lean against the adjacent strings, muting them. A classic example is the D major chord in the open position. People have a tendency to not bend the ring finger on the B string enough, and then their high E string does not ring out clearly.
Don’t Play All The Strings At Once
Look at some of your favorite guitarists when they are strumming. You may notice that they rarely hit all of the strings at once, unless they are going for that specific sound. It’s more common for them to be strumming parts of the chord, creating a more nuanced sound than if they were strumming all the strings simultaneously. The style of singer/songwriter Patty Griffin, a great rhythm guitarist with a killer strumming/picking hand, is an example of what you can create with relatively simple chord changes coupled with skilled strumming. Of course, the practice of strumming limited strings can be applied to any style of music.
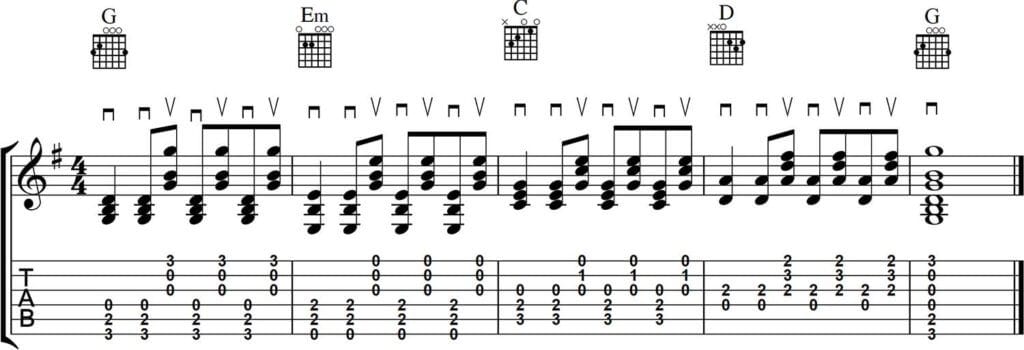
To develop this on your own, start with a simple chord progression. Let’s take the progression of G-Emin-C-D and play each for one measure (or four counts.) Try this strum pattern:
1 2-and 3-and 4-and.
Play downstrokes on the downbeats (1, 2, 3, and 4). Play upstrokes on the upbeats (each “and”). The strum would be: Down, Down-Up, Down-Up, Down-Up.
Direction Matters (The Downstroke vs The Upstroke)
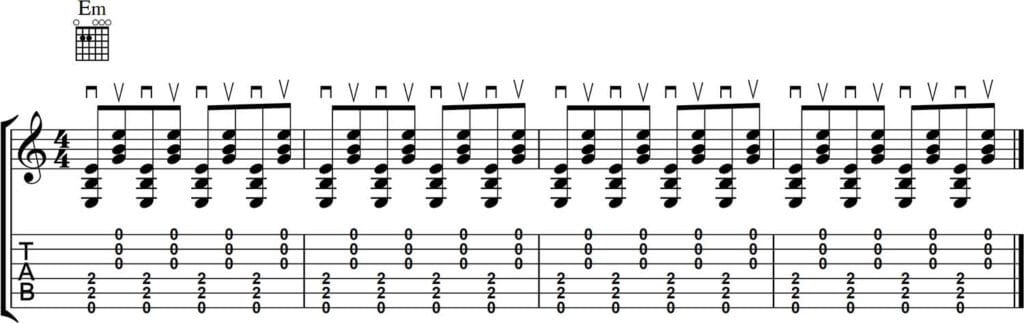
It’s important to remember that a downstroke has a different rhythmic emphasis than an upstroke. Not having this awareness can make your strumming lack fluidity. In general, downstrokes tend to be played on stronger beats (like the downbeats), while upstrokes tend to have weaker emphasis and are usually played on the upbeats. (See Example Two.)
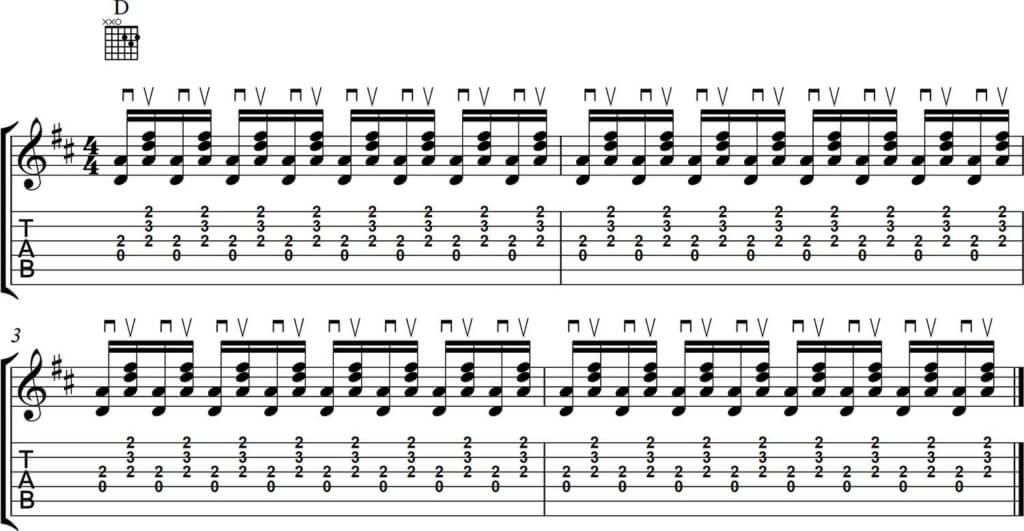
If you are playing a rhythm with a 16th note feel, the 1st and 3rd parts of the beat receive downstrokes, while the 2nd and 4th parts of the beat get upstrokes. (See Example Three.) Of course, there are exceptions to this, but thinking about strumming in these terms is a good starting point.
Being a great rhythm guitarist takes time and practice. Hopefully, these practical strumming tips will help you build a solid foundation as you develop your sound.
Happy strumming!

More posts
-
 By: Cynthia Schemmer
 -
Powered By: Fender
-
By: Cynthia Schemmer
-
By: Cynthia Schemmer
-
By: Leila Sidi
-
By: Leila Sidi
-
Powered By: Reverb
-
Powered By: Marshall Amps
-
Powered By: Positive Grid
-
By: She Shreds


Comments
I have been attending guitar lessons since childhood, for my family is quite a believer. I used to play there constantly and spend quite a lot of time, but since my studies at the university are pretty intense, I completely miss this time. But thanks to https://studyhippo.com/essays-on/the-great-gatsby/, this has changed and I can again get good grades while visiting my favorite places.
Comment by Roy Haines on June 26, 2020 at 12:32 amI personally like your article and thumbs up to you for sharing such a defined knowledge. Thank you.
Comment by Jenifer Benz on August 4, 2020 at 5:37 amthis is very cool, thanks for this information, you are like a https://en.wikipedia.org/wiki/Main_Page#
Comment by santymant37 on January 25, 2021 at 1:39 amGreat article and brilliant detailed tips – much appreciated.
Comment by Promo Codes on May 31, 2021 at 9:51 amI have been attending guitar lessons since childhood, for my family მაცივრის ხელოსანი is quite a believer. I used to play there constantly and spend quite a lot of time, but since my studies at the university are pretty intense, I completely miss this time.
Comment by Macivris xelosani on August 5, 2021 at 10:37 pmYou’ll increase your tone on the guitar if you practice and master these guitar strumming techniques. Strumming will become a lot more natural after that. Different guitar strumming techniques take time to master, so let’s get started right away! I found it with students ref of pay someone to take my online class, because of big opportunity in market
Comment by Rhett on December 16, 2021 at 7:46 amYou’ll increase your tone on the guitar if you practice and master these guitar strumming techniques. Strumming will become a lot more natural after that. Different guitar strumming techniques take time to master, so let’s get started right away! I found it with students ref of pro online class help, because of big opportunity in market
Comment by Rhett on December 16, 2021 at 7:47 amYou’ll increase your tone on the guitar if you practice and master these guitar strumming techniques. Strumming will become a lot more natural after that. Different guitar strumming techniques take time to master, so let’s get started right away! I found it with students ref of pro online class help, because of big opportunity in market
Comment by Josheph on December 16, 2021 at 7:48 amI have read the article. Everything was represented in a pretty good way. Regularly visit your site to collect some new information from your topic.
Comment by Polina Import on December 23, 2021 at 4:05 amThanks for sharing this Fantastic! blog. online shopping site reviewsv
Comment by Bellawillson on June 23, 2022 at 3:34 amYes, I’ve mostly preferred to shop online and save more overall your all the blogs are great. Thanks for Share online shopping site list
Comment by sophia on June 24, 2022 at 2:32 amThank you for sharing this information with us. What you’ve posted on your blog is fantastic. You’ve made a really informative and interesting blog post available to the general public.
Comment by Bellawillson on June 27, 2022 at 9:35 pmHiTechStore.com
That is Great
Comment by JackE on September 22, 2023 at 9:08 amI am free because I understand that I am solely ethically responsible for whatever I do. I am free, regardless of the restrictions that surround me. If I find them agreeable, I endure them; if they are too bothersome papa’s pizzeria, I destroy them. I am free because I understand that I am solely ethically responsible for whatever I do.
Comment by Joasnu on January 16, 2024 at 7:47 am