The case can be made that loopers are perhaps the greatest unsung hero of any musician’s personal toolkit and rehearsal routine. They allow soloists to endlessly experiment with improvisational ideas without fatiguing their bandmates’ patience, they allow songwriters to test how different parts of a song will eventually fit together as a whole, and they can even be manipulated into creating new pieces of music that would otherwise not be possible.
Despite all of these personal uses, loopers often hide in plain sight and remain unused on pedalboards, lurking just beneath the surface of the beautiful melodies, soaring solos, and fancy showmanship that accompany a stirring live performance.
Loopers can be as simple or as complicated as one chooses to make them and, hopefully, by understanding and re-examining their applications, we can all gain a new appreciation for their functionality in a variety of different situations. To do this effectively, let’s first strip away any preconceived notions and survey the most basic purpose and procedures of loopers.
Looper pedals allow musicians to record a line that is instantly played back on repeat, providing a backing track to record another line over. At their core, loopers offer musicians a way to record and playback music in real time, often with little to no alteration to an existing amplification setup. With the prevalence of pedalboard-friendly loopers, anyone can now simply add a stompbox to their rig that serves the same purpose a tape machine, stereo, or full fledged recording studio did before digital music technology was readily accessible.
We can take these looper recordings and immediately begin building layers on top of them—a process known as overdubbing. Overdubbing can be a way to recreate familiar elements of a song during personal practice, or even a way to explore new sonic territory. (Think of overdubbing a low bass line and quick-muted chop of the strings over a pre-existing rhythm guitar part to mimic a bassist and drummer, or creating tension by layering uncommon harmonic tonal centers or rhythmic figures over each other.)

If we expand on the idea of using loopers as a means of regulating and streamlining personal rehearsal time, it’s not surprising that many artists commonly find these pedals to be the most useful, including Elizabeth Cannon of rock band Elizabeth II. Based out of Washington, DC, Cannon blends nostalgia, thunderous vocals, and bluesy guitar riffs—often times using a looper during practice to work on her improvisation skills.

“I’ll loop different chord progressions and try out different licks I’ve learned in the context of those progressions,” says Cannon. “After I feel comfortable in a progression, I’ll try and improvise with the same set of licks in a different key, so my hands can get used to doing them all over the neck.”
Reliable looper application in a performance setting can be a bit more nuanced, but these “Live Hacks” are meant to help improve your overall stage performance instead of just a specific song:
Hack #1 – Banks
If your looper pedal has onboard memory which allows you to save and recall loops, you can pre-program intros or ambient soundscapes to use onstage as transitions between songs.
Hack #2 – FX
If your looper has onboard effects like playback speed and reverse, you can integrate these effects into a live show to establish beats, rhythms, and grooves that could not be performed otherwise. For instance, you can begin recording the final progression of a song with a looper, but instead of playing it back normally, immediately play it back with gradually decreasing tempo and volume to execute the ever-elusive “live fade.”
Hack #3 – Soundcheck
Admittedly, this hack isn’t so much about changing your onstage performance as it is about helping you find the right gear to use onstage. You can bring a looper pedal along while shopping for an amp or guitar to really listen to what an audience member will hear out of your potential new purchase. Loop yourself playing a variety of common styles and textures and then step back to most effectively evaluate how well that equipment handles your individual playing style. If your looper has banks, you can save loops featuring guitars with different pickup configurations and scale lengths, then easily toggle between them to hear how everything interacts as it fills the room.
Hack #4 – Click It
The best way to improve your onstage use of a looper is to extensively practice the required footwork at home. “The biggest advice that I have for musicians just beginning to use loopers is to use a metronome at first when practicing with one,” says Cannon. “It’s a great way to develop your innate sense of timing to ensure loops always sync with each other. It’s a bit tedious at first, but the more you work with it, the more you’ll passively think about it and your looping abilities will feel more natural.”

Although all loopers essentially offer the same service (record, playback, overdub) regardless of manufacturer, the most practical application of each model depends on the included features.
The Digitech JamMan Express XT, Hotone Skyline Wally+, and original or mini TC Electronic Ditto are among the most affordable loopers on the market. Their single-footswitch construction and reasonable sizes make immediate exploration easy without a steep learning curve.
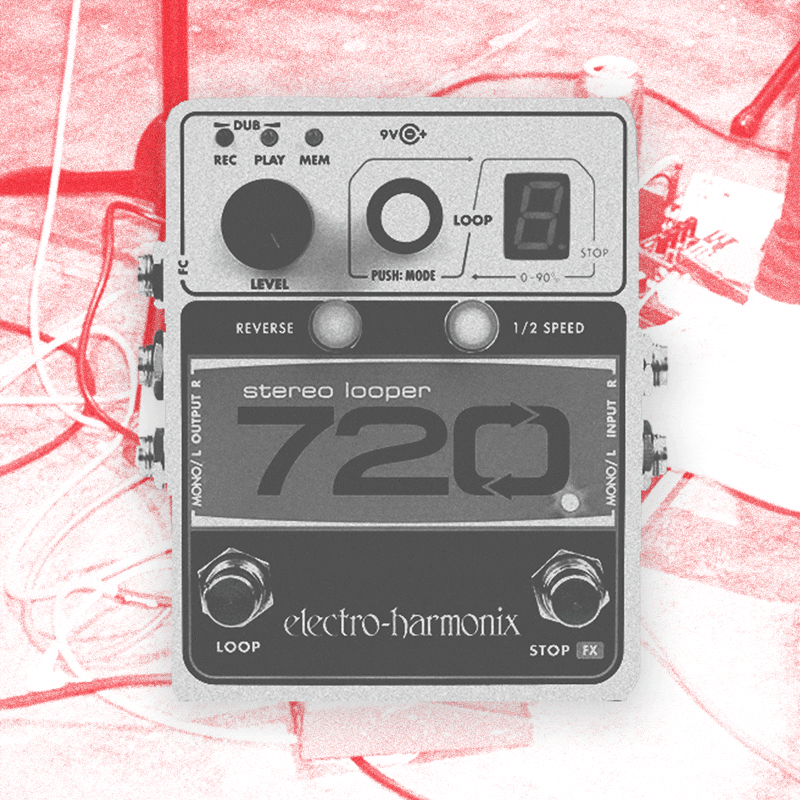
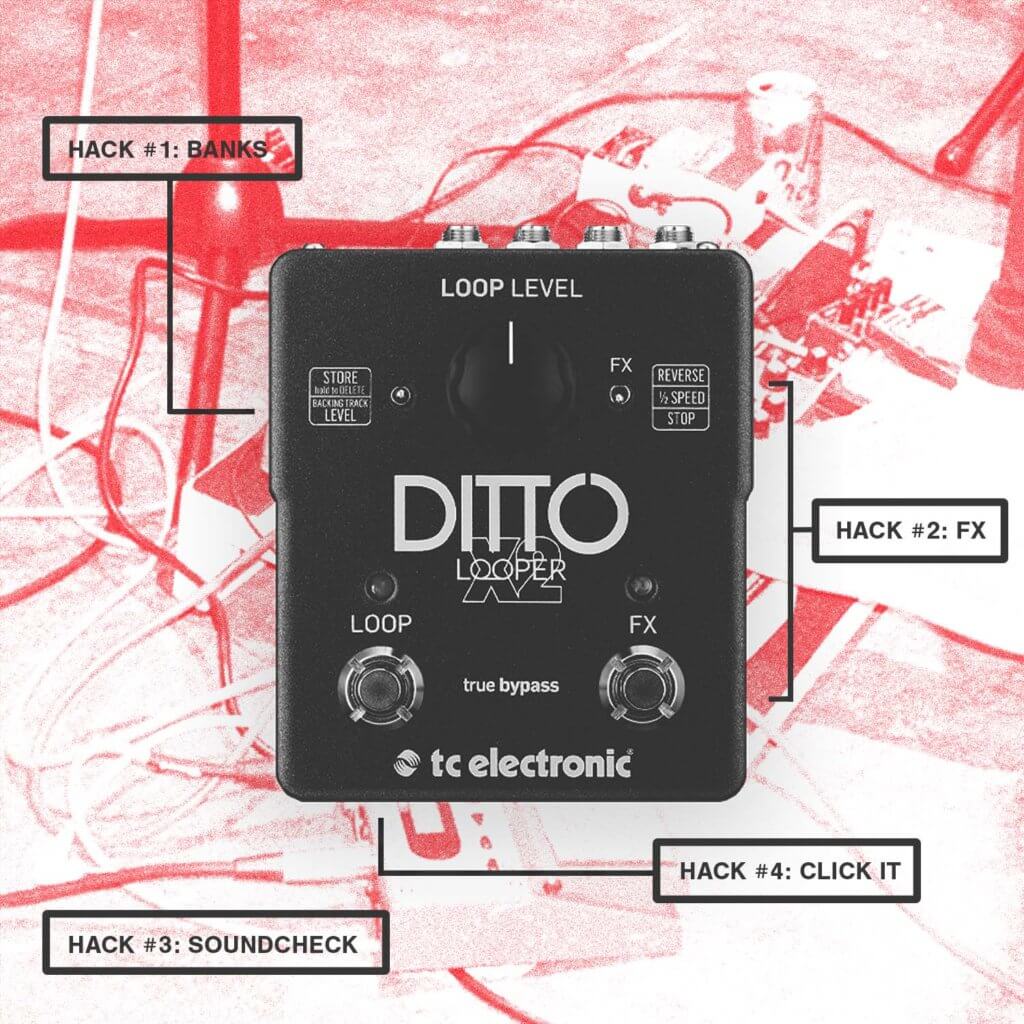
Conversely, models like the Electro-Harmonix 720, TC Electronic Ditto X2, and even the Line 6 multi-fx M9 are generally more suitable for live use because of their storage capabilities and multiple footswitches with dedicated ‘stop’ or ‘undo’ functions.
It should also be noted that if you currently use one of the digital delay offerings from brands like Boss, TC Electronic, or Electro-Harmonix, you might already have a looper at your disposal! As Cannon described, “the pedal that got me into loopers was my Boss DD-8 Digital Delay pedal that had a looper imbedded in it.” Most digital delays that are loaded with variable modes are likely to have a loop mode, which offers around 60 seconds of available loop time. These multi-function delay pedals don’t require an upfront investment in a dedicated looper, but they might just be the invitation down the looping rabbit hole that you need!.
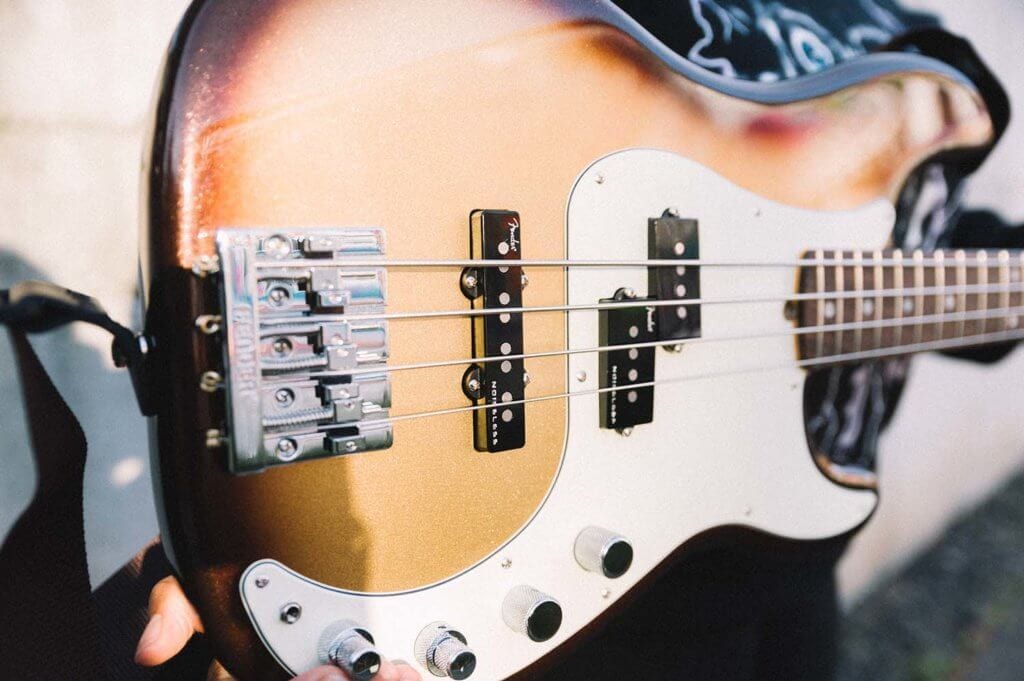
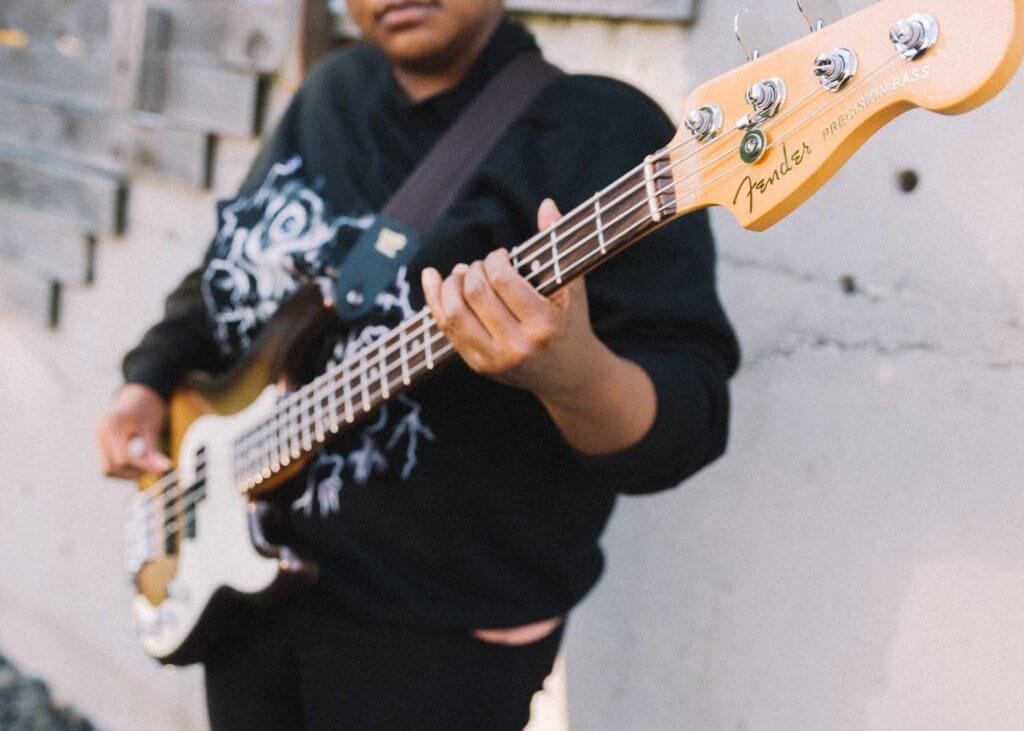
This past November, Fender released their brand new American Ultra Series, which reimagines their original classics in contemporary and advanced designs. Fender managed to make their iconic brand even better by debuting the even slimmer “Modern D” neck curvature, new color options, noiseless pickups, and medium-sized frets. With this heightened precision, performance, and tone to inspire creativity, the American Ultra Precision Bass is a solid choice to start saving for once those holiday dollars roll in.
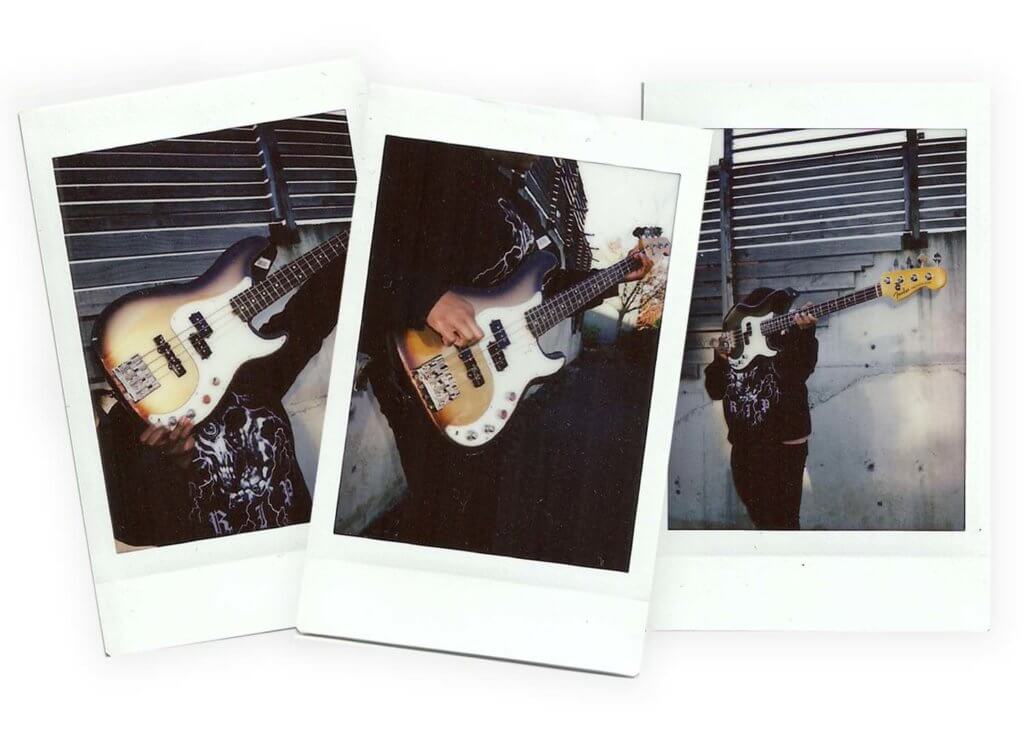
Opening the Elite Molded Hardshell Case that the American Ultra Precision Bass comes in, the gorgeous “Mocha Burst” bass still retained its newly manufactured smell and was aching to be played. At first sight, the American Ultra’s vintage style really stood out from those shock value basses in the shapes of lightning bolts or flying V’s. It retains a classic, old-school look with contemporary flare.
Opting to teach myself a simple song (Joan Jett’s “I Love Rock ‘n’ Roll”) and plugging into my studio apartment-sized amp, that familiar feeling of adrenaline took over. It was difficult not to imagine myself performing for a sold out crowd—or more realistically, to my friend through FaceTime. With Fender’s new “Modern D” neck shape, which is a slimmer neck with ultra rolled edges, a 10”-14” compound radius, and a tapered neck heel that allows easy access to the higher frets, the American Ultra Precision Bass is a hell of a lot easier to practice or gig with. It was comfortable to play for hours without getting tired because of the delicately contoured backside—it seemed to hug my body.
The American Ultra Precision Bass’s chrome, top-loaded 4-Saddle HiMass bridge (which Fender debuted in 2013) leaves just enough sustain without altering your tone too much. Imagine a person walking by wearing perfume: their scent remains in the air, but it’s not too strong or too light—the subtle sustain the HiMass bridge produces gradually and pleasantly fades away.
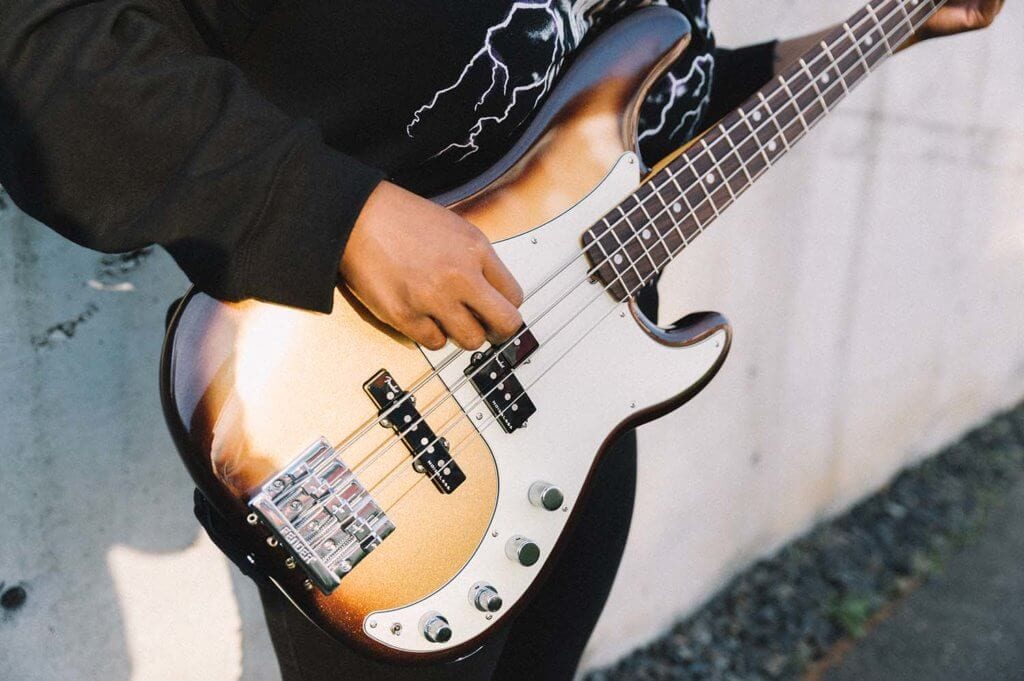
Both the bridge and middle pickups feature Fender’s Ultra Noiseless pickups—one Noiseless Vintage split-coil P Bass middle pickup and one Noiseless Vintage single-coil Jazz Bass bridge pickup—which eliminate any unfortunate bass hum. It was as if I was somehow playing a blank canvas, begging for distortion pedals.
A Fender guitar or bass has the ability to become that ol’ reliable instrument, passed down from generation to generation—and the American Ultra Precision Bass shows that the company still has the ability to crank out classic after classic. However, while this bass is incredibly easy on the eyes and comfortable to play due to its fret size and huggable contoured body, I would mainly recommend it to an experienced player, due to the price point and the complexity of this awesome machine.
This has been quite the year for Fender, who has been releasing vintage replicas of all of their best selling, highly-valued guitar models. Earlier this year they released the American Original and the American Performance Series, and this summer the company revealed the Fender Vintera Series, a new line of vintage-correct electric guitar and bass models that pay homage to the three most pivotal decades in early rock music (‘50s, ‘60s, and ’70s).
The Fender Vintera Series shines a light on the impact the company has made in the music industry, showcasing and recreating 15 of the most popular guitar models of the times. These shiny beauties are not manufactured in the United States, but they are not priced like knock-offs. Don’t shop this series if you are looking for a bargain banger—these guitars are the real deal.
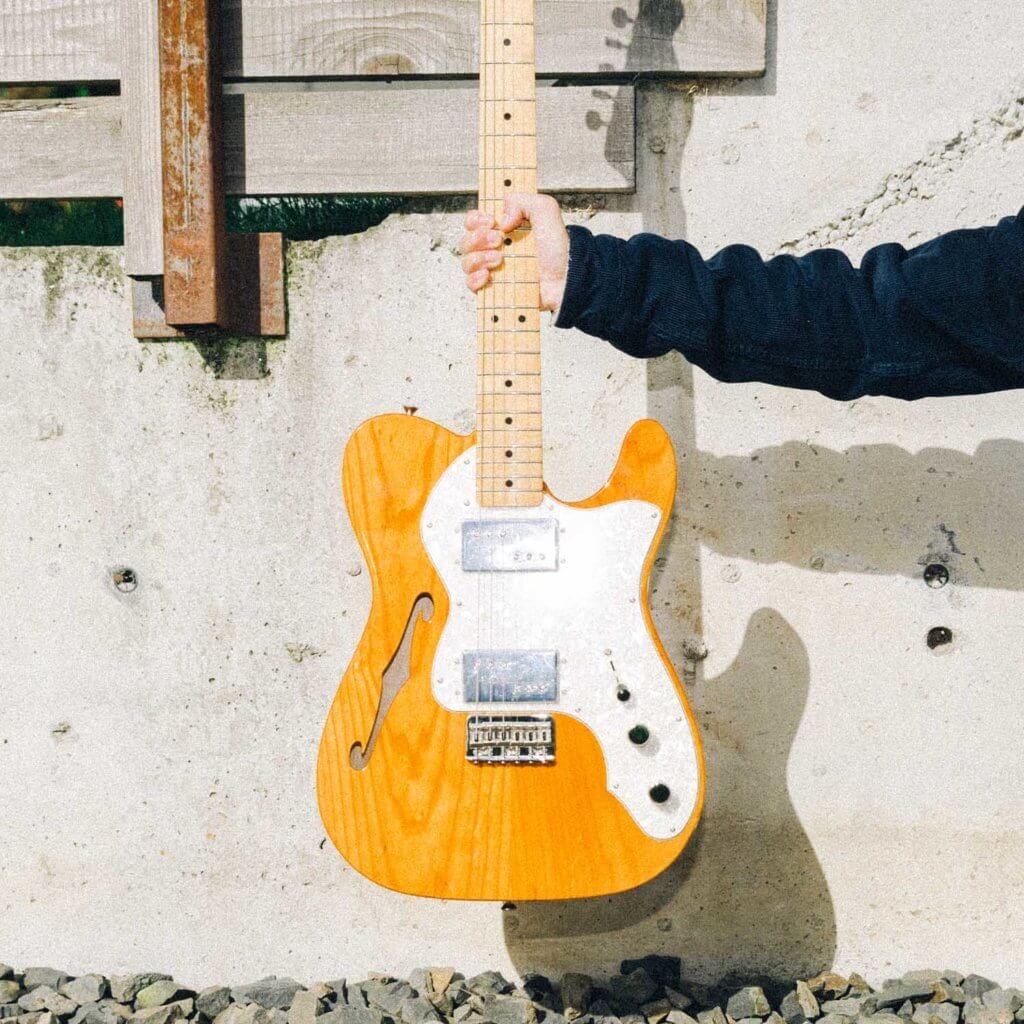
The answer will always be mixed, as you can’t recreate a moment in time. However, we humans certainly find the best ways to re-access these places in our tonal memories, using modern technology to bridge the gap. With the Fender Vintera ’70s Telecaster Thinline, all of the nostalgia of the ‘70s vintage Telecaster’s sound is truly harnessed in this replica: that twangy, easy to manipulate, clean tone.
Fender mirrored nearly every aspect of the original ‘70s Telecaster Thinline, from using Maple and Ash in the body—often defined as “sustainable hardwoods” (if there is such a thing)—to the installation and function of the tuning rods, the bridge, body specifications, and materials used. A few nice, ever so slight upgrades include stronger magnets (Alnico 5 vs. the traditional Alnico 3), and an extra tough and reinforced hard-tailed bridge.
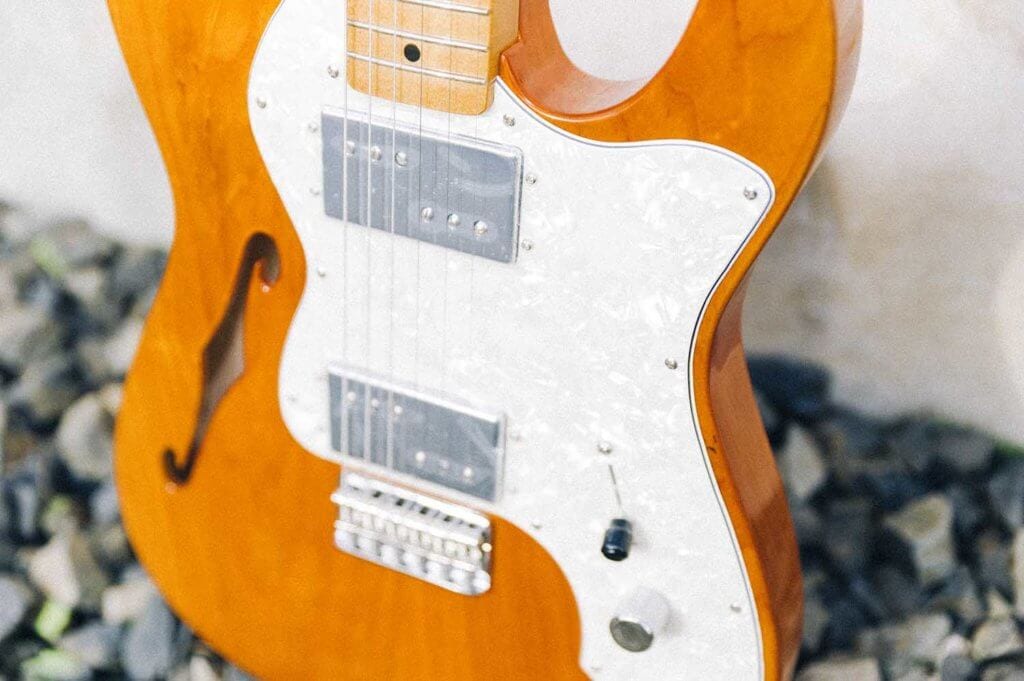
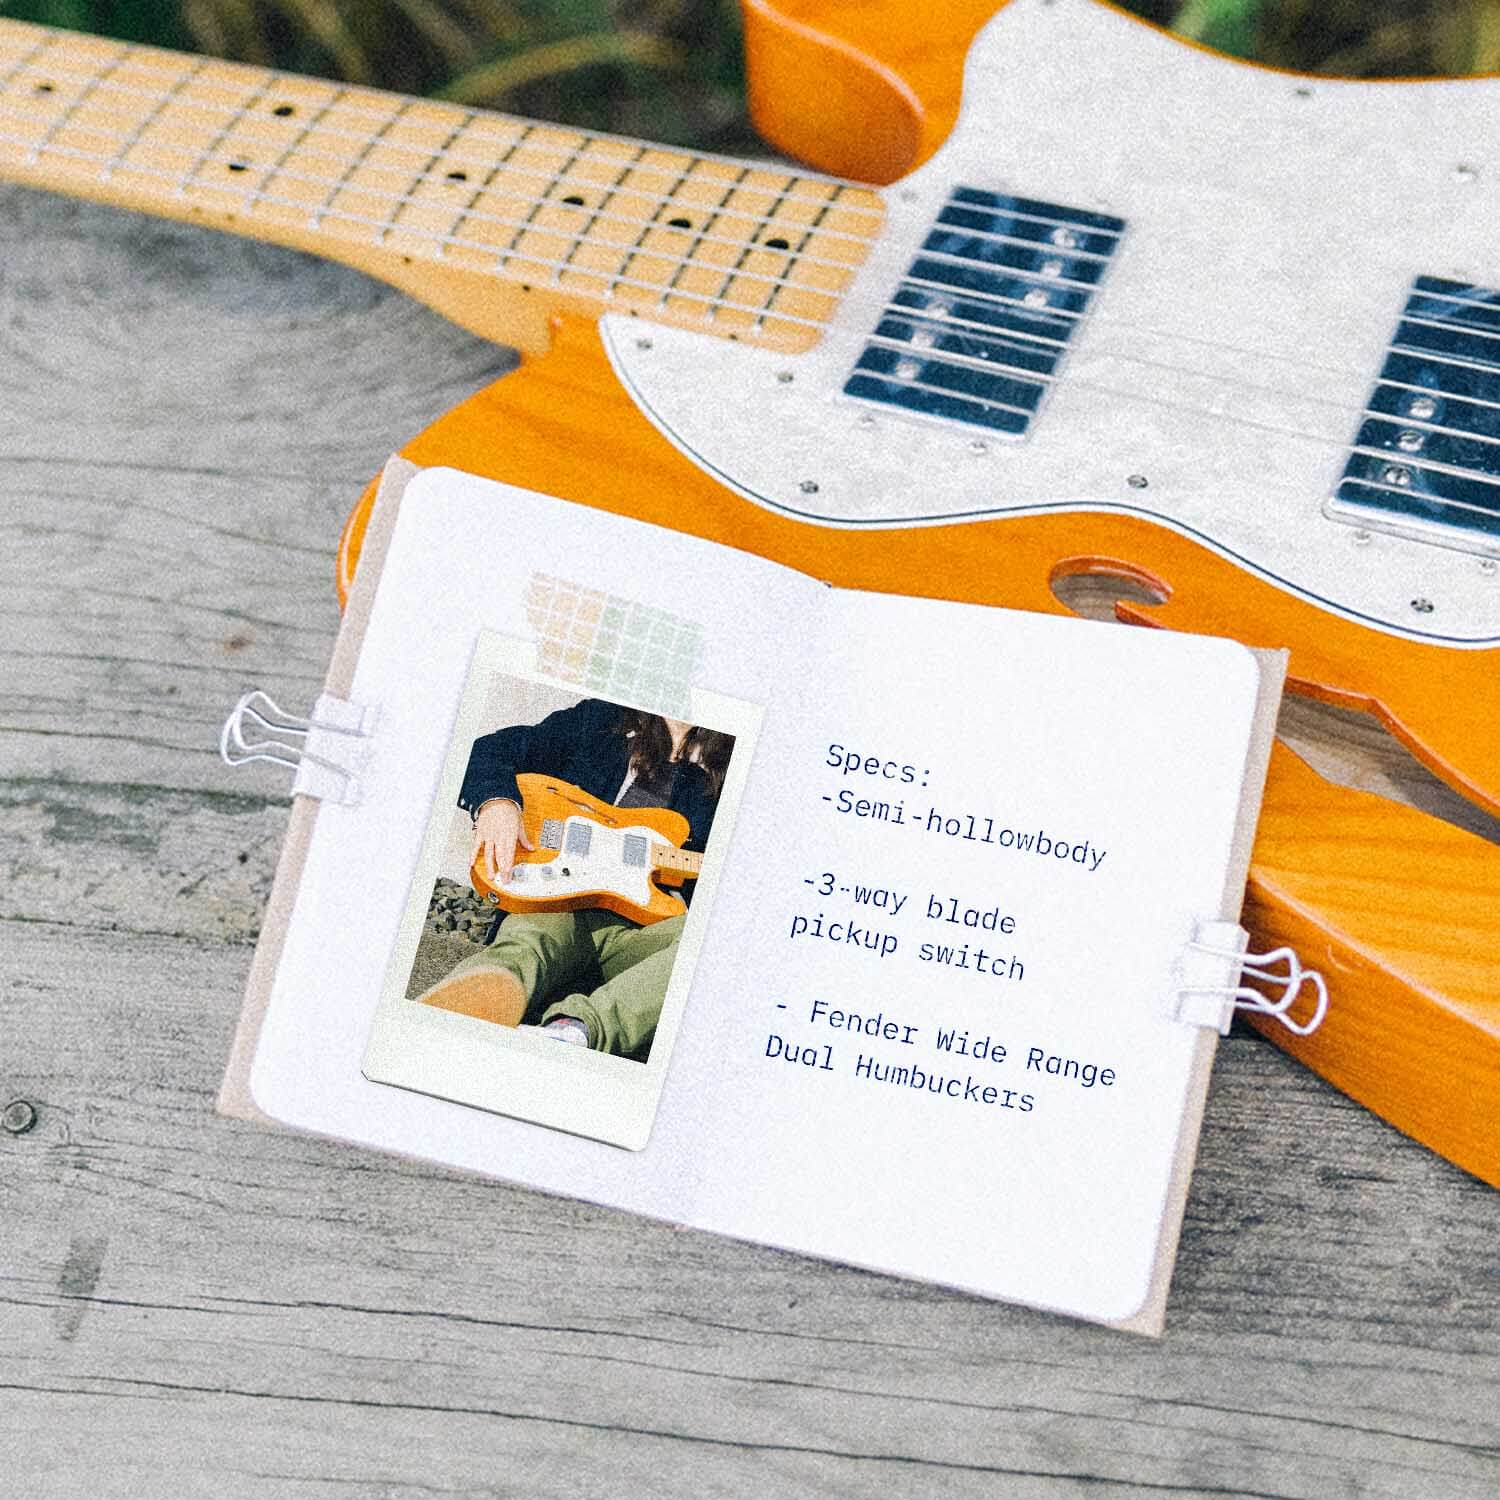
First off, you can’t help but notice how the wide-range humbuckers with “period correct” enamel-coated wiring affect the overall tone. The Vintera Thinline models are semi-hollow, and sport not the standard single coil/copper-plated steel-base plate pickup combo of original Standard Telecaster models, but instead these broad, warm, dual humbuckers.
This model carries a much richer, darker tone than what is typical of the classic Telecaster sound, lending a bit more resonance to thick leads and heavy strumming patterns. The string-through body makes for extra overall sustain and tuning stability for some serious picking. Vintage-style frets, a pearl pickguard, and three-way switching make this guitar look and play like a true vintage Thinline.

The Vintera ‘70s Telecaster Thinline is a physically different creation than the original Telecaster Thinline models of the 70’s, but only because of its age. The Vintera models feel, well… unavoidably new. The glossy polyester finish is definitely unique to the times: flashy, slick, and extra clean. With all vintage guitars, the wood weathers and morphs over the years, and becomes warmer as well as more dense and resonant: a time capsule of the elements.
Classic tones, powerful output, and quality craftsmanship make Fender’s Vintera Series nostalgic, reliable, and a solid choice when looking for that specific vibe that the Telecaster has been bringing to music since 1949. Nothing beats the real thing, but Fender has definitely worked very hard to make vintage replicas a real and respected genre of guitar. So instead of bringing your actual vintage guitar on tour, grab a hard case for this sweet baby and hit the road; this guitar is about as solidly constructed and reliable as it gets.
The world of buying and selling gear once felt a little inaccessible to me. In my head, it was going to take a big chunk of change to get the sound I was hoping for. Money was tight (cheers to your 20s!) and as much as I wanted to put a couple hundred bucks into my favorite hobby, other things tended to be more of a priority.

As time went on, I came to realize that investing in gear wasn’t quite as financially daunting as I thought it would be. It’s exactly that—an investment! For me, it started with a used $100 Fulltone OCD pedal; I didn’t have to break the bank to find something really awesome. Then I bought a compression pedal for $50 that I hated, so it sat on the shelf. What I didn’t realize at the time was that I could have easily resold that pedal for close to the same amount I’d spent for it and recouped the cost (or more likely, bought something new). Buying gear is an upfront cost, but unlike most other things you buy, it generally doesn’t decrease in value.
In a way, the gear you own becomes assets, and by selling the gear you’re not using, you might not even have to touch your bank account to buy some new pieces. “For a lot of musicians, there’s nothing more inspiring than a new instrument or piece of gear,” says Dan Orkin, Director of Content at Reverb. “By landing on a regular pattern of out with the old and in with the new, you can keep yourself stocked with new sounds and ideas in a much more budget-friendly way.”
In this two-part series, we’ll lay out the basics of how to sell your gear, starting with where and what to sell, how to assess condition, and where to research.

There are a lot of decent and completely functional avenues to sell your gear, but Reverb is very much worth checking out. When I sell gear, I use Reverb out of pure convenience. It’s incredibly easy: everything I’ve listed has sold. There are tons of tools and resources to help you understand how to pack and ship your gear, and if you do happen to run into an issue, they have an entire team of musicians that you can speak to.
If you can use Google, you can list an item on Reverb. To get started, you simply start typing what you’re selling, like “TC Electronic Ditto Looper.” When you see the item you’re trying to sell, simply click “Sell one like this” and the selling form pre-fills with all of the info Reverb has about the gear. You also have the option to start a listing from scratch, but even then, the form makes it easy to see what info and details are needed.
Once your listing is posted, potential buyers can communicate directly with you to ask any questions they may have regarding your product. Having the opportunity to provide clarity to your buyers via the Reverb app as opposed to encrypted email addresses or text messages keeps it personal and much more organized. Altogether, this system feels more professional than other avenues of selling your gear; the attention to detail makes me feel much less likely to wind up with an unhappy customer. I get a notification on the Reverb app when someone decides to purchase something I’ve listed, I pop it in a box, take it to either the post office or print the label right at home, and slap it on my porch. They get the sweet gear I no longer want, and my budget towards something I’ve had my eye on is closer to the finish line.
First things first: you’ll need to pinpoint the gear you’re no longer using, looking to upgrade, or just not that into. This can be hard, especially if you’re like me and tend to be sentimental—but don’t get in your own way here! If you haven’t touched something in six months or so, it’s probably safe to say that money could be better used for something else more exciting to you.
“Keep in mind: If you sell a piece of gear and you find that you’re really missing that particular piece, you can always re-buy it without losing too much, if any, money in the process,” Orkin says.
Most of the gear we buy and use to make music will still retain much of its value, especially if you’ve taken good care of it. Depending on what condition it’s in, even if it’s just functional enough, it’s possible to sell almost anything somewhere. Of course, you might not always get an impressive amount of money for your old mic stand, but things like boutique pedals or vintage instruments (with a higher demand as a result of their limited quantity and unique characteristics or effects) can fetch a price close to what they cost brand new if you keep them clean and in good repair.
“Some gear is truly timeless and universal, which means that there will always be a buyer for it. Think classic guitar models from Fender or Gibson, solid all-around acoustics like Taylor, or practical items that everyone needs like Shure SM-58 microphones,” says Orkin, who also edits the Reverb Price Guide which provides real-time data on what items are being bought and sold for on Reverb. “These sort of items tend to retain value relatively consistently as people are always seeking them out. That said, some rare and niche effects and boutique guitar brands might sell for even higher than their original new price tags.”
In some cases, if the gear needs slight repair, it might be worth paying someone to fix any issues before selling, as the additional amount you’d be able to get selling a working piece may be greater than the cost of fixing it.

The next thing to do is decide what kind of condition the gear is in. When you sell a piece of gear on Reverb, you’re asked to select from a list of “condition” options, ranging from “Brand New” (still in package, never used) to “Poor.” This is one of the first things that appears on your listing, even before someone clicks on it. Depending on what condition you choose, a handy tool appears on the Reverb app to tell you what the average price your gear sells for in the condition it’s in.
As a seller, I’ve made myself a rule to always round down what I feel the condition is, as I want customers to be pleasantly surprised with the shape it’s in, never underwhelmed or disappointed. It doesn’t have to be drastic, but that tiny ding on the pedal face might take it from “Mint” to “Excellent,” even though I know everything else about this pedal is squeaky clean. To me, this creates an element of trust, especially since buyers can write a public review about their experience purchasing from you. In being as honest as possible, you’re increasing the possibility that people will be happy with their purchase, and in turn the people who view your future listings will feel more inclined to work with someone with good rapport.

Deciding what to price your gear can feel tricky, or maybe you aren’t quite sure of the value of the gear you have. As I’ve mentioned above, the Reverb Price Guide can help with this. In addition to the tool that appears as you’re creating your listing to help find your average price, the price guide catalogs price estimates based on previous transactions to see what your gear has sold for in the past.
You can also search “sold listings” on Reverb, which gives some additional insight on what prices products have sold for in the past. From here, you can compare to other sites and stores to find the most well-rounded and accurate price point that feels fair to you and the buyer. Staying knowledgeable and having access to this information can put you in a more confident place when it comes to negotiating a price with a buyer, which we’ll touch base on in the second part of this series.
“The great thing about music gear—particularly guitars—is that with some exceptions, the technology doesn’t change too much. That means a Stratocaster from 1996 that has been well cared for is worth about as much as one from 2014,” Orkin says. “Compare that to things like televisions and cars, and it’s clear that the gear industry is especially friendly for folks who are plugged into buying and selling to fund their ability to try new gear and sounds.”
New toys keep music really fun and exciting, and hopefully keeps you writing and playing. You don’t need a ton of money or all of the best gear to make cool tones and tunes—just gear that works for you. And if you find yourself with something you’re not a fan of, these tips can help you sell it back into the gear ecosystem and put that money toward something you’ll love.
Stay tuned for Intro to Selling Your Gear: Part 2 where we will address making a listing, negotiating, and shipping!
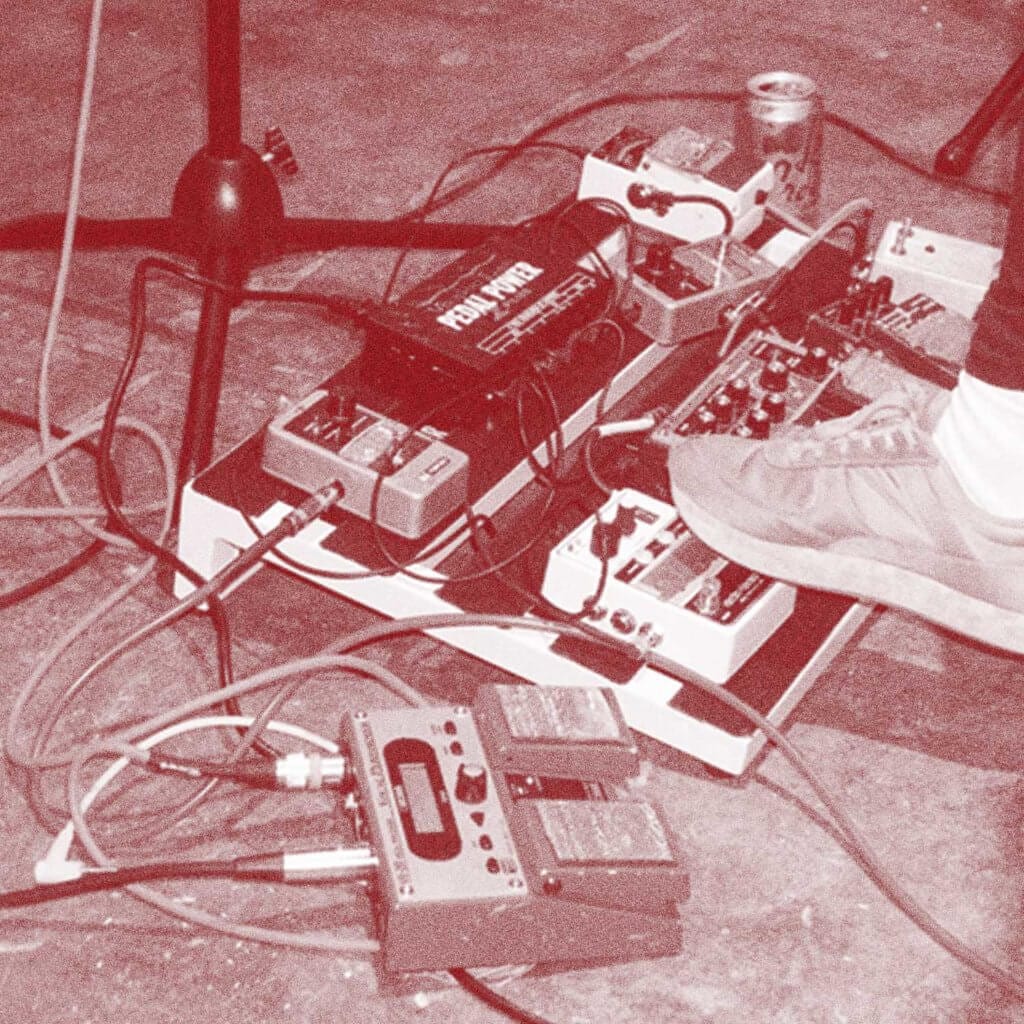
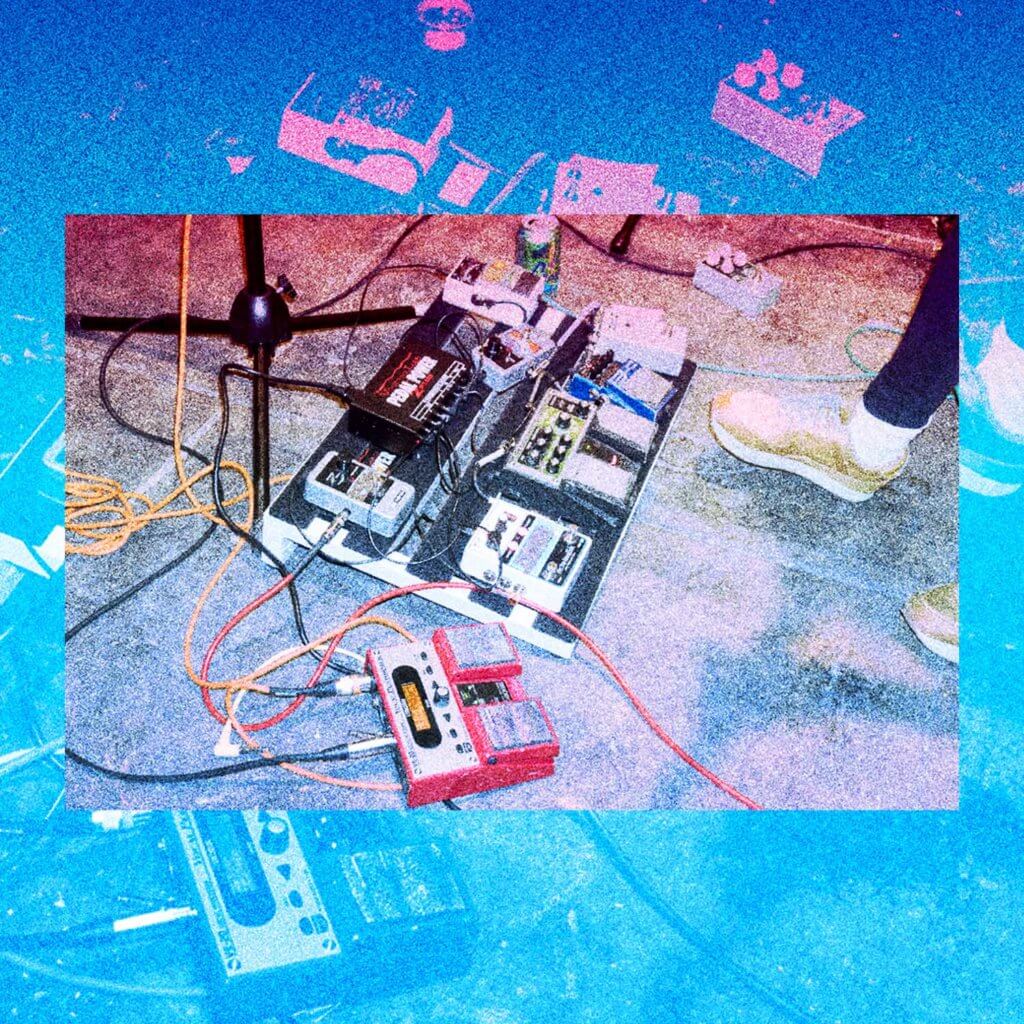
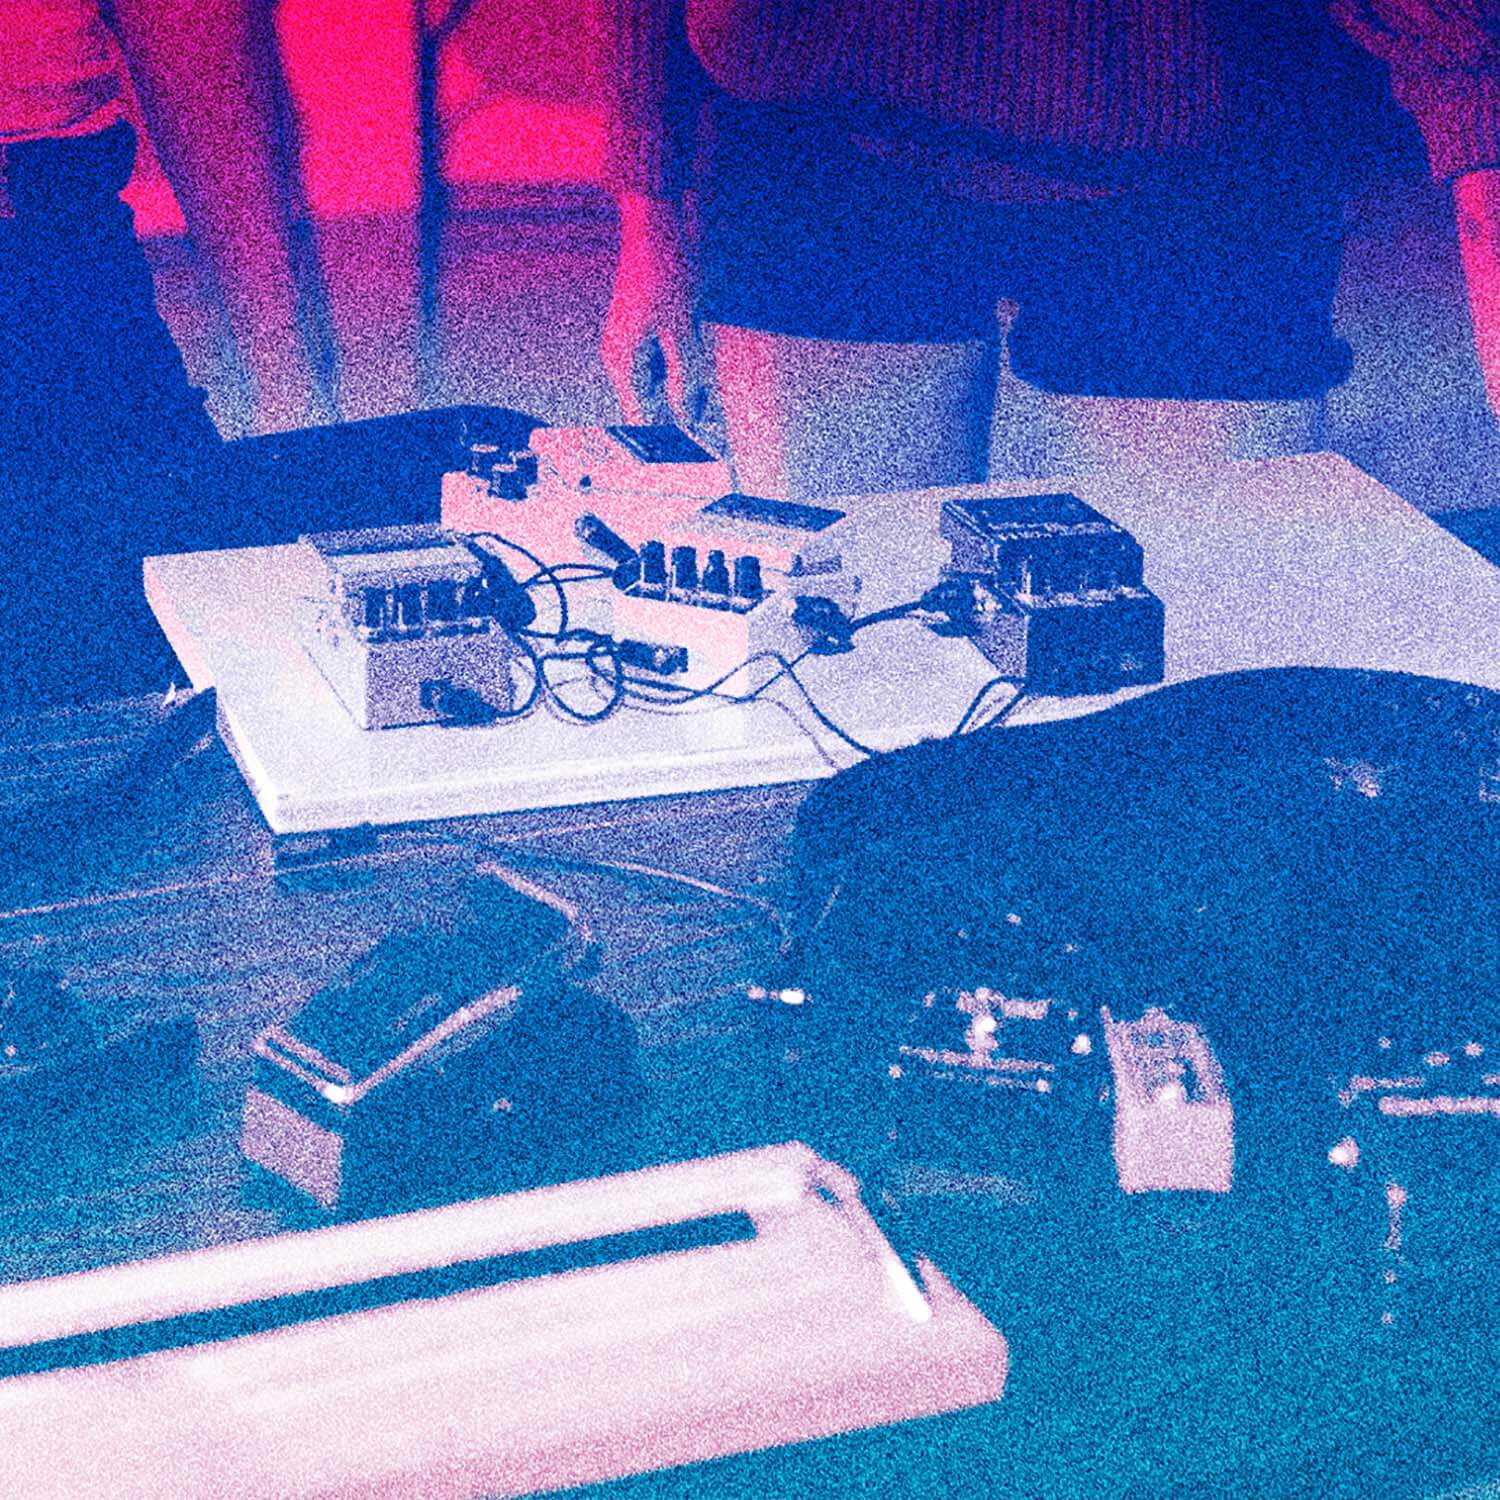
Building a great pedal board requires a little bit of planning and patience, but once you understand the basics, it becomes easier to put together the perfect rig for your needs. The defining qualities of a reliable pedal board go beyond just providing a better way to store your pedals: they make your setup time much faster, and keep your tone free of excess noise and interference. In this guide, we’re here to lay down the foundation that you’ll need to take the mystery out of putting together your first pedal board.
Size
Whether you’re buying your first pedal board or building from scratch, you’ll need to think about the pedals you’ll want to use in terms of space (don’t worry, we’ll get into specific pedals, too). Be sure to factor in room for at least one extra pedal; it might be a bigger investment, but having that extra space will be helpful when it comes to setting up everything neatly and adding wiring and a power supply. The extra space also comes in handy if you decide to add on extra pedals in the future, or if you just want to swap around pedals.
Dimensions
Now, consider the angle and height of the board in relation to how easy it will be to reach the pedals while playing standing up. If you already own the tools required in the plethora of DIY templates available online (including this tutorial we posted last year), then building your own board can be quite an affordable and rewarding experience. Over the years I have seen pedal boards made of everything from plain slabs of plywood, vintage suitcases, repurposed pieces of Ikea furniture, and the like. In every case, the owner had exactly just what they needed.
With that being said, if you’re not the handy type and prefer to buy a board, the Pedaltrain Nano+ is 18” and can be found for under $75 new (and even less) on Reverb. It’s just large enough to accommodate about five pedals and also comes with its own case.

While most pedals can run on 9-volt batteries, doing so should only be a last resort or as a backup at a gig if your other power supply craps out. Replacing batteries is unsustainable, and a quick way to lose money if they’re not rechargeable. The two most popular power supplies for a pedal board are daisy chains and isolated power supplies.
Daisy chains like the TrueTone 1Spot adapter are very affordable (on average about $20-35) but they offer the least resistance to noise because every pedal shares a ground. Isolated power supplies like the Voodoo Labs Pedal Power 2 Plus are more expensive (around $100 and up) but are popular in professional setups because they’re less noisy than daisy chains—and there’s nothing more frustrating than a disorderly rig that ruins a performance!
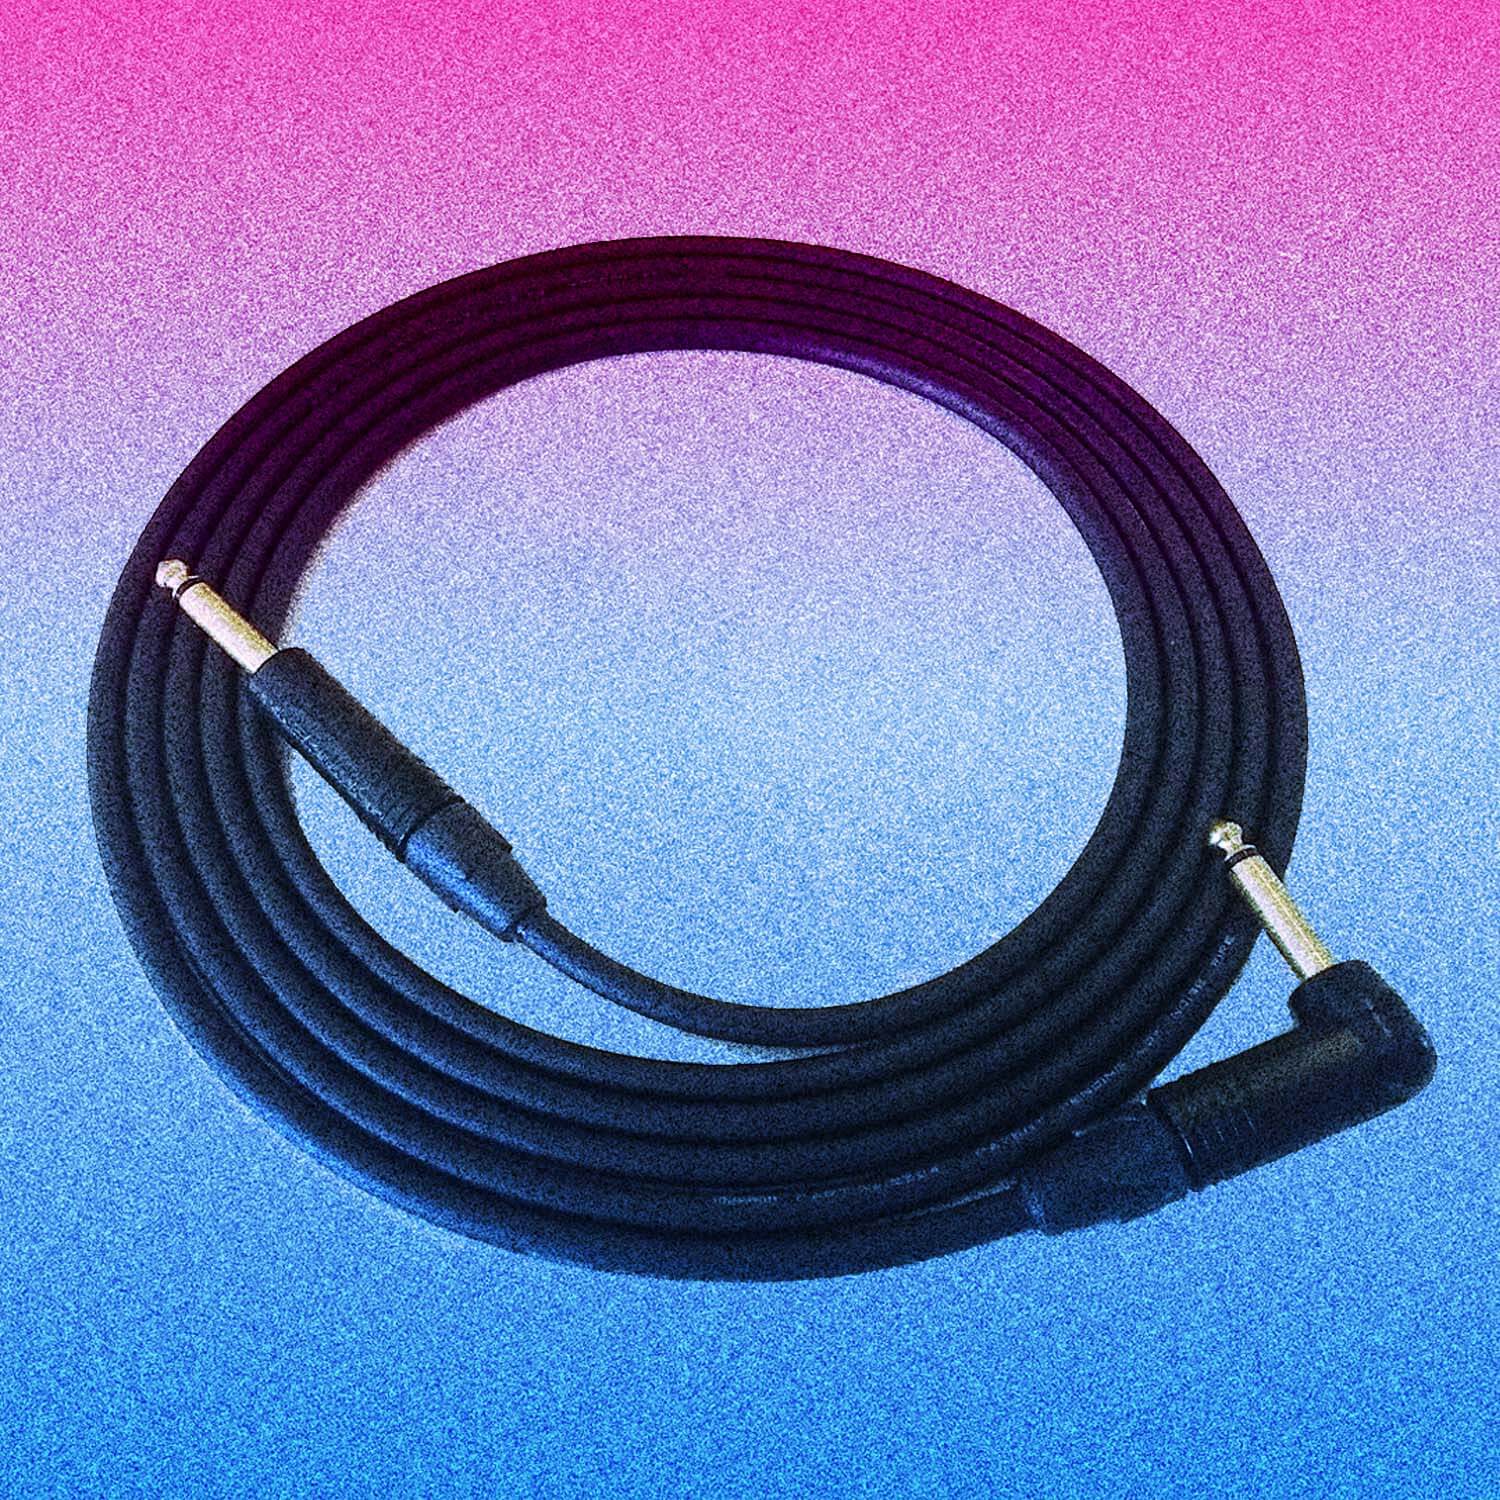
The trick to keeping a pedal board as noise-free as possible is to understand what causes noise and signal degradation in the first place. Power is roughly half of the equation, while the other half relies on cables.
Not all cables are created equal, and the cheap ones won’t do you any favors when it comes to performance. Mogami cables are not cheap, but they’ve become the industry standard because they are extremely durable and have a lifetime warranty in which you can exchange a broken one for a new one at any of their retailers or by mailing them back. If you’re on a tighter budget, bigger chain stores will offer lifetime warranties on their house brand cables, which tend to be cheaper. Be sure to equip your entire rig with the same type of cable, as mixing and matching brands and qualities is not ideal; the weakest cable will effectively cancel out the benefits of better cables, such as lower noise floors and better durability (since they all share the same signal path).
The ends of the connectors themselves can make a large impact on the amount of space taken up on the board. There are 3 types of connecters:
The first step to building a pedal board is obtaining the pedals themselves, and shopping second-hand at places like Reverb is a great way to save money on used pedals (and in some cases, it can even be the spot to find rare and/or vintage pedals that are no longer in production). You may even find that it’s a great place to sell your own pedals when you grow tired of them and want to essentially flip them for something else you’ve been eyeing.
Listed below are some of the most popular and essential effects. Many guitar pedals hold their value, which makes it easy to trade them around and experiment without spending tons of money. Buying used saves you, on average, about 27-35% off the price of a new pedal, and most sellers on Reverb report getting around 85% of their initial investment on a used pedal after they sell it.
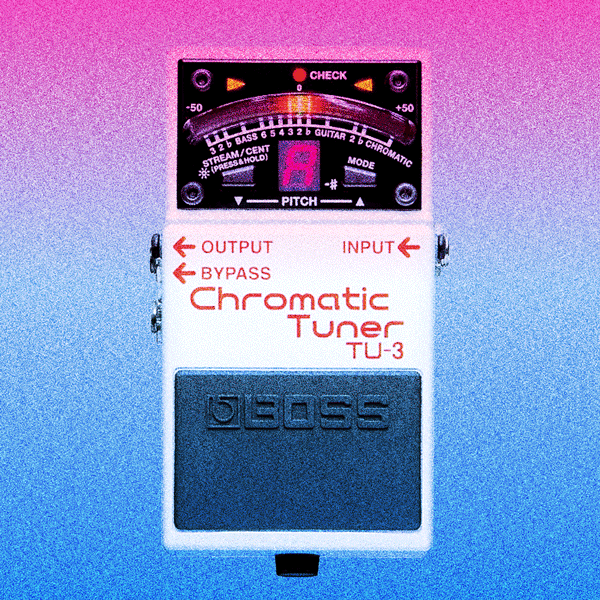
Tuner
I would suggest getting a good tuner with a display that you can easily see in both high and low lighting. On average, tuners go for $100 new and $60 used. Since they’re often first in line on most rigs, you’ll want to get one that’s known for keeping your tone pure and unaffected, such as a Boss TU-3, TC Polytune, or Peterson Strobe. Some tuners offer both buffered and true bypass switching, and in some cases may even have outputs for powering more pedals. It’s worth noting that if you’re visually impaired, you may want to consider a headstock tuner, which is a bit closer to the eyes.
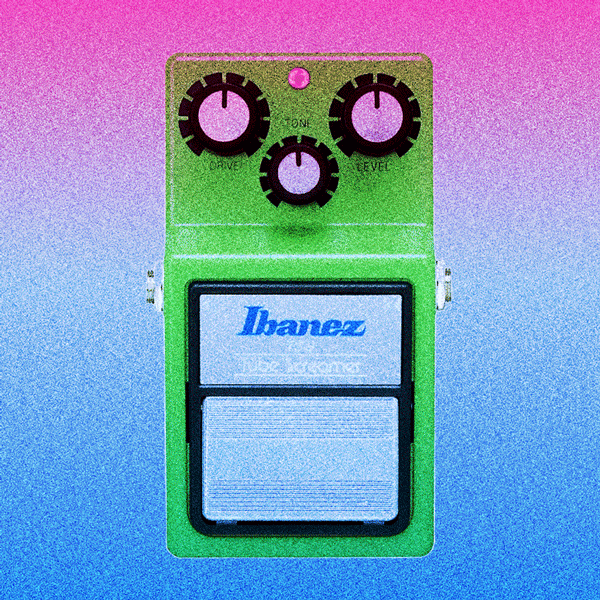
Overdrive
The Ibanez TS9 Tubescreamer, which goes for an average of $60 on Reverb, is one of the most popular overdrive pedals of all time. Initially, these were popular with blues guitarists who favored the ability to send any clean amp into a smooth overdrive, rich with sustain. This not only allowed players to achieve a cranked up tube amp sound at lower volumes, but it also enhanced the sound of amps that were already on the verge of breakup. Although the pedal on its own will not provide enough gain to push an amp into full on distortion (aka hi-gain), surprisingly, it’s very common to find these pedals on the rigs of modern metal guitarists. Taking advantage of the Tubescreamer’s ability to maintain its clarity, a lot of these players are using this pedal to tighten up the low end frequency response that sometimes causes a guitar to get lost in a mix. Typically this is done by turning the level of the pedal all the way up and the drive all the way down. The tone knob is dialed in the most pleasing spot to the players ears. The resulting sound is quite subtle on its own, but using this setting with a cranked up hi-gain amp like a Peavey 6505 and the effect is immediately felt—and this, along with a noise gate, is what practically defines today’s modern metal sound. The secret to getting a good sound with a Tubescreamer is to get an idea of how the level and tone knobs interact with each other; in general, the pedal will sound better with the output cranked higher than the drive knob. The position of the tone knob itself plays a large impact in the overall character of the sound which can range from thick and syrupy to quite bright but not quite ice picky.
Fuzz vs. Distortion (If You Can’t Have Both)
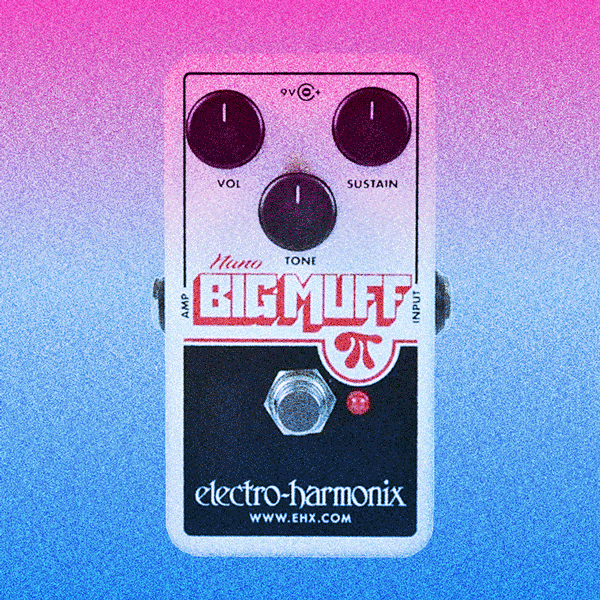
Unless you only want to play clean (or rely solely on what you can get out of your amp), getting a distortion pedal is practically mandatory. The type of distortion pedal you choose has a huge impact on your sound. Fuzz is a bit more retro and perfect for capturing the wild electric guitar sounds of most ‘60s and ‘70s rock. In some cases, fuzz pedals are popular with players who are drawn to the bold wave-like sound that the Nano Big Muff Pi (average at $60 used on Reverb) provides, whereas players that are seeking a tighter sound might go for something like a Boss DS-1, which can be found used for an amazingly affordable average of $35.
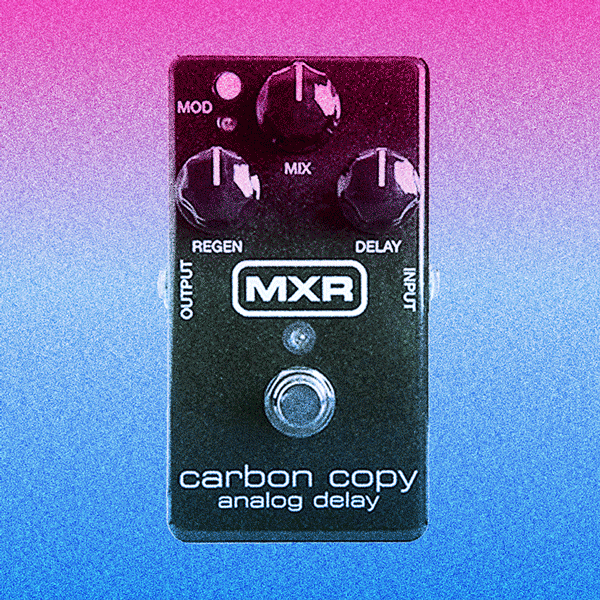
Reverb & Delay
These two effects are used to add a sense of depth to guitar tone. Reverb emulates a sense of space, like a concert hall, while delay simply repeats the signal from your guitar for a short period of time. Used together, you can get some stunning results, but some players may feel they only need or the other.
The MXR Carbon Copy is an analog delay that is extremely popular due to its warm, lush sound. On average, they go for around $95 used, which is a great price. Delay can also be used to add a more rhythmic feel to single note passages or giving a guitar solo a little something extra to stand out.
The Electro Harmonix Nano Holy Grail Reverb is a natural choice for someone looking for a simple yet versatile reverb. These pedals sell for around $70 on Reverb and offer emulations of both spring and hall reverbs, as well as a unique setting called “flerb,” which introduces a slight flanging effect.
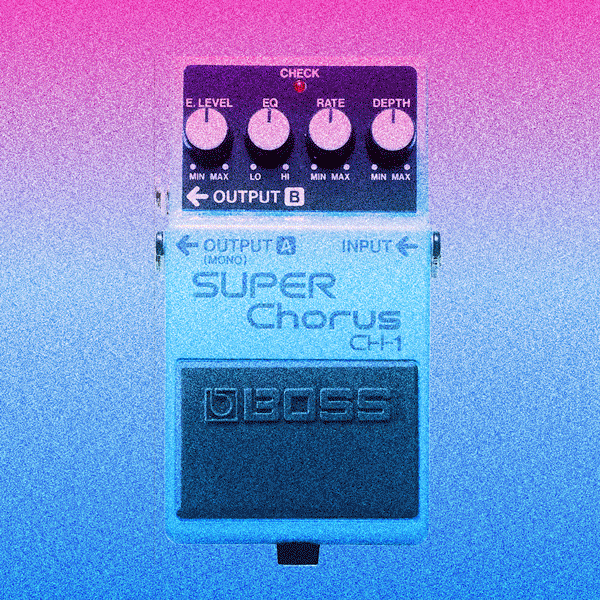
Modulation
Modulation effects—otherwise known as chorus, phasers, flangers, and tremolo—can be used to add a little bit of movement to both clean and distorted tones. Usually, just having one of these types of pedals can add a lot of variety. I would recommend trying each of the following before purchasing to see what you like: the Boss Super Chorus ($50 used), the MXR Phase 90 ($45 used), the MXR Micro Flanger ($65 used), and the Boss TR-2 Tremolo ($65).
The final thing to consider when putting your board together is the layout of the pedals. Industrial strength Velcro from your local hardware store is both affordable and practical, allowing you to quickly move things around as needed while still safely securing the pedals in place. You’ll want to experiment with your pedals in different configurations to find out what sounds best in what order, but generally, effects that alter the gain are placed early in the chain, and effects like modulation are placed last. There is no right or wrong way to go about doing this, so you’ll want to trust your ear on this one, but you may find better results by following this order (from right to left):
Be sure to check out Reverb for all your used gear on their Facebook, Instagram, Twitter, and LinkedIn! #foundonreverb
In my experience, learning to play the guitar was a battle of wills between myself and my dad’s acoustic. It felt massive compared to my size, and I struggled to pull off anything other than open-string chords. I tried and failed with bar chords—my hands could never make it work, and I hate doing things I’m not good at. I happily resigned myself to the first three frets or so, and from there I tried my best to figure out how to write a song using the catalog of chords I already knew, or how to learn my favorite songs via the internet.
As I continued learning, I kept seeing the word capo. I wasn’t sure what it meant, and I’d never seen one let alone used one. It wasn’t until a friend bestowed one upon me for my birthday that I realized what it was used for. I jumped right in and all of a sudden the rest of my guitar became accessible to me, and it blew my dang mind.
Owning a capo opened a creative door for me. I didn’t know what a key was or how to write in one (I still don’t, really) but if I placed my capo on different frets to play my songs, they had a tendency to feel totally new. I found keys that felt more comfortable for my voice, and my sad songs actually felt sad too—I was hooked.

If you’re interested in playing with a capo, there are some things to consider to make sure you have the right fit. First, what are you playing? Capos are used on many different instruments that are typically fretted, such as ukuleles, mandolins, and guitars. A good next step is to check out your fretboard—is it flat or does it curve? Some capos are shaped to fit curved or flat fretboards so that they exert even pressure across the strings. An incorrectly shaped capo for your guitar could result in some frustration. If there isn’t enough tension on a string, it might not resonate and instead sound more muted or create buzzing. With too much tension, the strings begin to bend out of tune.
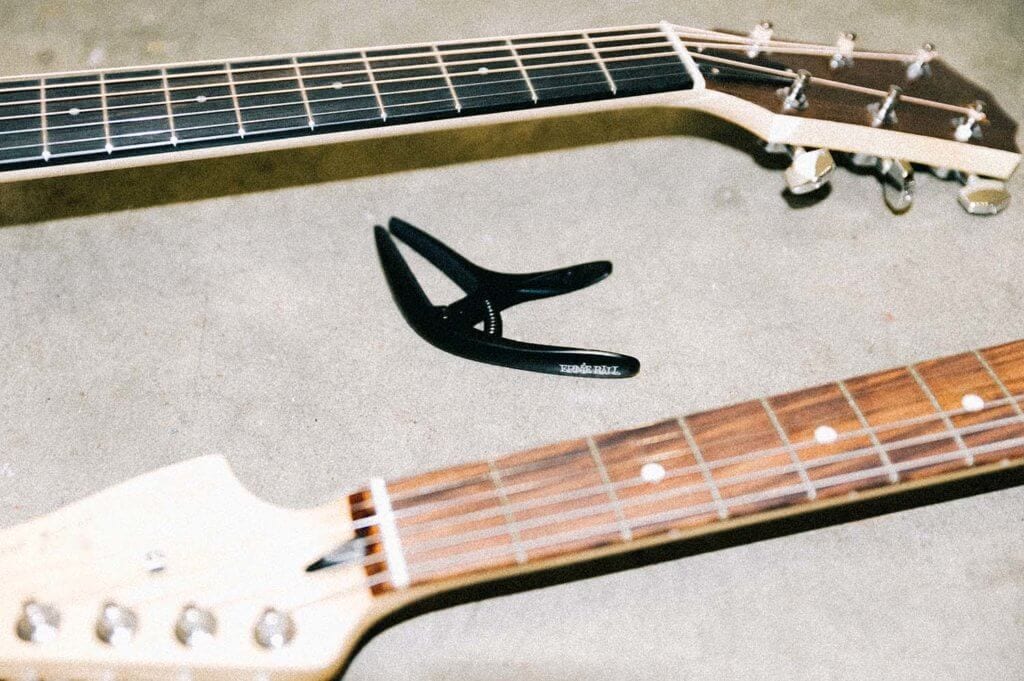
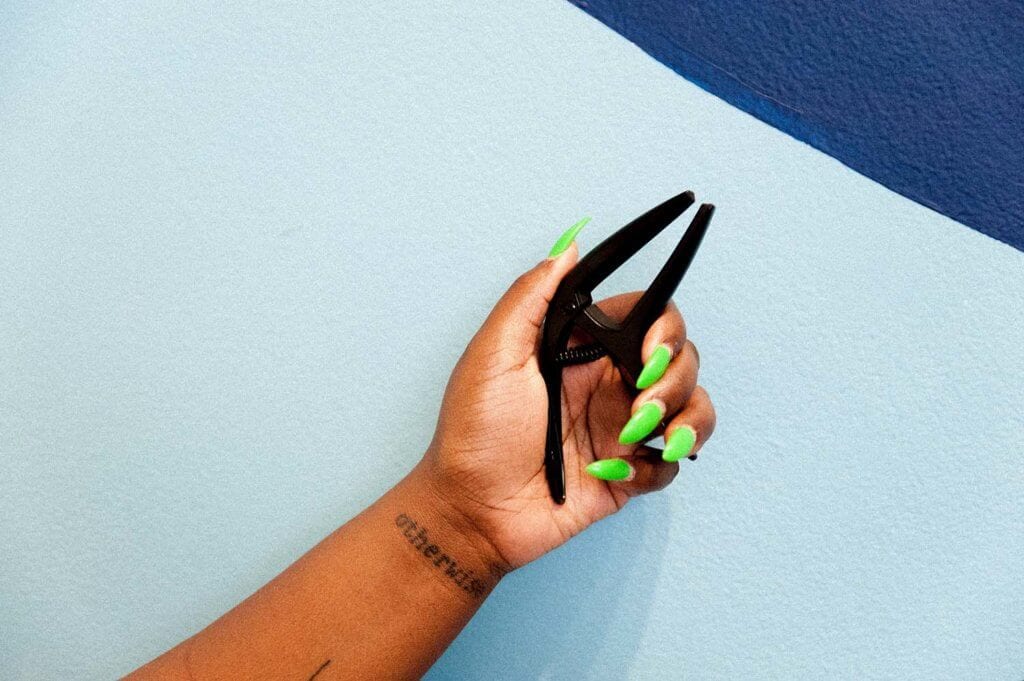
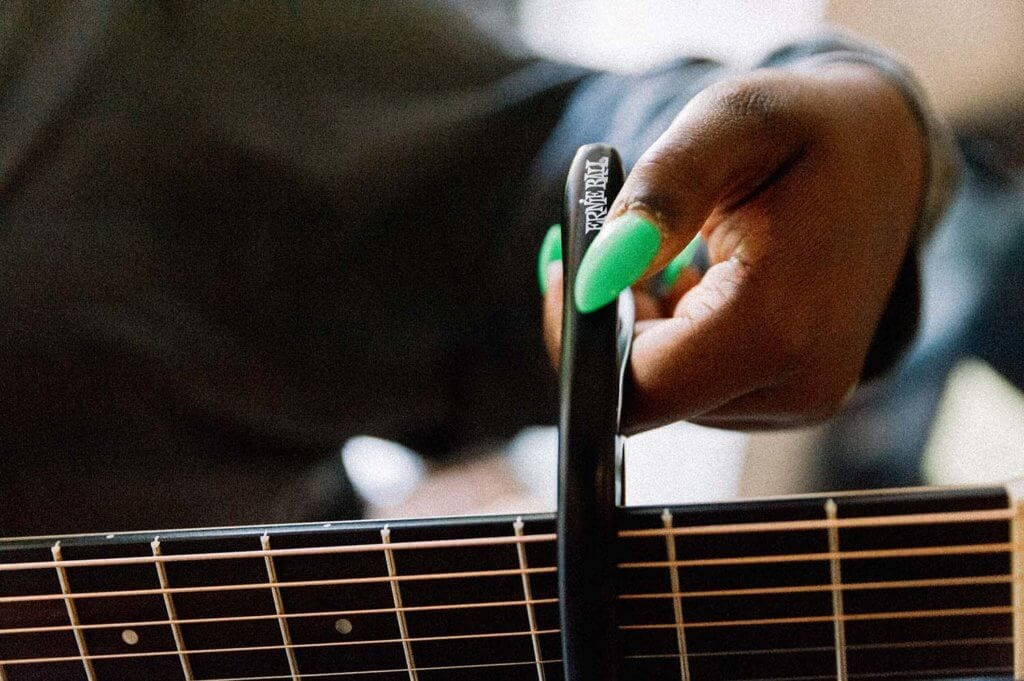
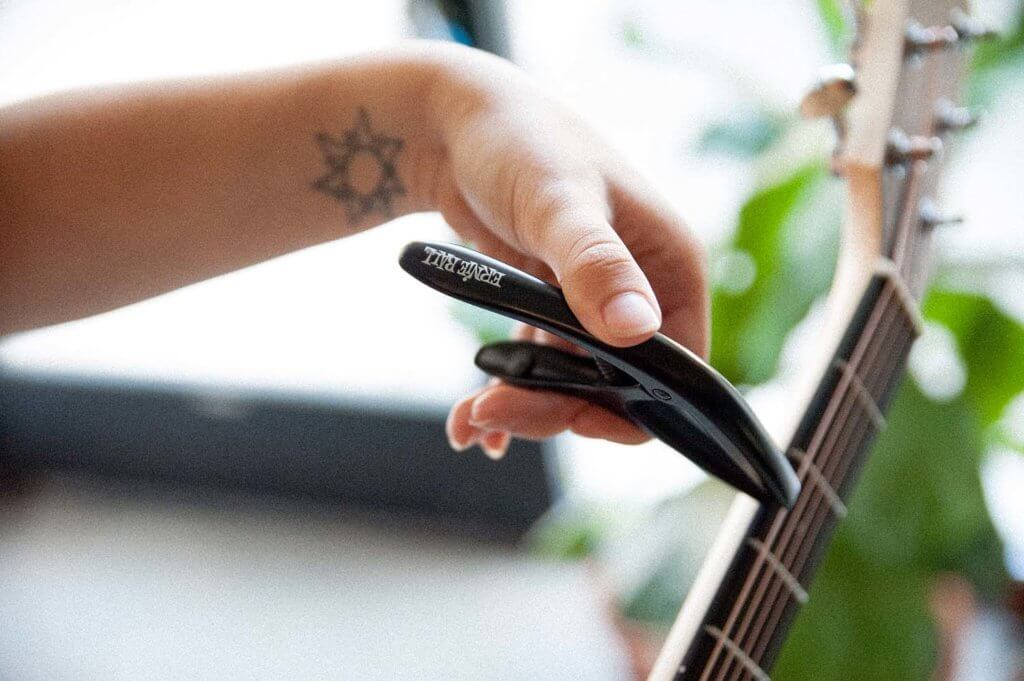
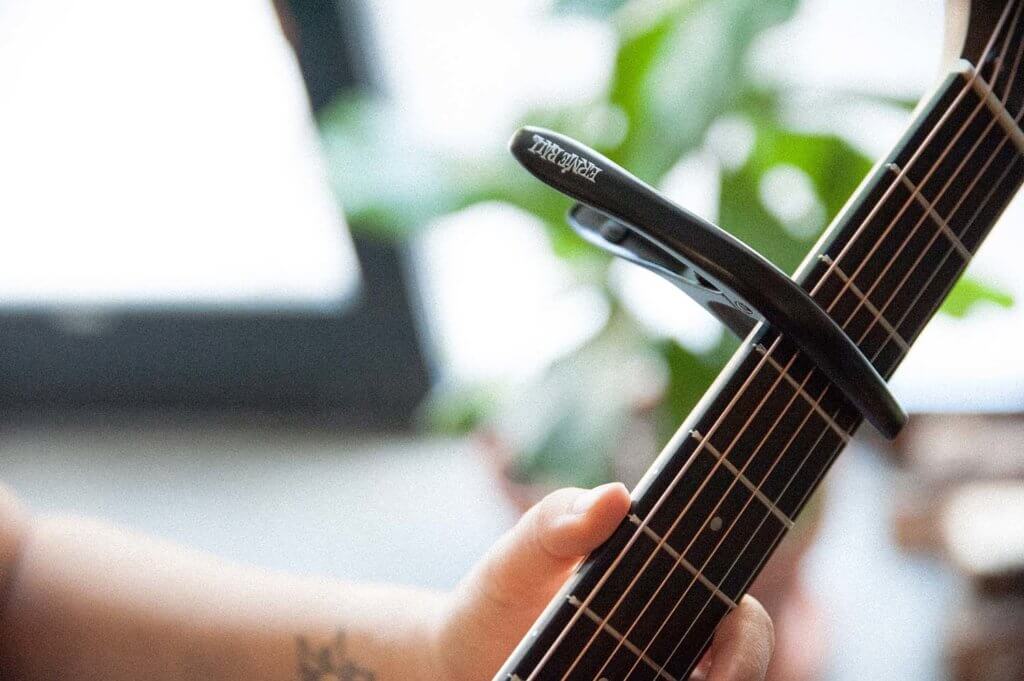
You’ll hear everyone swear by the kind of capo they use, such as trigger, strap, or spring (I’ve even used a pencil and a hair tie, it’s up to you). For beginners, a trigger or spring capo are great options. They’re very common, easy to find, and affordable. I’ve found these work great for me. You just need to use one hand to remove or reposition it, and the hardware stays well out of the way of my hand while I play. For this lesson we’re using the Axis Capo from Ernie Ball. The design is genius: it’s capable of being used with either a flat or curved fretboard simply by turning it around, which means you could use it on essentially any guitar you encounter—electric, acoustic, and even seven string guitars. Plus it’s simple and discreet, as opposed to my shiny gold capo, which, while endearing, looks a little dramatic in comparison.
A capo acts as a clamp, pressing down every string at your desired fret to change the pitch of the open string. If you play the chords you know as though the capo acted as the end of your guitar, they’ll be in a new key. For every fret you move the capo up from zero, you’re raising the pitch of the string by a half step. Your E string becomes a G when capoed at the third fret, and so on. If you ever encounter a song that feels just out of your vocal range, adjusting the key with a capo will help pitch the guitar up to a place that feels more comfortable to sing along.

Say you’re playing a song in the key of E on your instrument. If you were to place your capo on the second fret, and play the same chords relative to the capo, you’re now playing that same song a whole step up, in the key of F# (or Gb). Guitars are often played in the keys of C, D, G, A, and E because it’s more easily tuned to do so, and since not all chords are available in an open position, capos are useful to access those other keys for any reason you see fit.
Now that you know what a capo is, I’m sure you’ll realize you see them everywhere. Loved by every kind of guitar player, it’s a useful tool regardless of your playing ability, and anything that inspires you to keep playing and writing is a very good idea!
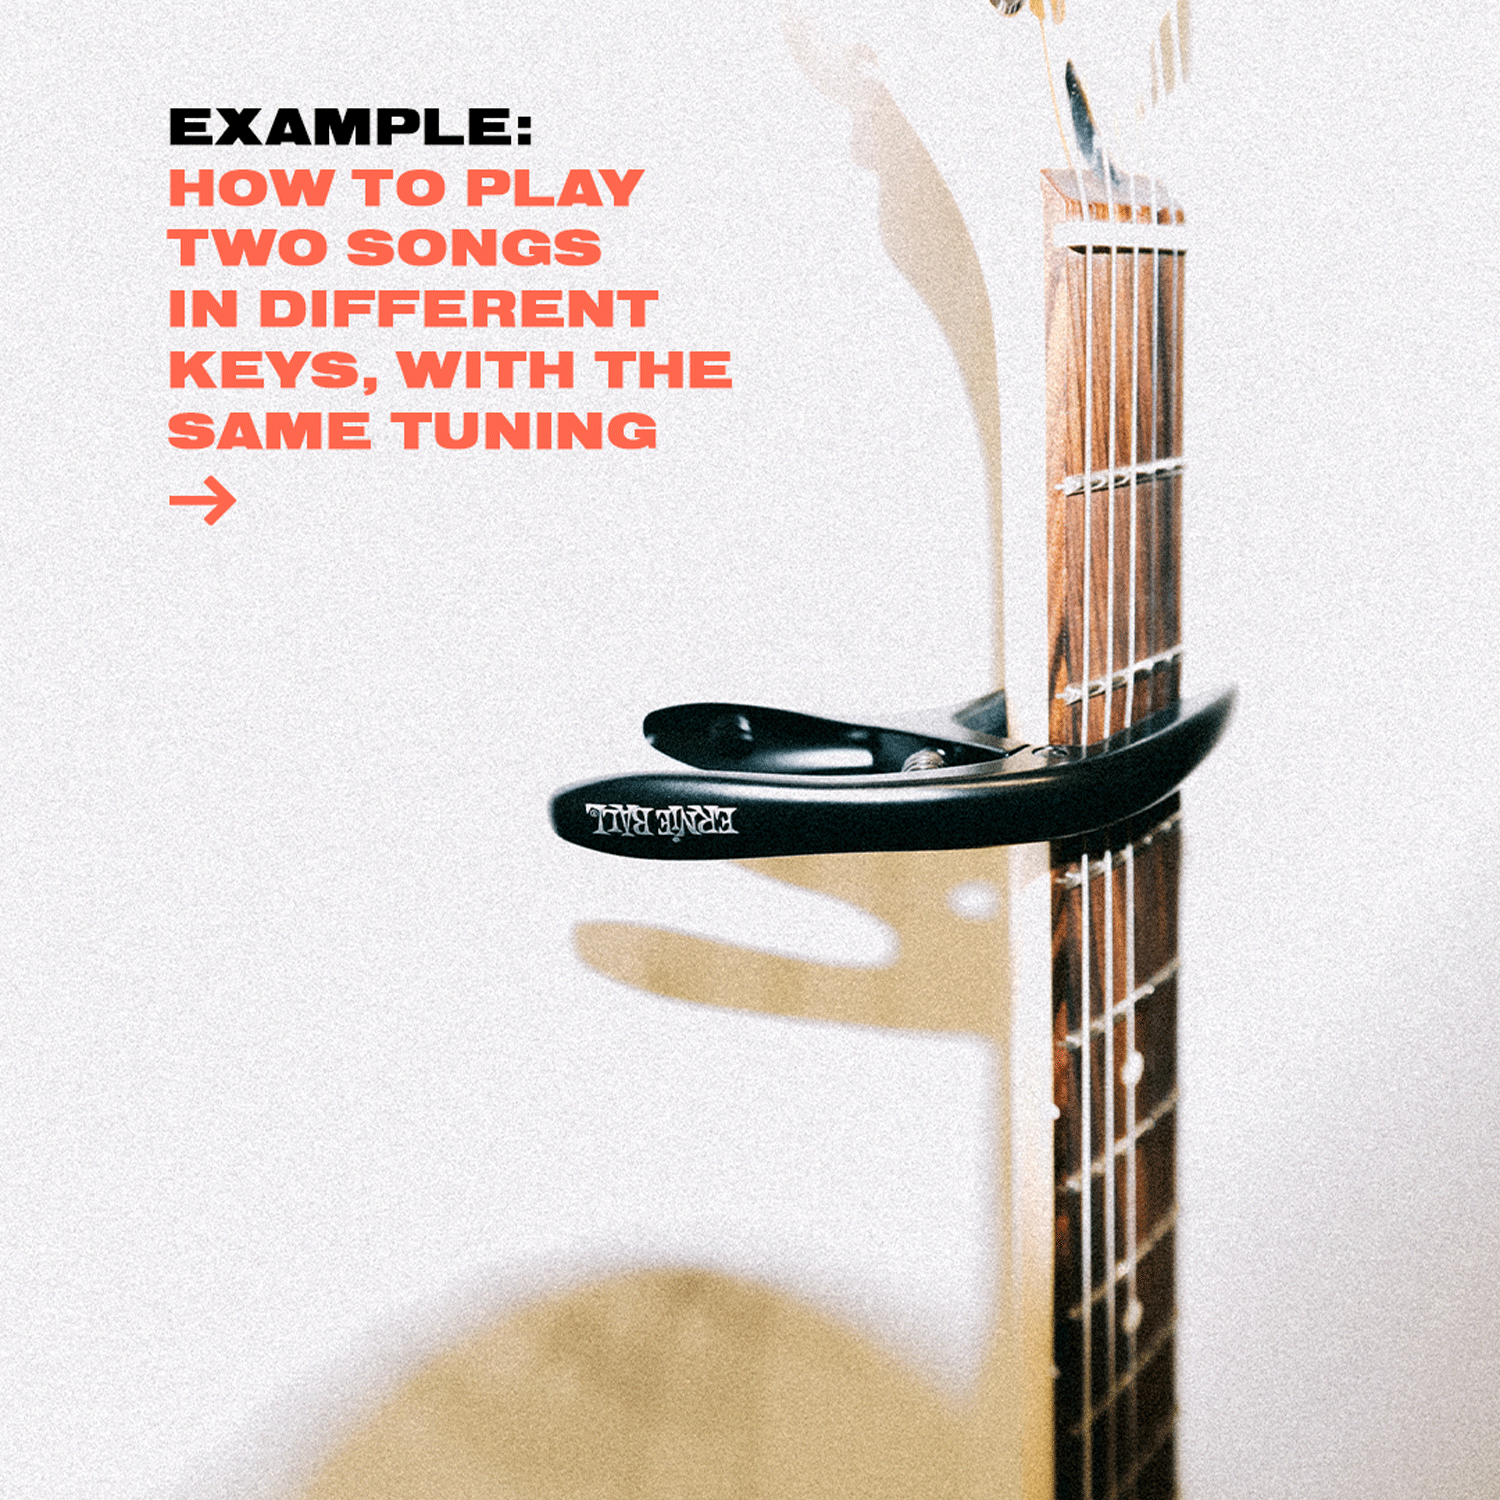
Capos aren’t just reserved for songs played with open string chords, either. They also allow for some variety with alternate tunings and voicings. When multiple guitars are played together, using a capo gives different voicings of the same chord and adds a tasteful variety of notes that gives the chord more dimension and resonance. Open tunings (when all six strings are tuned to a note in a certain chord) and alternate tunings (as weird and adventurous as you please) are excellent reasons to use a capo, making it possible to play different songs with the same tuning but in a different key, without having to switch guitars or adjust tuning for the sake of timeliness.
For example: In the past, I’ve used open D tuning on a guitar, which means that the guitar is tuned to use the three notes to form a D major chord without having to touch a fret (D A D F# A D). Playing in open tuning sounds beautiful and resonant, with every string adding to the fullness and tonality. Open tunings come with their own voicings and shapes to play chords, but most importantly, you can now play every major chord by barring a finger across all six strings on one fret in this open D tuning. By barring the second fret, you have an open E major chord, and the third fret would be an F major. With your capo serving that exact same purpose, you can barre your instrument at the 5th fret and play in open G, which would otherwise be awkward, very tense, or mostly not possible if you had tried to tune up or down to those notes. The same notion can be applied to alternate tunings: having the freedom to adjust the pitch anywhere without the restrictions of string tension (or time for tuning in a live setting) to play your song the way you’d intended.
Capos are an awesome and simple creative tool, and hopefully one you revisit often. As you continue to learn and grow as a player, you may find that you use your capo less when bar chords become easier and voicings enable you to play in other keys without one. After breaking out my Axis Capo recently, I realized I’m pretty overdue for experimenting with a capo and actually very much looking forward to playing with one again as a more confident player and writer.
More often than not, electric guitar strings are a last minute choice, hanging lonely on a wall behind the counter. A quick read on the packaging, and a suggestion or two from the person behind the counter does the trick. Often intimidating, and technical words are what can push us away from becoming educated and strings—often considered an accessory—get overlooked. In reality, the vibrations they create, or don’t create, will make or break your tone no matter how amazing your guitar is. Companies like Elixir Strings have taken it upon themselves to elevate the string game, in particular through their custom coated strings which have become popular among studio and touring musicians.

In my early string shopping adventures, I became acquainted with the Elixir Nanoweb coated strings. I quickly started to believe that these were the perfect string for me. They eliminated finger squeaks (a highly valued quality in the studio), guaranteed tone consistency throughout the life of the strings, and a long life-span overall. After six plus months of use before breaking my first string, uncoated strings were dead to me.
The guitar you play is going to be the thing closest to your body, the thing you wrap your immediate creative energy around. The materials on that guitar are of the utmost importance. What about the part of the guitar that dictates the way your fingers get to dance, and the immediate output they create?
Strings: The first thing we touch, the first thing we forget to care about. Let’s break down what you’re actually touching when you play coated strings.
Elixir Strings uses a proprietary coating built on science and engineering, consisting of organic polymers. What’s that? These polymers are the same materials found in medical products that are used inside the human body.
Unique to Elixir Strings coating process, the gaps between the windings in the wound strings, and outer surface of the string, are coated with a featherweight proprietary polymer. This repels debris like dirt, oil, and dead skin from attaching itself to your strings. Once your strings get dirty, you may as well be screaming with your hands over your mouth, your tone and resonance are highly compromised.

Corrosion is a string’s worst nightmare, causing breakage at friction points, caused by rust, potting, and wear and tear. Elixir’s newest line, the nickel plated Optiweb coated electric string, has quickly moved into the spotlight with the ability to feel like an uncoated string. A thinner coating makes for a more natural feel. You get the benefit of a bright, crisp tone, without the altered feeling of a coated string. You can experiment with any of Elixir’s three types of custom coated strings to find your preferred tone and feel, knowing all will provide the same tone life.
Polyweb: Warm, slick, and fast: the original coating
Nanoweb: Bright, and smooth: feels a little more natural than Polyweb, still squeak proof.
Optiweb: Crisp, and natural feeling, sounds like uncoated strings, and have the cleanest response, giving you more attack.
Elixir Strings strives to set you up for success, utilizing proven scientific technology to extend your tone life, and quality exponentially. Less fussing, more shredding!
Fender is one of the oldest and most popular manufacturers of musical instruments today. They helped usher solid body electric guitars into existence during the 1950s which has since become their most influential period. From 1950 through 1959 Fender released three core guitars that were each meant to be at the top of the line with each debut, including the Jazzmaster.
The Jazzmaster arrived in 1959 and was a radical departure from both the Telecaster and the Stratocaster which were already very successful. Originally this guitar was designed to entice jazz musicians who were not typically known for playing with solid body guitars. The offset shape of the guitar was designed to be exceptionally comfortable while playing sitting down and balances well when standing up. The bridge featured a new tremolo system that offered greater tuning stability with a bar that was easier to reach.
At the heart of the guitar were its electronics which featured large single coil pickups that were similar in appearance to Gibson P90s but had a different method of construction and their own distinct sound. Jazzmasters also featured a unique “rhythm circuit” that when engaged gave a slightly darker tone to the guitar’s neck pickup. The rhythm circuit also had separate volume and tone controls which could be used to dial in a “preset” tone on the fly.
By 1980 the guitars were gone, production ceased and discontinued. Thankfully the Jazzmaster did not stay discontinued for long as today they still offer it in a variety of configurations and price points.
Renaissance
Although the Jazzmaster never quite took off with its intended audience, it began to develop an underground following with guitarists who were attracted to its unique sound and aesthetics. During the 80s into the early 90s Jazzmasters could be found for lower prices than vintage strats and teles.
A lot of players in the emerging indie and alternative rock scene began to use Jazzmasters. There were a lot of popular mods that players used to make their guitars a little more suited to their own needs but one of the more popular ones was changing the pickups.
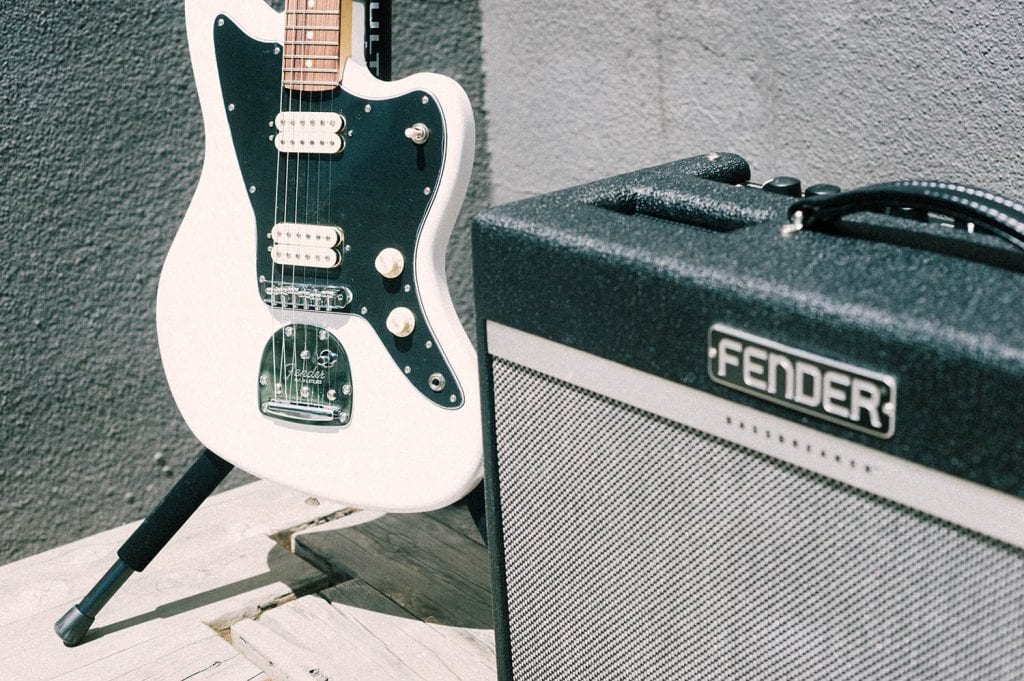
Although the original pickups were highly regarded for their tone, some players preferred humbuckers which handled the higher gain tones with less noise and gave the guitars a thicker more modern sound. With this in consideration Fender unveiled the Player Series Jazzmaster.
Introducing the Player Series Jazzmaster
Fender Player Series instruments are all made with pride in Ensenada, Mexico. The intent behind the series is to offer high quality affordable instruments that are built well enough to be enjoyed by players at all levels of ability. Overall the Player Series in general offers an excellent value for their relatively low cost when compared to Fender’s American-made instruments.

The Player Series Jazzmaster takes a modern approach while still offering a vintage inspired look and sound. The body keeps the original contours while the hardware gets a beefier bridge and set of tuners. Instead of the original single coil pickups, Fender provides a fantastic set of Alnico II humbucking pickups. The pickups have a nice amount of clarity with plenty of output to push a tube amp into overdrive. In lieu of a rhythm circuit you have the ability to split the coils via a push pull pot on the tone knob arguably making it the most versatile guitar in entire Player Series lineup.
With the push pull engaged I was able to capture that sweet single coil sound that made Fender famous in the first place, but with the humbuckers engaged I had no problem taking the same guitar to punk rock and even some rather extreme metal territories. It’s also worth noting that there is a hum canceling position available with using the guitar in its single coil mode.
The neck features a Pau Ferro fretboard which is currently a more sustainable alternative to rosewood. Pau Ferro has an appearance that is similar to rosewood but is a bit lighter in color ranging from reddish hues to deep chocolate brown. The grain tends to be a bit more intense/striking than rosewood. It is also less porous than rosewood and has a feel that is closer to ebony. Because the wood is less porous it does not need to be oiled as much or nearly as often, overall it requires little maintenance.
Previously, Pau Ferro fretboards were seen on the Fender Stevie Ray Vaughan signature model which was introduced in 1992 and it is nice to see Fender implementing a high quality wood with sustainability in mind on the Player Series guitars. The tremolo on the guitar is quite nice and holds up to extended use without slipping out of tune once it’s dialed in.
Impressions…
For this review I paired the guitar with Fender’s Bassbreaker 30R which, much like the Player Series Jazzmaster, is a versatile powerhouse of its own and one of Fender’s few High Gain options. Once I unzipped the gig bag I was in awe of just how cool the instrument looked. I felt as if it would look good on stage with just about any band regardless of genre.
One of the things that surprised me the most was how comfortable it was to play, and as a result I played it as often as I could have. For the price point, the pickups were among some of the best I have heard and I would likely not consider changing them for quite some time, if ever. I also found the sheer range of tonal options quite useful and inspiring which overall, made for a guitar that was very hard to put down.
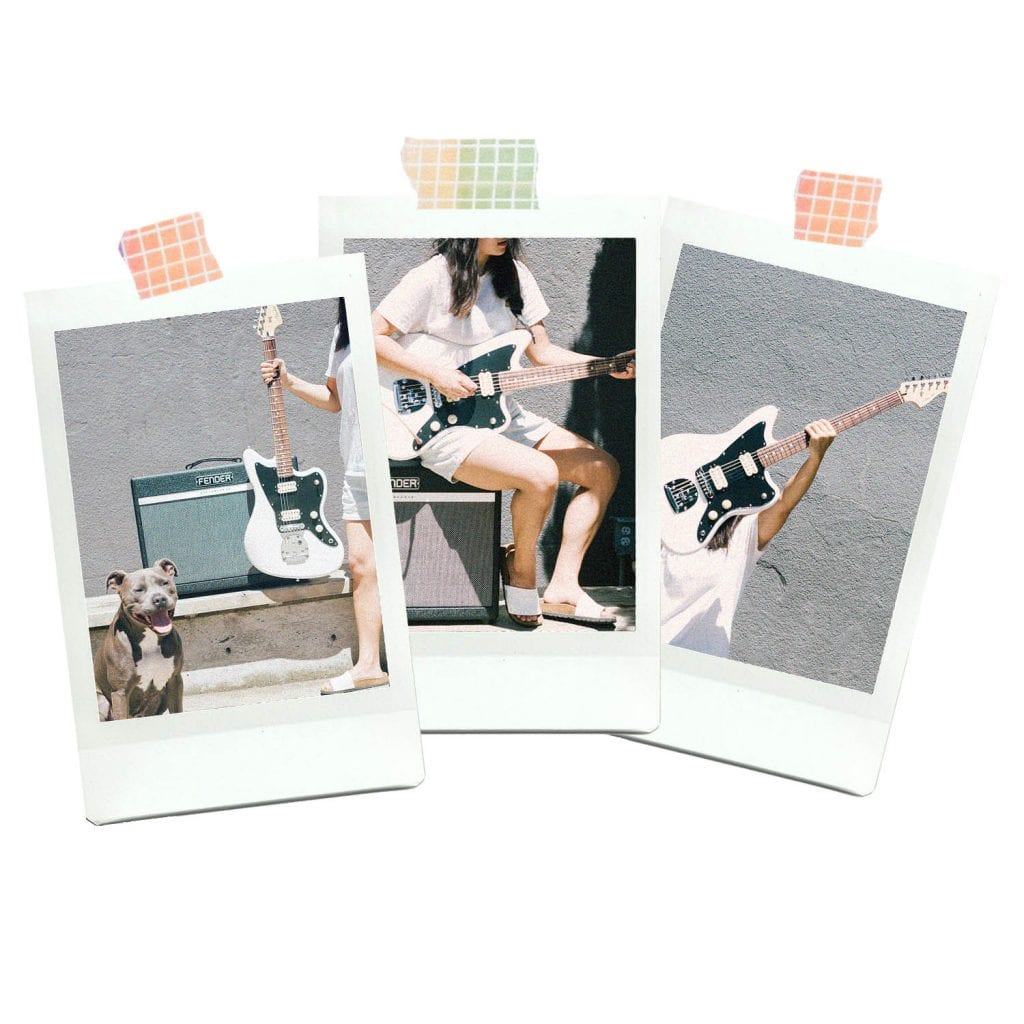
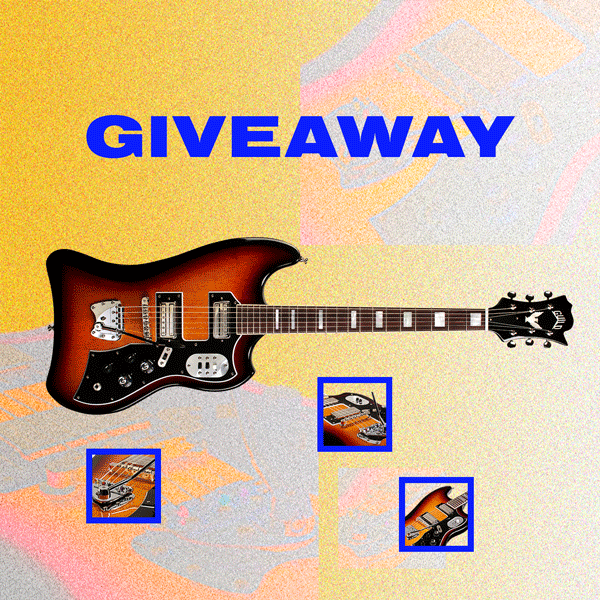
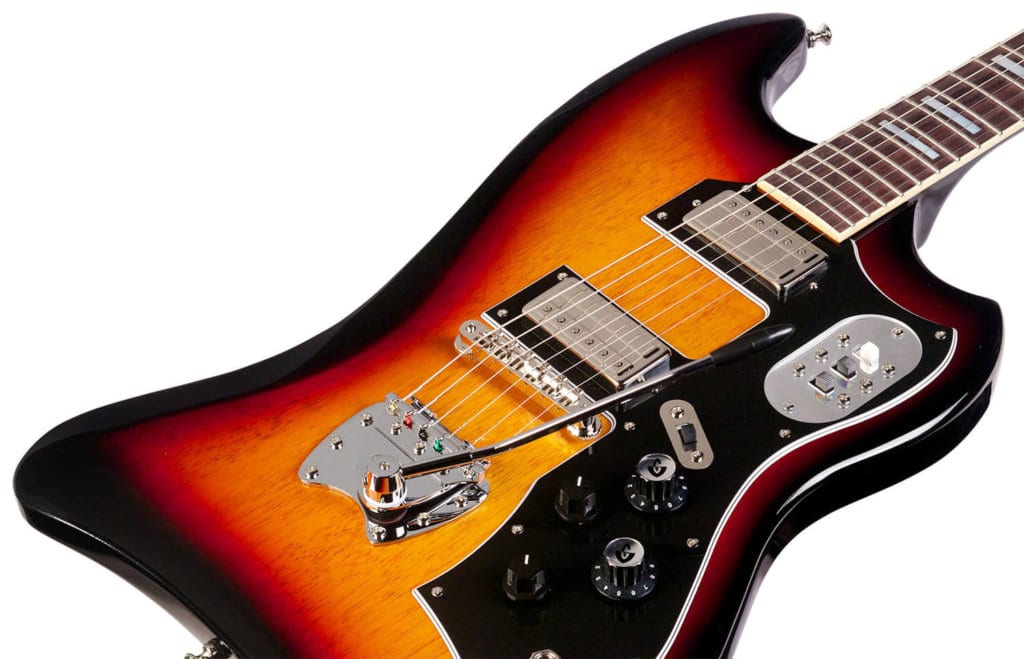
ENTER NOW to for a chance to win the Guild Guitar S-200 T-Bird. It’s a performance enhanced version of the OG from the 60s featuring the LB-1 Little Bucker pickups that pay homage to the original Guild humbuckers. The T-Bird offers one of the largest array of tones to give you maximum variety.
At A Glance
To enter, fill in the submissions form below and follow these three rules:
CONGRATS TO ISABEL ZACHARIAS FOR WINNING!
When you first start playing guitar it’s one thing to learn when you need to change your strings, but navigating the sheer variety of strings available can be difficult without any prior knowledge or experience. The moment you break a guitar string changing them becomes mandatory, but it should not be the only time it happens.
When do I change my strings?
Strings wear out when they become dirty and develop pits. The windings start to flatten around the area that the strings make contact with the frets. As, they begin to wear out the strings will also lose the ability to stay in tune and start to sound dull. Often symptoms of bad strings can literally be felt and heard when you’re performing:
Does your guitar all of a sudden feel more difficult or uncomfortable to play? Do you feel like your tone is going dead? Because strings play such a large role in the overall tone of our instruments it’s worth it to try something different when you are feeling uninspired.
What strings are we using?
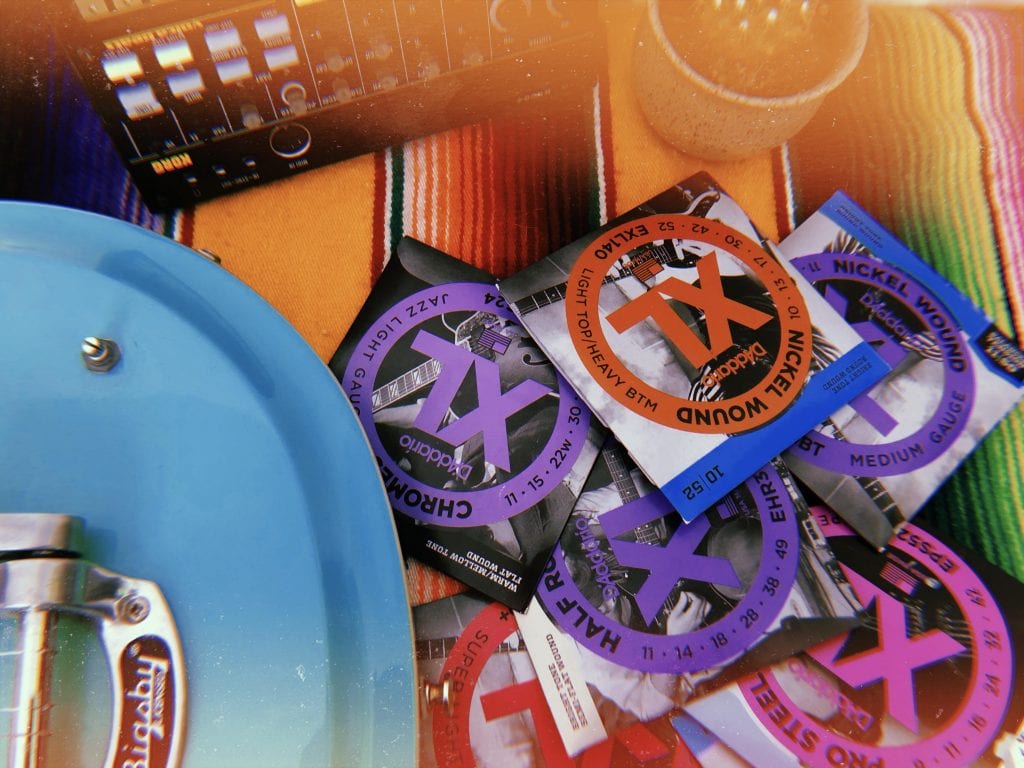
D’Addario is one of the most popular string makers in the world today and pride themselves on being a leader in string innovation. They offer more than a dozen varieties of electric guitar strings suitable for any style and, thanks to their attention to detail, deliver incredibly consistent performance. D’Addario & Company, Inc. is a family owned and operated business founded in 1974 and currently based in New York. The XL electric guitar strings that we’re using in this lesson is among one of their most popular: each string utilizes a high-carbon hex shaped steel core for extra strength and tuning stability. This core is then finished in a variety of configurations, each with its own unique playability and feel.
What does that even mean? We’ll explain more about the components within a string that impact your tone, and how to look out for the option that suits you best.

Selecting the right size of guitar strings is all about choosing how you want your guitar to “feel,” and it can make the difference between a guitar that you never want to put down and one that you might never want to pick up again. Light strings are easier to fret and bend, but they also require a lighter, more accurate touch to compensate for the reduced tension compared to medium gauge strings. Heavy gauge strings can be played at standard tuning (E). This will produce a fuller tone, but will take a bit of effort to play with due to the increase in tension.
A Lesson in Tension
It’s important to consider the tuning(s) that you will be using most often. Tuning more than a half-step down—for example, drop C—can significantly decrease the tension of your strings. If tuning down is common for you, you’ll want to consider medium or heavy gauge strings to help counteract that drop in tension which can make the strings difficult to play in tune. If there is too much tension the strings will pull the neck forward resulting in a higher action which then makes it harder to play. When there is not enough tension the neck will pull the strings closer to the frets resulting in a lower action that is difficult to play without excessive buzzing. In extreme cases the strings might even rest against the fretboard itself. Typically, guitars that have a vibrato system are a little more sensitive.
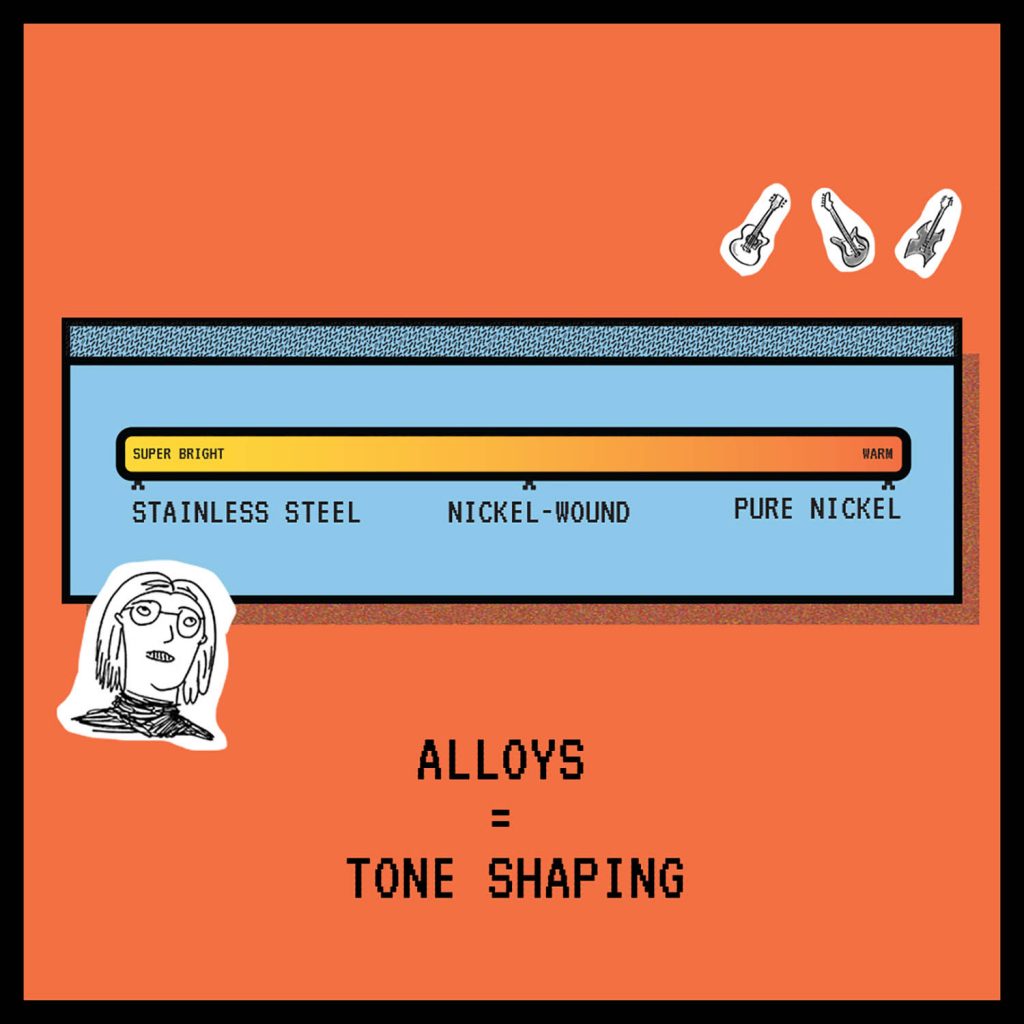
Like coffee, guitar strings are available in a few different blends which are commonly referred to as alloys. Most electric guitar strings feature a steel core while the outer winding may consist of different alloys such as pure nickel, nickel-plated steel, stainless steel. Each alloy will uniquely respond to the magnetic properties of your guitar’s pickups, with some sounding brighter than others.
Pure nickel is known today for its warmth and smooth upper highs, because it was one of the only options available during the early years of the electric guitar’s history, it is a solid choice for recreating a vintage guitar sound.Pure-nickel wound strings are also handy for helping tame an overly bright sounding guitar.
Nickel-wound is short for nickel-plated steel and it is perhaps the most popular electric guitar string and considered the industry standard because of its overall balanced sound.
Stainless steel is more sensitive to magnetics than pure-nickel and nickel-wound strings. As a result there is more output and an increased level of highs. These can sound brighter and more aggressive, making them a good match for guitarists who like to play with very high gain amps and pedals. High carbon steel is also good for bringing some life to a dark sounding guitar.
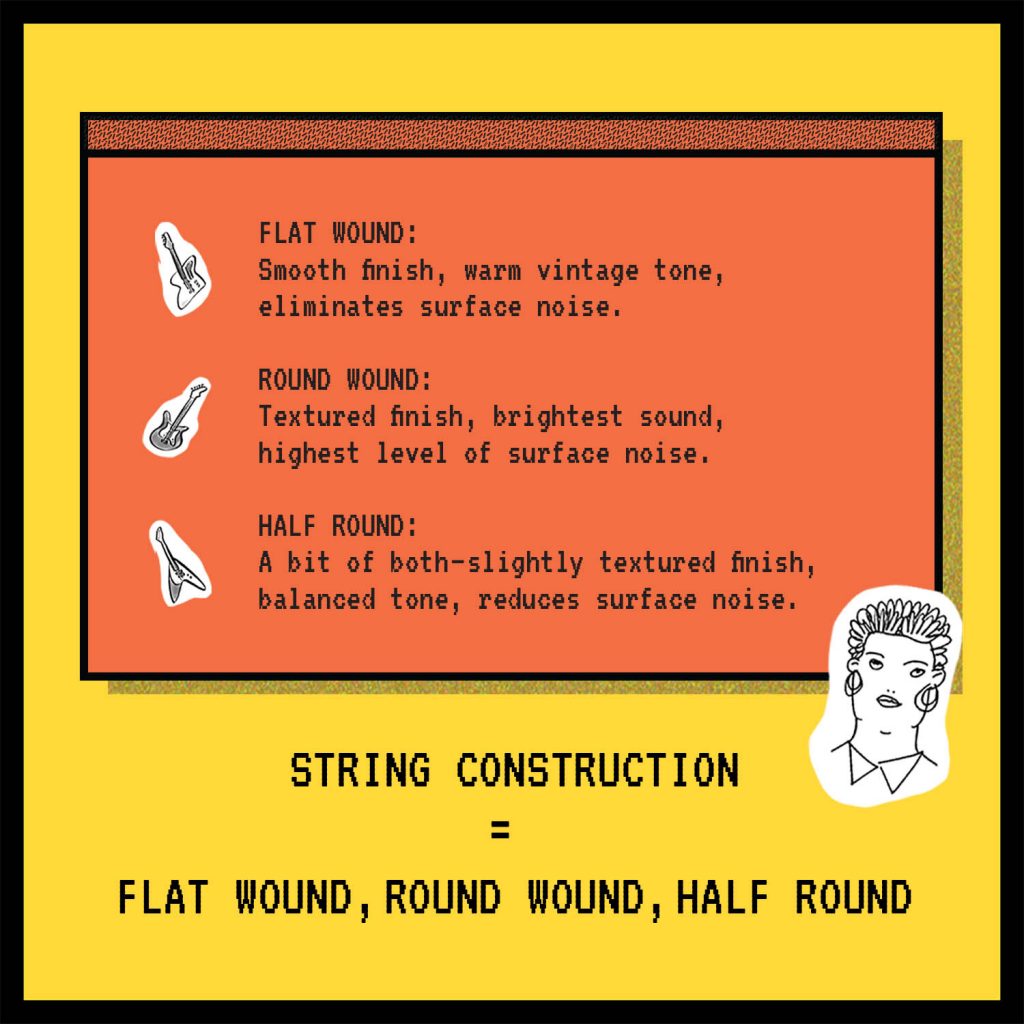
Flat wound strings are the original electric guitar string and as a result just so happened to be there during the first wave of everything from Blues to Rock and Roll. These strings have a much smoother finish than round wounds and have significantly less noise. However, because of the winding they are also not as bright as round wounds. The timbre of these strings could be described as “classic, with a strong fundamental and a lot of warmth.” I would highly recommend trying a set of chromes if you have never tried a set of flat wounds and your inspirations tend be of the vintage flavor.
Round wound strings for the electric guitar started to emerge in the early 1960s, became an industry standard by the 1980s and are showing no signs of slowing down anytime soon. They differ from flat wounds not only by timbre but also feel. The type of metal core used to make the string has a significant effect on the tonal character of the strings timbre.
Half round strings are a cross between flat wound and round wound strings offering the best of both worlds. These strings are brighter sounding than most pure-nickel round wounds but not as bright as nickel-plated steel. Like flat wound strings, there is a reduction in surface noise compared to round wounds—making them a great choice for recording. They are also a great choice for players who like the feel of flat wounds but want to cut through a little more with reduced finger noise.
In Conclusion
I would highly suggest for all guitar players to experiment with all of the factors that we have gone over here at least once. I have been playing guitar for nearly 18 years now and one thing I have learned is that there is simply not a “one size fits all” string that feels and sounds perfect on every guitar. Every guitar is different and every player unique. You might find that you like a certain type of winding with certain type of guitar, and what ends up becoming your favorite string on your “number one” just might surprise you.
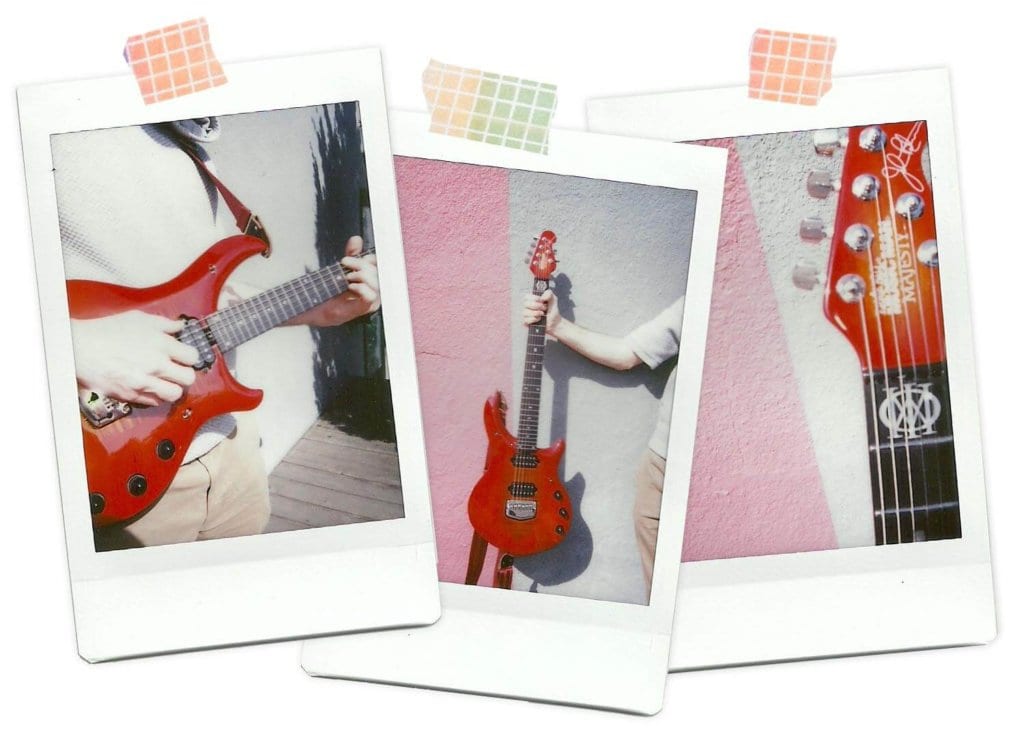
Even playing the Monarchy Series Majesty through a tiny amp will still melt a room. The tones are so clear; no hum at all to the guitar, and the built-in gain boost just destroys everything. John Petrucci has put all of his experiences as a guitar player and performer for the last 35 years into the making of this instrument. The technology and design involved in the Majesty shines through from the mind of a true player. I enjoyed going through and discovering all that the Majesty has to offer.
AT A GLANCE
FEATURES
When learning about this guitar, I felt like I was trying to get through a new IOS system. The cut out is different than most guitars, carved in deep to the body so you can reach that 24th fret. The entire guitar is one piece of African mahogany blended together with a Honduran mahogany neck. There are many options of sounds with only three push/push knobs and two toggle switches. The two humbuckers can be split on the inner coils by pushing in the tone knob, swooping out your mids for that lead riff. Having a built-in preamp boost gets that fat bottom distortion, no pedals needed. The top toggle switch controls the Piezo pickups built into the saddle of the floating tremolo bridge.
PIEZO PICKUPS
On top of having a guitar that looks like a Volkswagen race car with just as many features, you can make it sound like an acoustic with the flip of a switch. Piezo pickups work by picking up the vibrations of the string and resonance of the wood. Normally used on acoustic nylon stringed instrument (since normal magnetic pickups can’t pick up nylon), these pickups are built into the bridge to receive the vibrations. They typically use a type of compressed crystal, yet another reason why guitars are magic.
With the stereo output, you can route into a second amp to have the piezo pickup play out separately as if playing two guitars at once. The tone of the “acoustic” string vibration comes out very bright and metallic, while the humbuckers fill out the lower register. On the back of the guitar there is a panel that controls the mono settings, as well as a battery pack to power the piezo pickup.
TO WRAP IT UP
The new 2019 Monarchy Series Majesty is priced for the player who needs a guitar that plays and sounds as majestic as it looks. At $3,299.00 you can count on the craftwork to shine above the rest. With a custom signature on the headstock, there really is no other guitar quite like this one.
At the tail end of the 1800s, Portuguese immigrants from Madeira and Cape Verde who were inhabiting the Hawaiian islands began to introduce the instruments that we now know as ukuleles today. Inspired by other small guitar-like instruments such as the cavaquinho, timple, and rajão, the four string ukulele quickly became popular not only on the islands, but within the entire world itself.
These days if you are a musician or simply know someone who is, then you have probably been around a ukulele at least once due to its immense popularity. For many, the ukulele becomes something of a companion that is taken everywhere and played often. Playing often requires changing strings often, and sometimes you may find yourself in a position where the job might need to get done quickly.
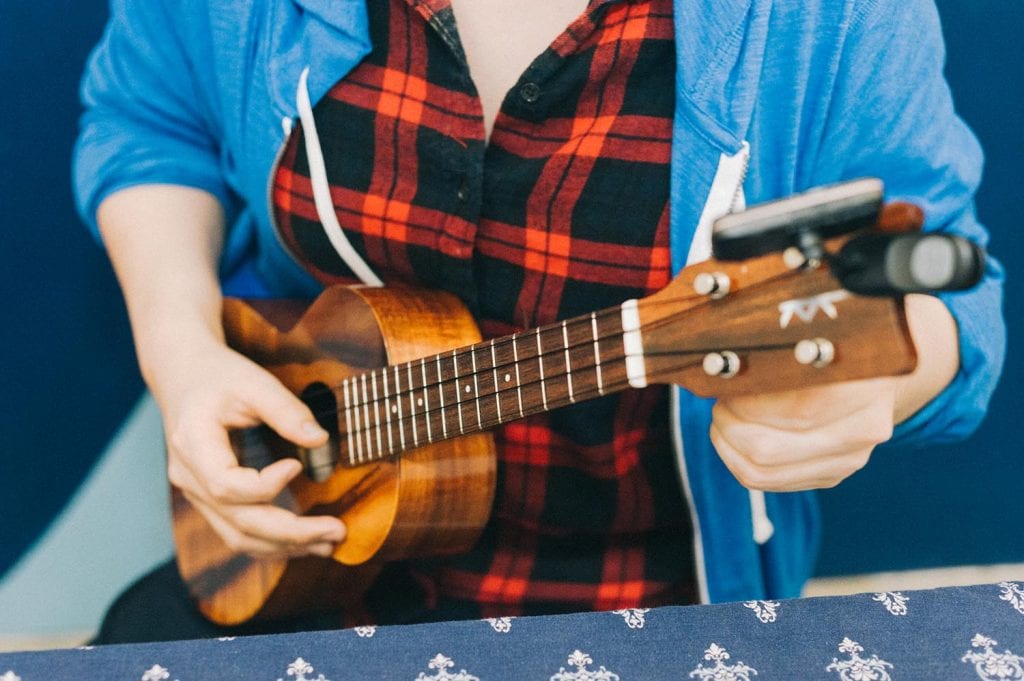
Traditionally, ukulele strings are tied on the bridge of the instrument in a manner similar to a classical guitar. The process of tying on strings can be tedious even for the experienced hand, so players might not change them as often as they should. As ukulele strings are played, the pressure from the frets along with microscopic dirt and debris eventually compromise the instrument’s ability to stay in tune. The string may also simply start to sound dull, altering the timbre of the instrument in a negative way. It is for these reasons that it is recommended to change all the strings at the same time whenever one breaks so that you can have consistent tuning and timbre across the entire fretboard.
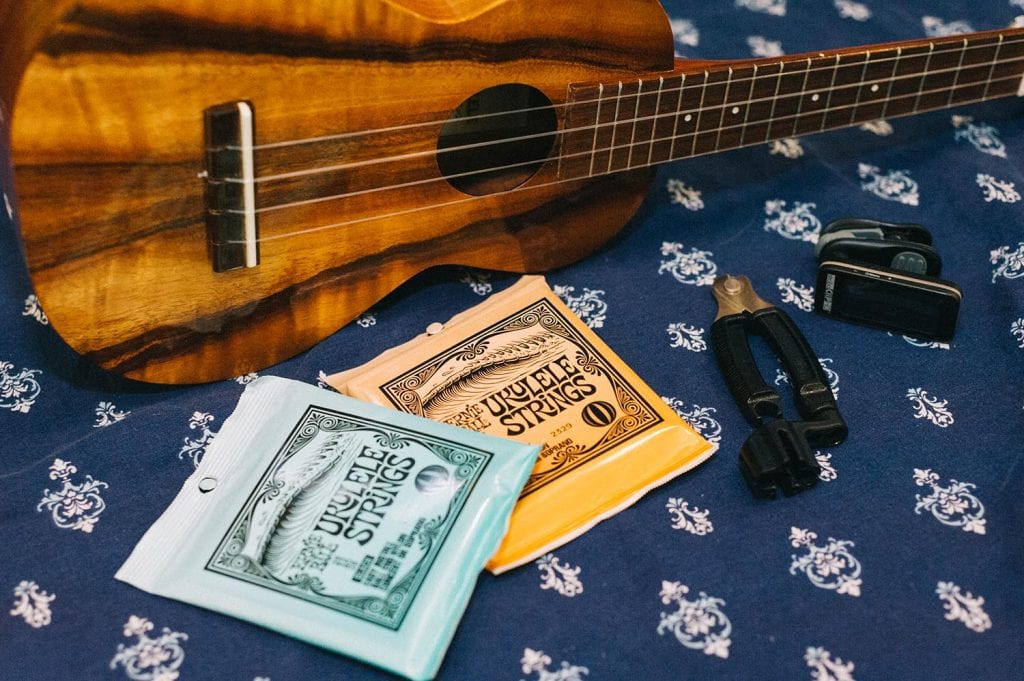
The easiest way to go about changing your ukulele strings only involves a few simple tools and a bit of practice. It might take you 30 minutes to an hour to change your strings for the first time but eventually you might be able to get through it in less than 10 minutes. All you need is a fresh set of strings, a string cutter, peg-winder, tuner, and a clean place to work where the ukulele will not be susceptible to damage. For this example we will use the new ukulele strings available from Ernie Ball which are made of fluorocarbon and feature a ball end. These strings are an excellent choice because they eliminate the need to tie the strings on to the bridge. They are available in both black and clear fluorocarbon which have a very balanced sound. I find the clears to have a little more presence in the lower mids while the black ones are quite snappy and perhaps a little more articulate in the upper frequencies. It’s worth it to try out both formulas to see which sounds best on your ukulele. Both packs provide a generous enough length to accommodate any ukulele.
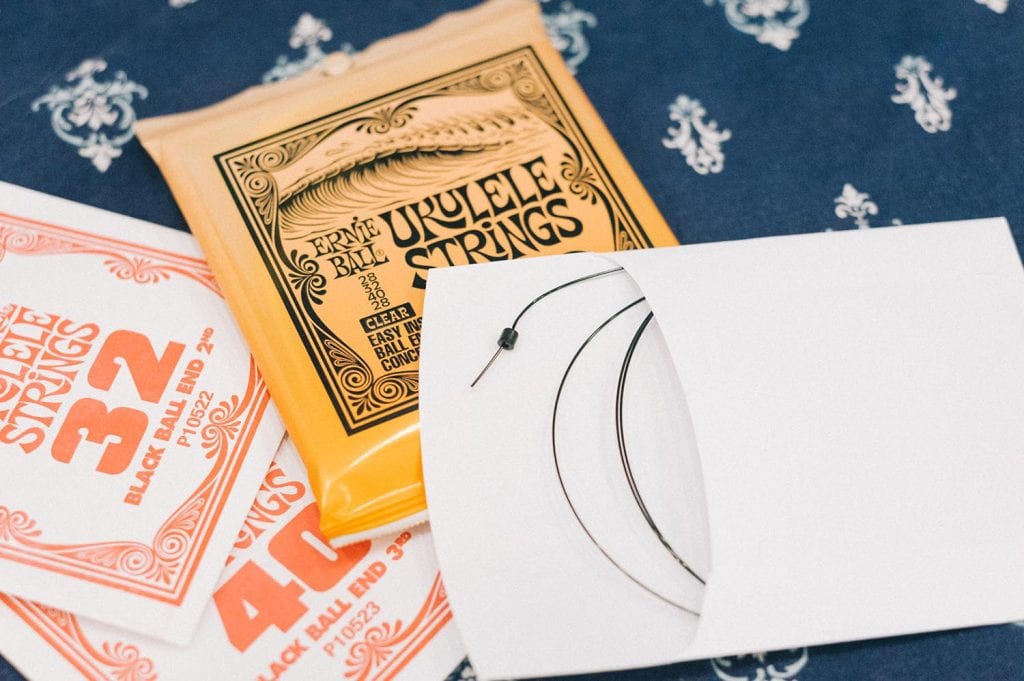
Inspect and determine which type of bridge the ukulele has, the two most common are tie-on, and slotted bridges. Bridges with pins to hold the strings in, like the ones used on steel-string acoustic guitars, are quite rare but do pop up from time to time. Remove all of the strings by using the peg winder to loosen all of the tension out of them one by one. When the strings are off you’ll have a good opportunity to really clean up the instrument and it’s always a good idea to do so. The strings themselves come packaged with labels indicating which string is which, but it’s useful to remember that the “1st string” is the one closest to the floor when you are holding the instrument in the playing position and the “4th string” is the one closest to the ceiling. If you are using a tie-on bridge, thread the string through the hole on the bridge which you would normally tie onto and pull it through until the ball end meets the end of the bridge. The ball end will hold your string in place instead of having to tie it on. If you are using a slotted bridge than you can simply cut the ball end off and tie one small knot at the end of the string. The knot itself can just be a simple single loop.*

After you tie your knot, slide it into the slot of the bridge and pull up until the knot keeps the string from popping out of place. If you are working with a bridge that uses pins then you will need to remove them first. Place the string inside the hole and slowly push the pin back into place while simultaneously pulling up on the string until the ball end locks the string into place. Once your string is secured to the bridge then you’ll want to lay one of your hands around the third fret using a gentle karate chop motion. You’ll find that using your hand as a guide like this will always result in the perfect amount of wraps around the tuners of many stringed instruments.
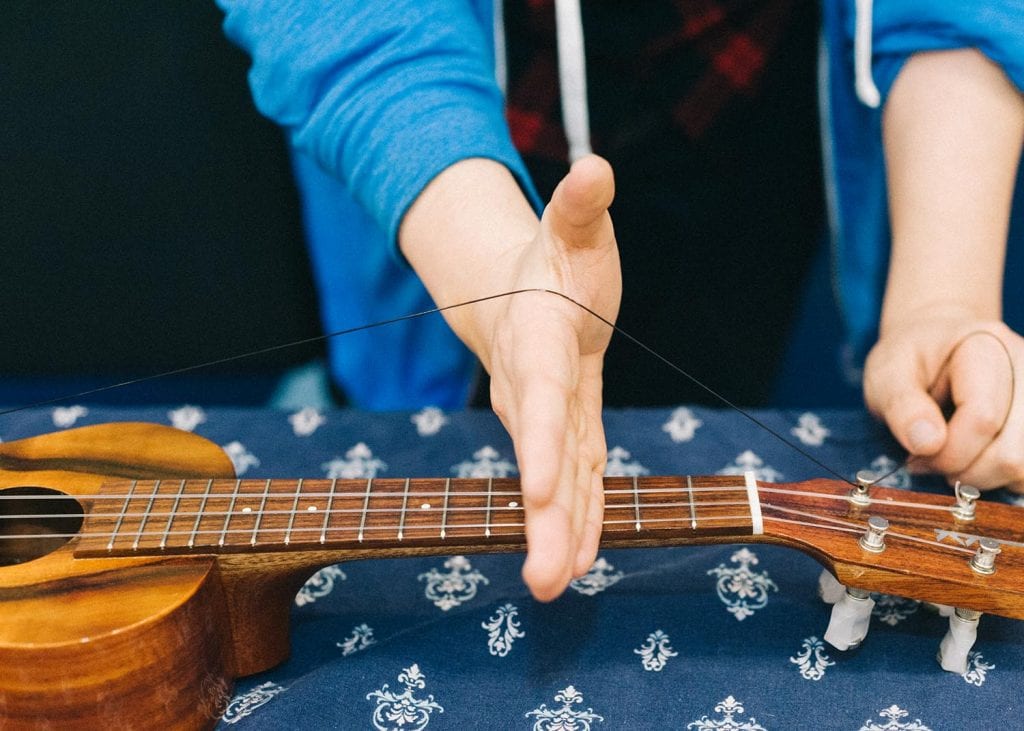
With your other hand guide the string inside of the hole of the tuner and pull it through until the string begins to have some tension. While still holding that tension take note of the direction that you will be turning the tuning key. Take the end of the string that is sticking out and from the opposite direction that you will be turning the tuning key, wrap the string once underneath itself and pull up. Start winding the tuning key and guide the windings into place as you turn it so that all of wraps are stacked on top each other instead of over each other.
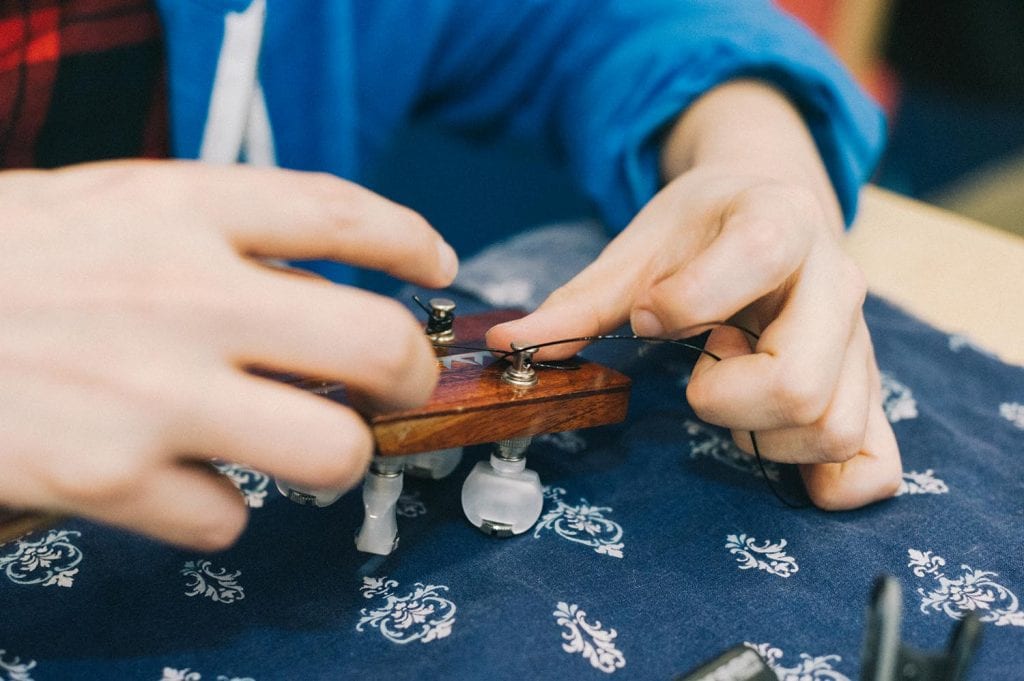
This will result in a winding that is far less likely to slip and increase your tuning stability. Cut the remaining ends off the strings with the string cutter and bring the instrument to pitch. Gently tug and strings and re-tune until the instrument starts to hold the tuning. Recycle the packaging and enjoy the fresh sound!