When you first start playing guitar it’s one thing to learn when you need to change your strings, but navigating the sheer variety of strings available can be difficult without any prior knowledge or experience. The moment you break a guitar string changing them becomes mandatory, but it should not be the only time it happens.
When do I change my strings?
Strings wear out when they become dirty and develop pits. The windings start to flatten around the area that the strings make contact with the frets. As, they begin to wear out the strings will also lose the ability to stay in tune and start to sound dull. Often symptoms of bad strings can literally be felt and heard when you’re performing:
Does your guitar all of a sudden feel more difficult or uncomfortable to play? Do you feel like your tone is going dead? Because strings play such a large role in the overall tone of our instruments it’s worth it to try something different when you are feeling uninspired.
What strings are we using?
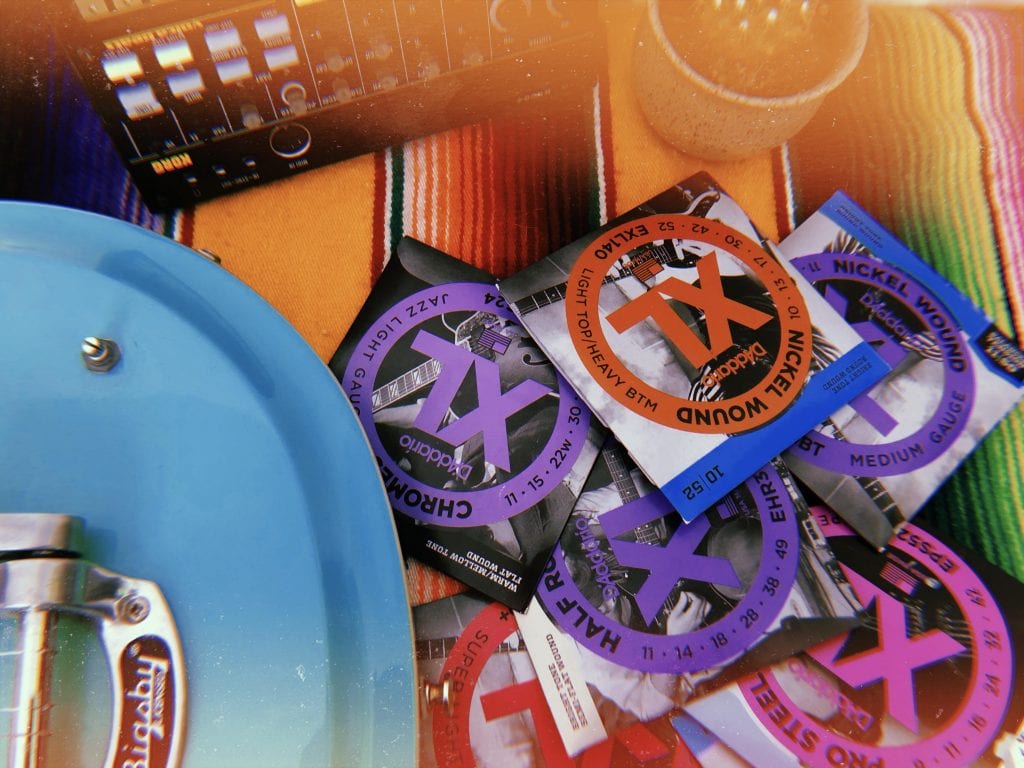
D’Addario is one of the most popular string makers in the world today and pride themselves on being a leader in string innovation. They offer more than a dozen varieties of electric guitar strings suitable for any style and, thanks to their attention to detail, deliver incredibly consistent performance. D’Addario & Company, Inc. is a family owned and operated business founded in 1974 and currently based in New York. The XL electric guitar strings that we’re using in this lesson is among one of their most popular: each string utilizes a high-carbon hex shaped steel core for extra strength and tuning stability. This core is then finished in a variety of configurations, each with its own unique playability and feel.
What does that even mean? We’ll explain more about the components within a string that impact your tone, and how to look out for the option that suits you best.

Selecting the right size of guitar strings is all about choosing how you want your guitar to “feel,” and it can make the difference between a guitar that you never want to put down and one that you might never want to pick up again. Light strings are easier to fret and bend, but they also require a lighter, more accurate touch to compensate for the reduced tension compared to medium gauge strings. Heavy gauge strings can be played at standard tuning (E). This will produce a fuller tone, but will take a bit of effort to play with due to the increase in tension.
A Lesson in Tension
It’s important to consider the tuning(s) that you will be using most often. Tuning more than a half-step down—for example, drop C—can significantly decrease the tension of your strings. If tuning down is common for you, you’ll want to consider medium or heavy gauge strings to help counteract that drop in tension which can make the strings difficult to play in tune. If there is too much tension the strings will pull the neck forward resulting in a higher action which then makes it harder to play. When there is not enough tension the neck will pull the strings closer to the frets resulting in a lower action that is difficult to play without excessive buzzing. In extreme cases the strings might even rest against the fretboard itself. Typically, guitars that have a vibrato system are a little more sensitive.
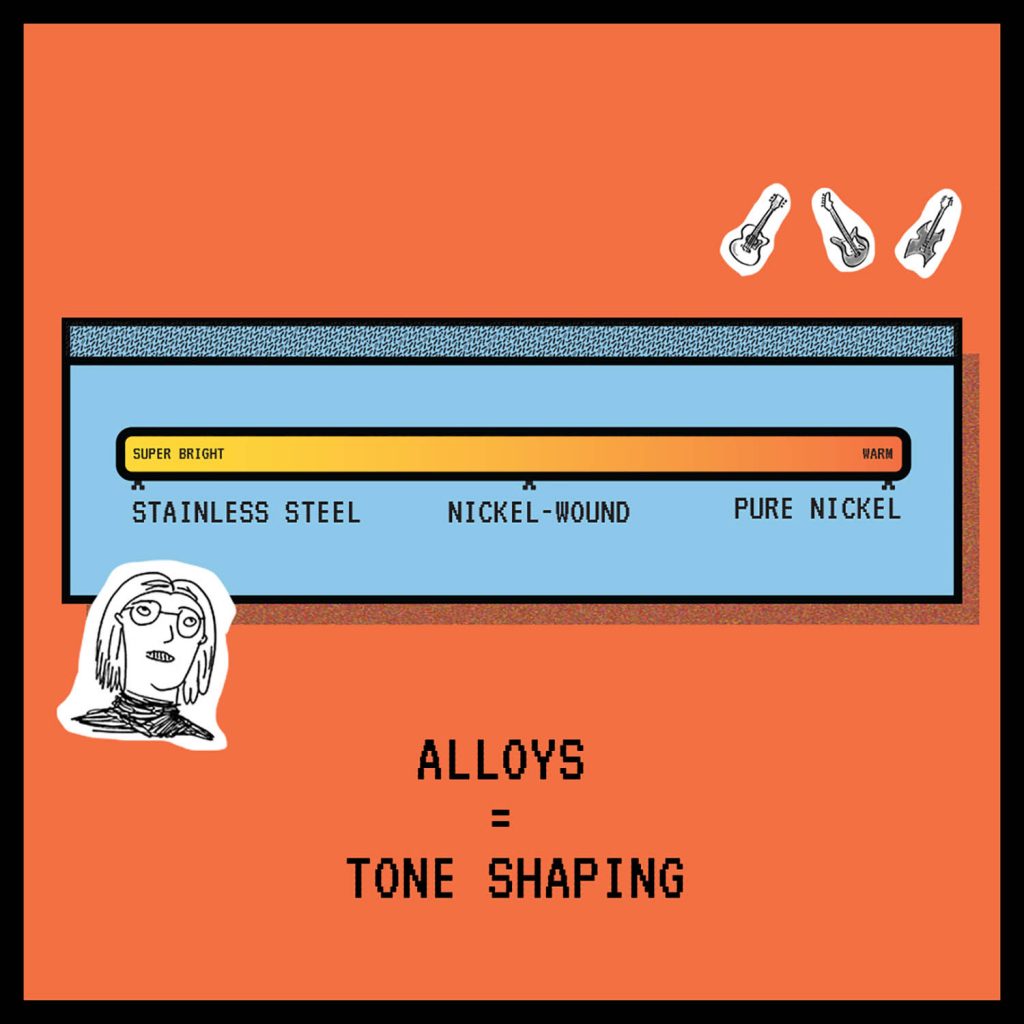
Like coffee, guitar strings are available in a few different blends which are commonly referred to as alloys. Most electric guitar strings feature a steel core while the outer winding may consist of different alloys such as pure nickel, nickel-plated steel, stainless steel. Each alloy will uniquely respond to the magnetic properties of your guitar’s pickups, with some sounding brighter than others.
Pure nickel is known today for its warmth and smooth upper highs, because it was one of the only options available during the early years of the electric guitar’s history, it is a solid choice for recreating a vintage guitar sound.Pure-nickel wound strings are also handy for helping tame an overly bright sounding guitar.
Nickel-wound is short for nickel-plated steel and it is perhaps the most popular electric guitar string and considered the industry standard because of its overall balanced sound.
Stainless steel is more sensitive to magnetics than pure-nickel and nickel-wound strings. As a result there is more output and an increased level of highs. These can sound brighter and more aggressive, making them a good match for guitarists who like to play with very high gain amps and pedals. High carbon steel is also good for bringing some life to a dark sounding guitar.
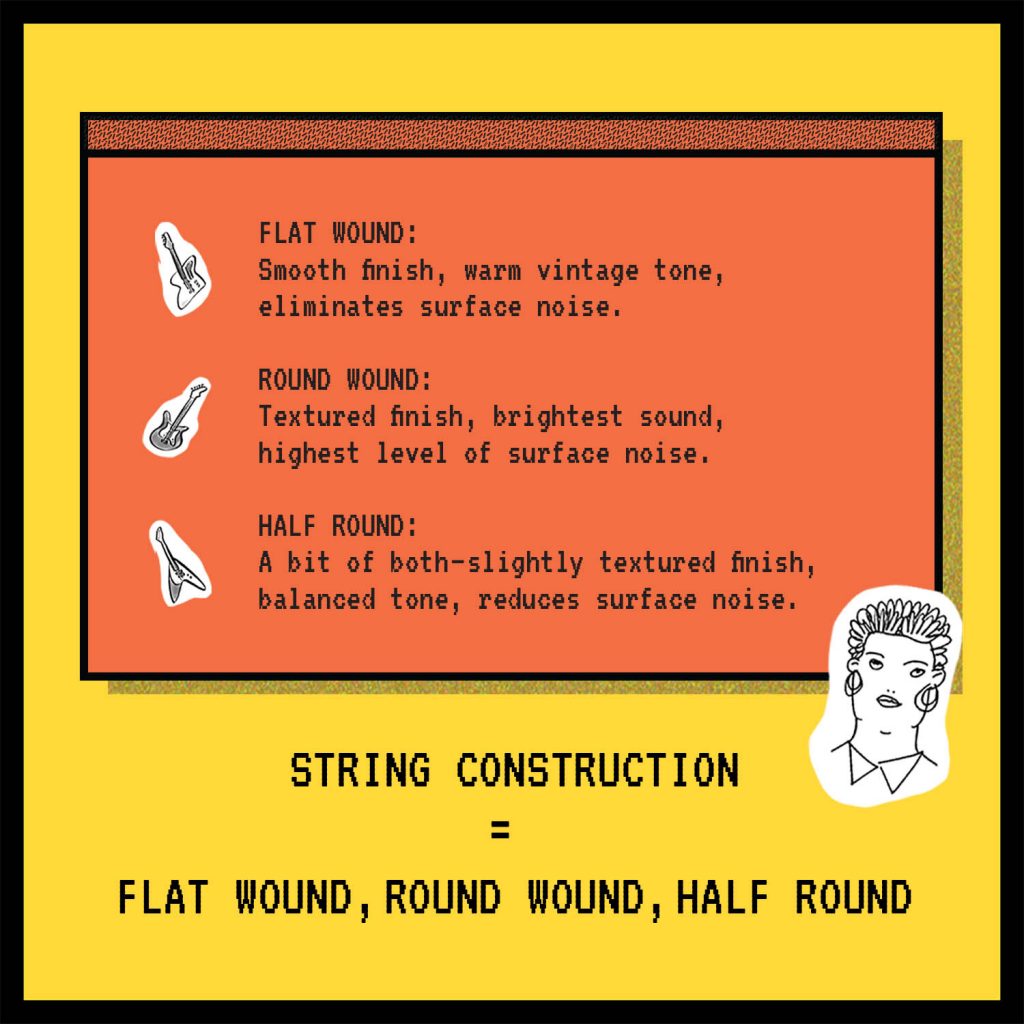
Flat wound strings are the original electric guitar string and as a result just so happened to be there during the first wave of everything from Blues to Rock and Roll. These strings have a much smoother finish than round wounds and have significantly less noise. However, because of the winding they are also not as bright as round wounds. The timbre of these strings could be described as “classic, with a strong fundamental and a lot of warmth.” I would highly recommend trying a set of chromes if you have never tried a set of flat wounds and your inspirations tend be of the vintage flavor.
Round wound strings for the electric guitar started to emerge in the early 1960s, became an industry standard by the 1980s and are showing no signs of slowing down anytime soon. They differ from flat wounds not only by timbre but also feel. The type of metal core used to make the string has a significant effect on the tonal character of the strings timbre.
Half round strings are a cross between flat wound and round wound strings offering the best of both worlds. These strings are brighter sounding than most pure-nickel round wounds but not as bright as nickel-plated steel. Like flat wound strings, there is a reduction in surface noise compared to round wounds—making them a great choice for recording. They are also a great choice for players who like the feel of flat wounds but want to cut through a little more with reduced finger noise.
In Conclusion
I would highly suggest for all guitar players to experiment with all of the factors that we have gone over here at least once. I have been playing guitar for nearly 18 years now and one thing I have learned is that there is simply not a “one size fits all” string that feels and sounds perfect on every guitar. Every guitar is different and every player unique. You might find that you like a certain type of winding with certain type of guitar, and what ends up becoming your favorite string on your “number one” just might surprise you.
At the tail end of the 1800s, Portuguese immigrants from Madeira and Cape Verde who were inhabiting the Hawaiian islands began to introduce the instruments that we now know as ukuleles today. Inspired by other small guitar-like instruments such as the cavaquinho, timple, and rajão, the four string ukulele quickly became popular not only on the islands, but within the entire world itself.
These days if you are a musician or simply know someone who is, then you have probably been around a ukulele at least once due to its immense popularity. For many, the ukulele becomes something of a companion that is taken everywhere and played often. Playing often requires changing strings often, and sometimes you may find yourself in a position where the job might need to get done quickly.
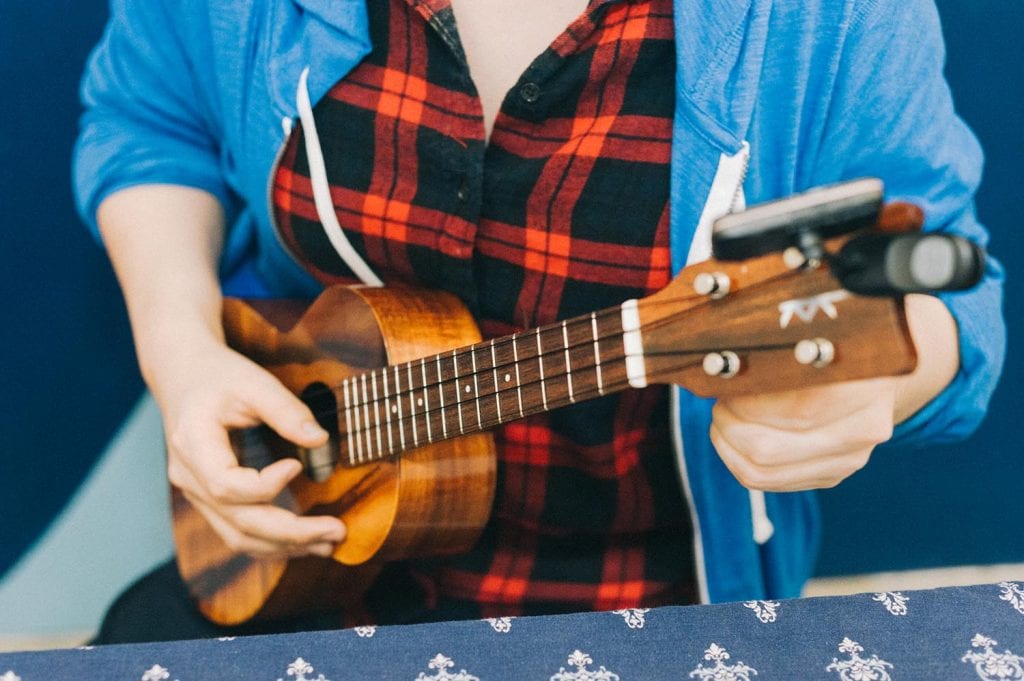
Traditionally, ukulele strings are tied on the bridge of the instrument in a manner similar to a classical guitar. The process of tying on strings can be tedious even for the experienced hand, so players might not change them as often as they should. As ukulele strings are played, the pressure from the frets along with microscopic dirt and debris eventually compromise the instrument’s ability to stay in tune. The string may also simply start to sound dull, altering the timbre of the instrument in a negative way. It is for these reasons that it is recommended to change all the strings at the same time whenever one breaks so that you can have consistent tuning and timbre across the entire fretboard.
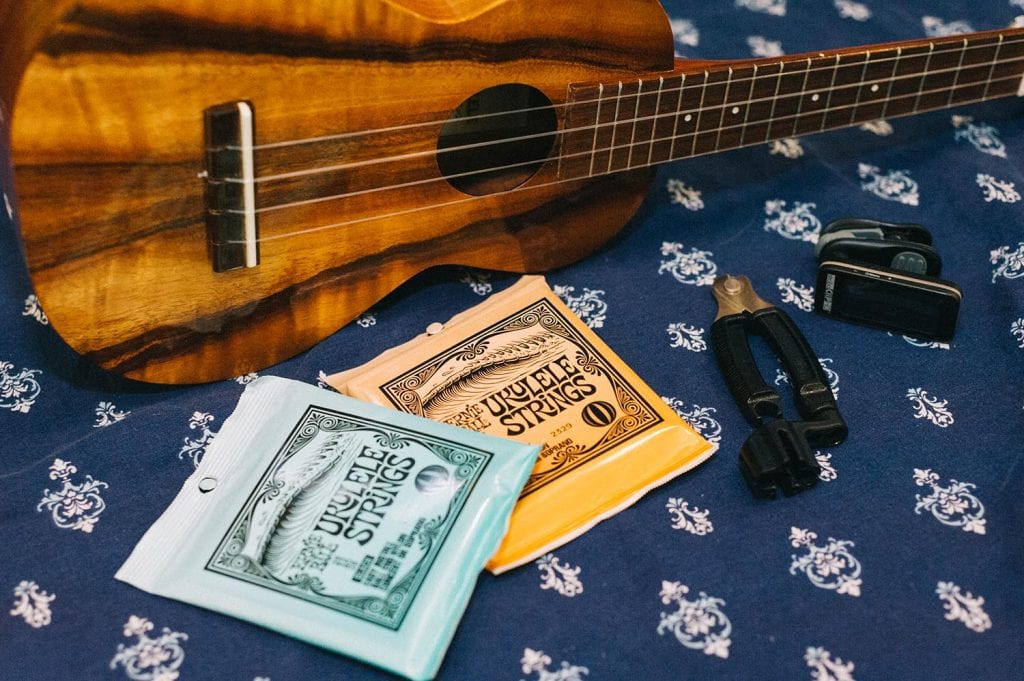
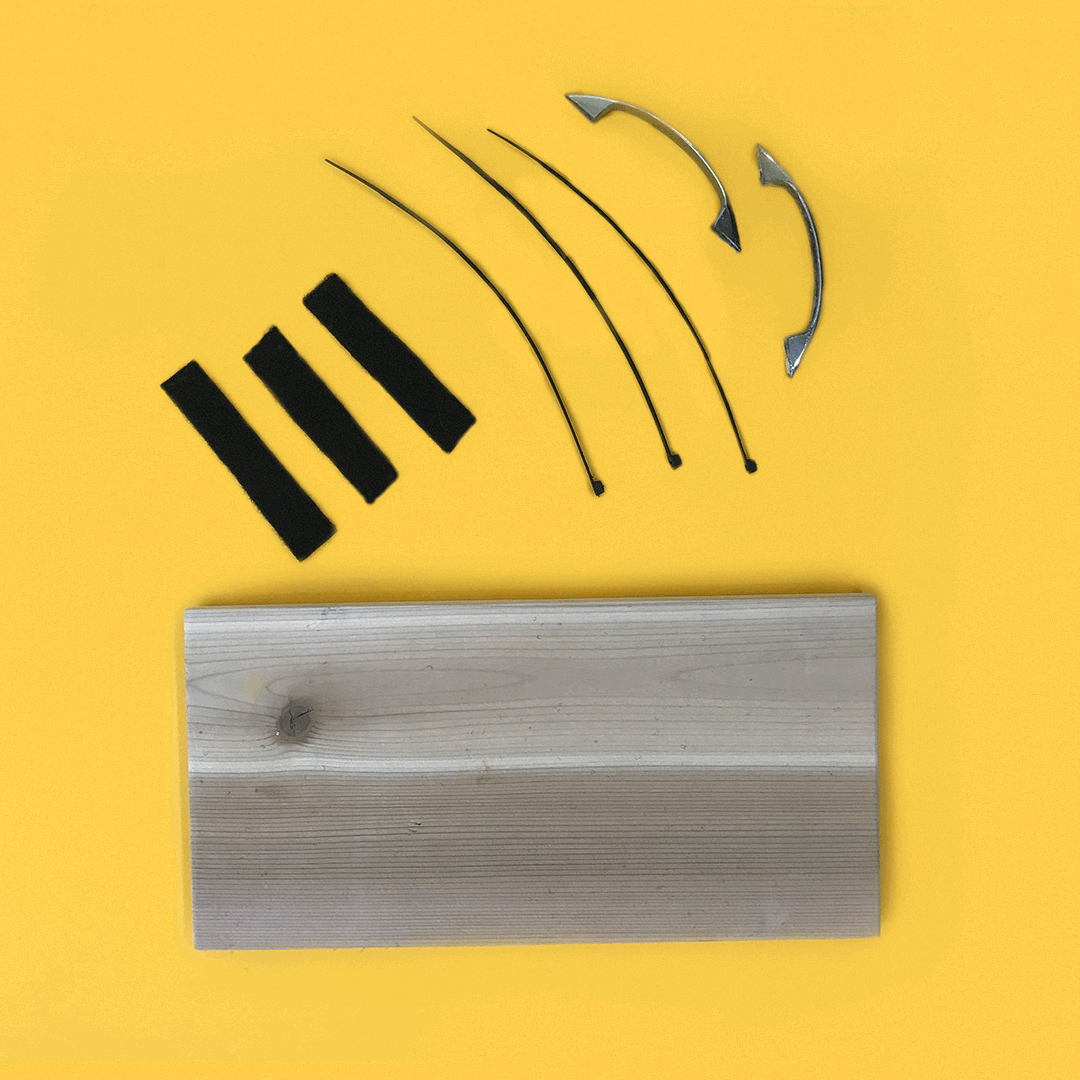
The easiest way to go about changing your ukulele strings only involves a few simple tools and a bit of practice. It might take you 30 minutes to an hour to change your strings for the first time but eventually you might be able to get through it in less than 10 minutes. All you need is a fresh set of strings, a string cutter, peg-winder, tuner, and a clean place to work where the ukulele will not be susceptible to damage. For this example we will use the new ukulele strings available from Ernie Ball which are made of fluorocarbon and feature a ball end. These strings are an excellent choice because they eliminate the need to tie the strings on to the bridge. They are available in both black and clear fluorocarbon which have a very balanced sound. I find the clears to have a little more presence in the lower mids while the black ones are quite snappy and perhaps a little more articulate in the upper frequencies. It’s worth it to try out both formulas to see which sounds best on your ukulele. Both packs provide a generous enough length to accommodate any ukulele.
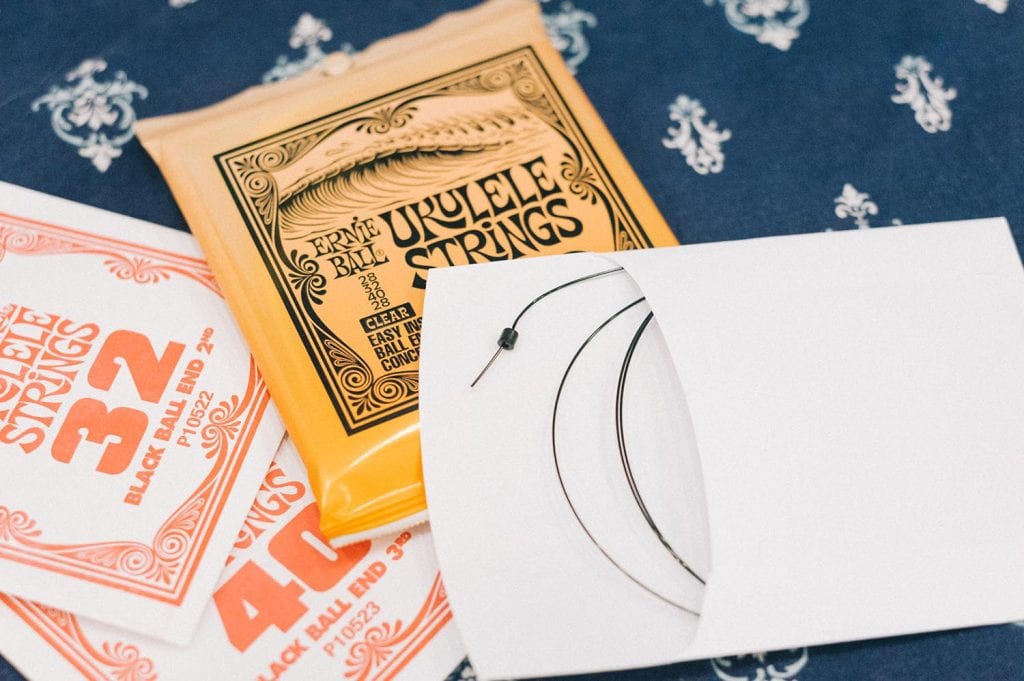
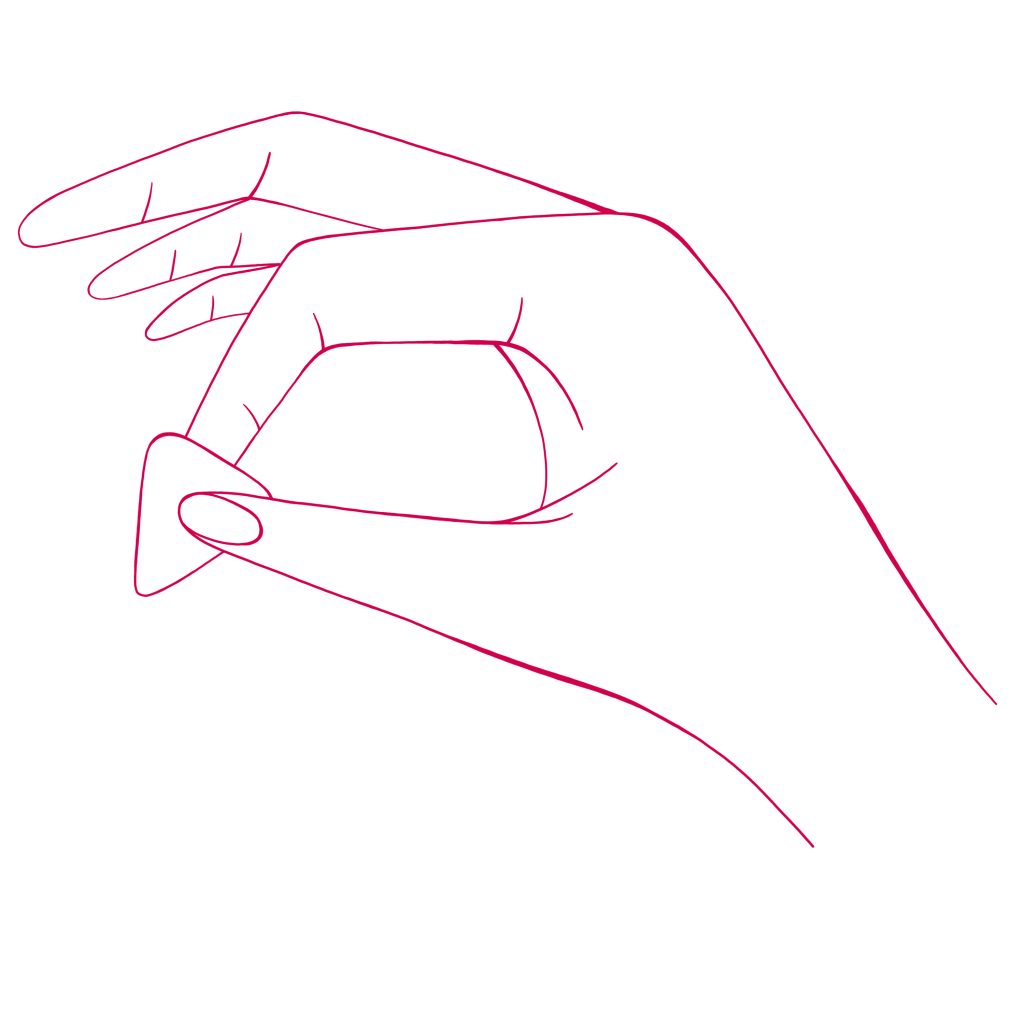
Inspect and determine which type of bridge the ukulele has, the two most common are tie-on, and slotted bridges. Bridges with pins to hold the strings in, like the ones used on steel-string acoustic guitars, are quite rare but do pop up from time to time. Remove all of the strings by using the peg winder to loosen all of the tension out of them one by one. When the strings are off you’ll have a good opportunity to really clean up the instrument and it’s always a good idea to do so. The strings themselves come packaged with labels indicating which string is which, but it’s useful to remember that the “1st string” is the one closest to the floor when you are holding the instrument in the playing position and the “4th string” is the one closest to the ceiling. If you are using a tie-on bridge, thread the string through the hole on the bridge which you would normally tie onto and pull it through until the ball end meets the end of the bridge. The ball end will hold your string in place instead of having to tie it on. If you are using a slotted bridge than you can simply cut the ball end off and tie one small knot at the end of the string. The knot itself can just be a simple single loop.*

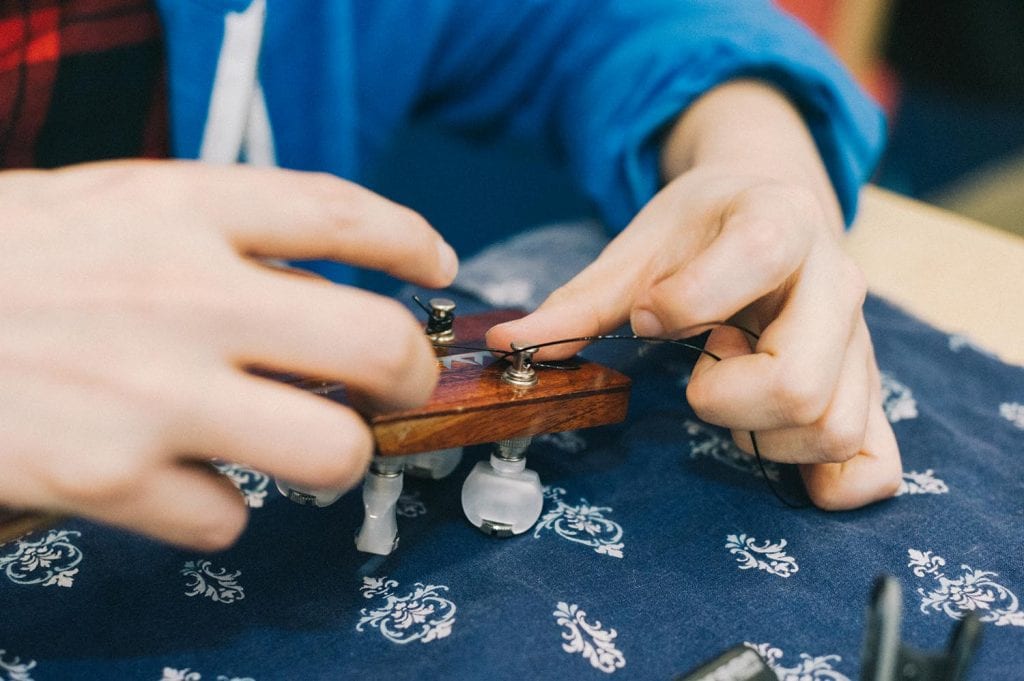
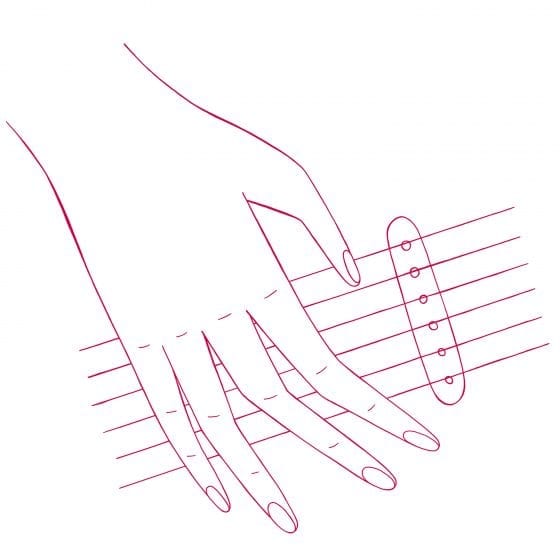
After you tie your knot, slide it into the slot of the bridge and pull up until the knot keeps the string from popping out of place. If you are working with a bridge that uses pins then you will need to remove them first. Place the string inside the hole and slowly push the pin back into place while simultaneously pulling up on the string until the ball end locks the string into place. Once your string is secured to the bridge then you’ll want to lay one of your hands around the third fret using a gentle karate chop motion. You’ll find that using your hand as a guide like this will always result in the perfect amount of wraps around the tuners of many stringed instruments.
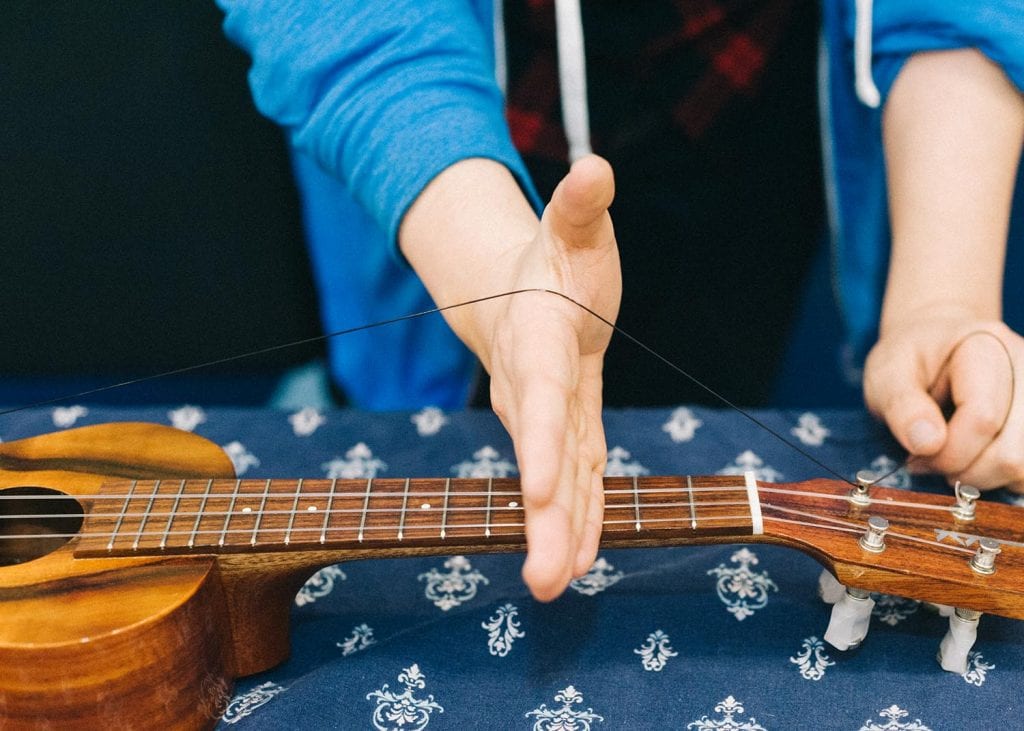
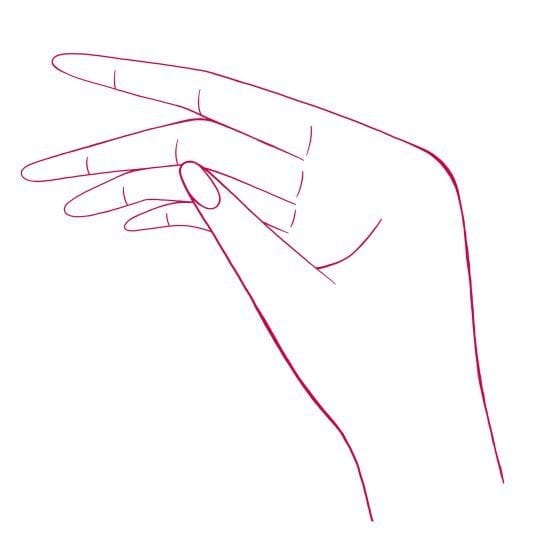
With your other hand guide the string inside of the hole of the tuner and pull it through until the string begins to have some tension. While still holding that tension take note of the direction that you will be turning the tuning key. Take the end of the string that is sticking out and from the opposite direction that you will be turning the tuning key, wrap the string once underneath itself and pull up. Start winding the tuning key and guide the windings into place as you turn it so that all of wraps are stacked on top each other instead of over each other.
This will result in a winding that is far less likely to slip and increase your tuning stability. Cut the remaining ends off the strings with the string cutter and bring the instrument to pitch. Gently tug and strings and re-tune until the instrument starts to hold the tuning. Recycle the packaging and enjoy the fresh sound!


So your rig is making a weird noise? What do you do? There are so many components in a guitar or bass rig: the amp, the speakers, the guitar, and alllll those pedals and cables and power supplies. So many opportunities for weird buzzes and disconnections to happen! Even weird things, like your cellphone or the room or environment you’re in, can cause weird noises.


When you’re having noise problems and you don’t know what part of your rig is causing it, the best way to narrow it down is to check all the components. I like to do it in this order:
If you’ve never heard the term pedalboards before, it can refer to the entire board AND the pedals affixed to it, or just the blank board itself. They allow you to secure your pedal chain to something portable so when you move it you just have to plug and unplug it from the power source or the wall!
Note: If you haven’t already, take some time to get caught up with part 1, part 2, part 3, and part 4!
Lots of companies make boards that you can buy, like Pedaltrain or Boss. Some of these have power supplies and other features built in with carrying cases. These might be a good option for you if you don’t have access to woodworking or crafting supplies.
You can also just use a simple wood board for a pedalboard, though—which is what you’ll be creating in this lesson! Sometimes it’s nice to add a slight slant to the board you’re building, like a wedge under the back edge, if you have two rows of pedals so you can more easily reach the pedals on the row furthest from you! Pedalboards can be whatever you want them to be, though, I’ve even seen people use skateboard decks with the wheels removed as boards.
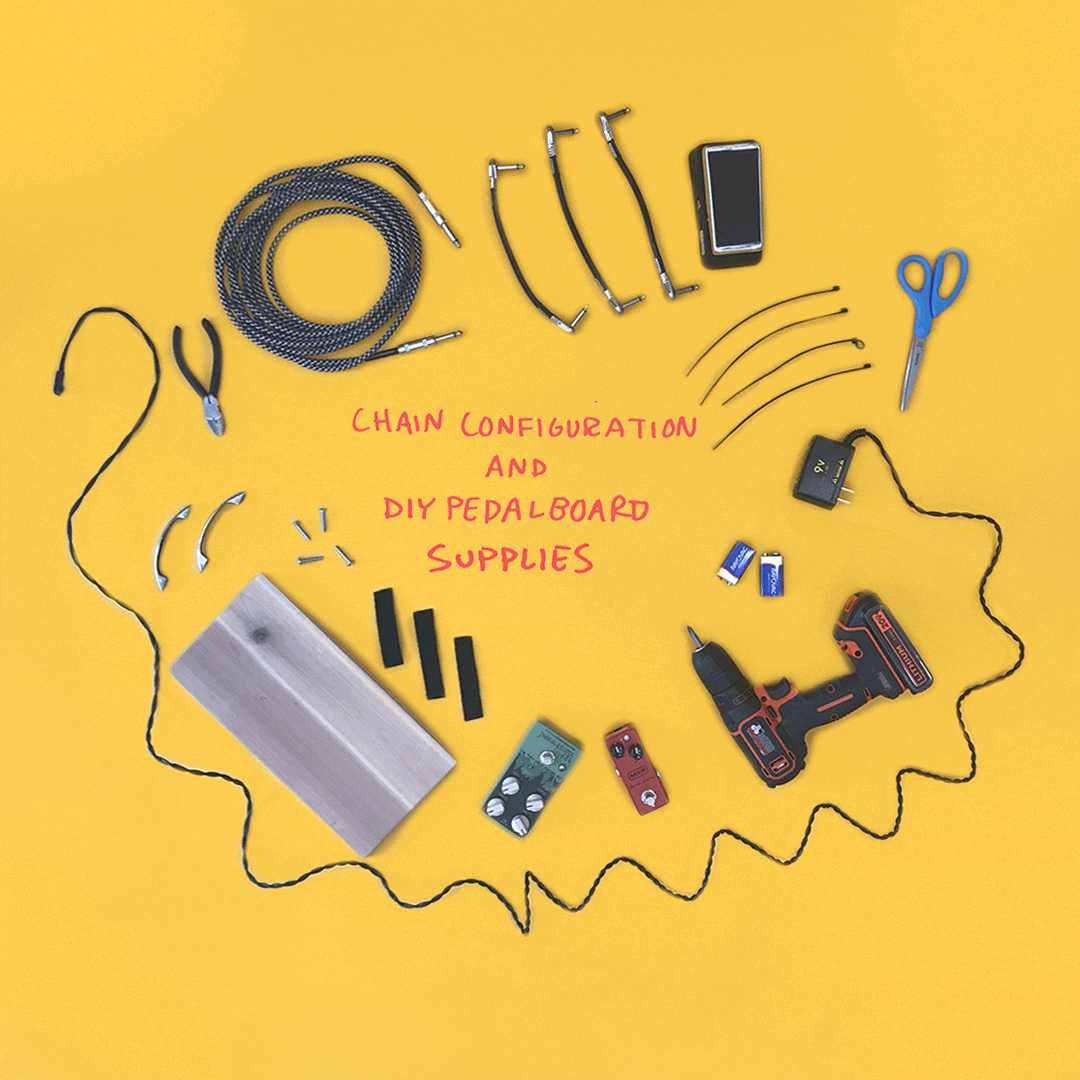
You will need:
For this lesson we will use a 6″ x 2′ of thick 3/4″ plywood donated by ADX. Any type of wood will do,though, and other sizes include:
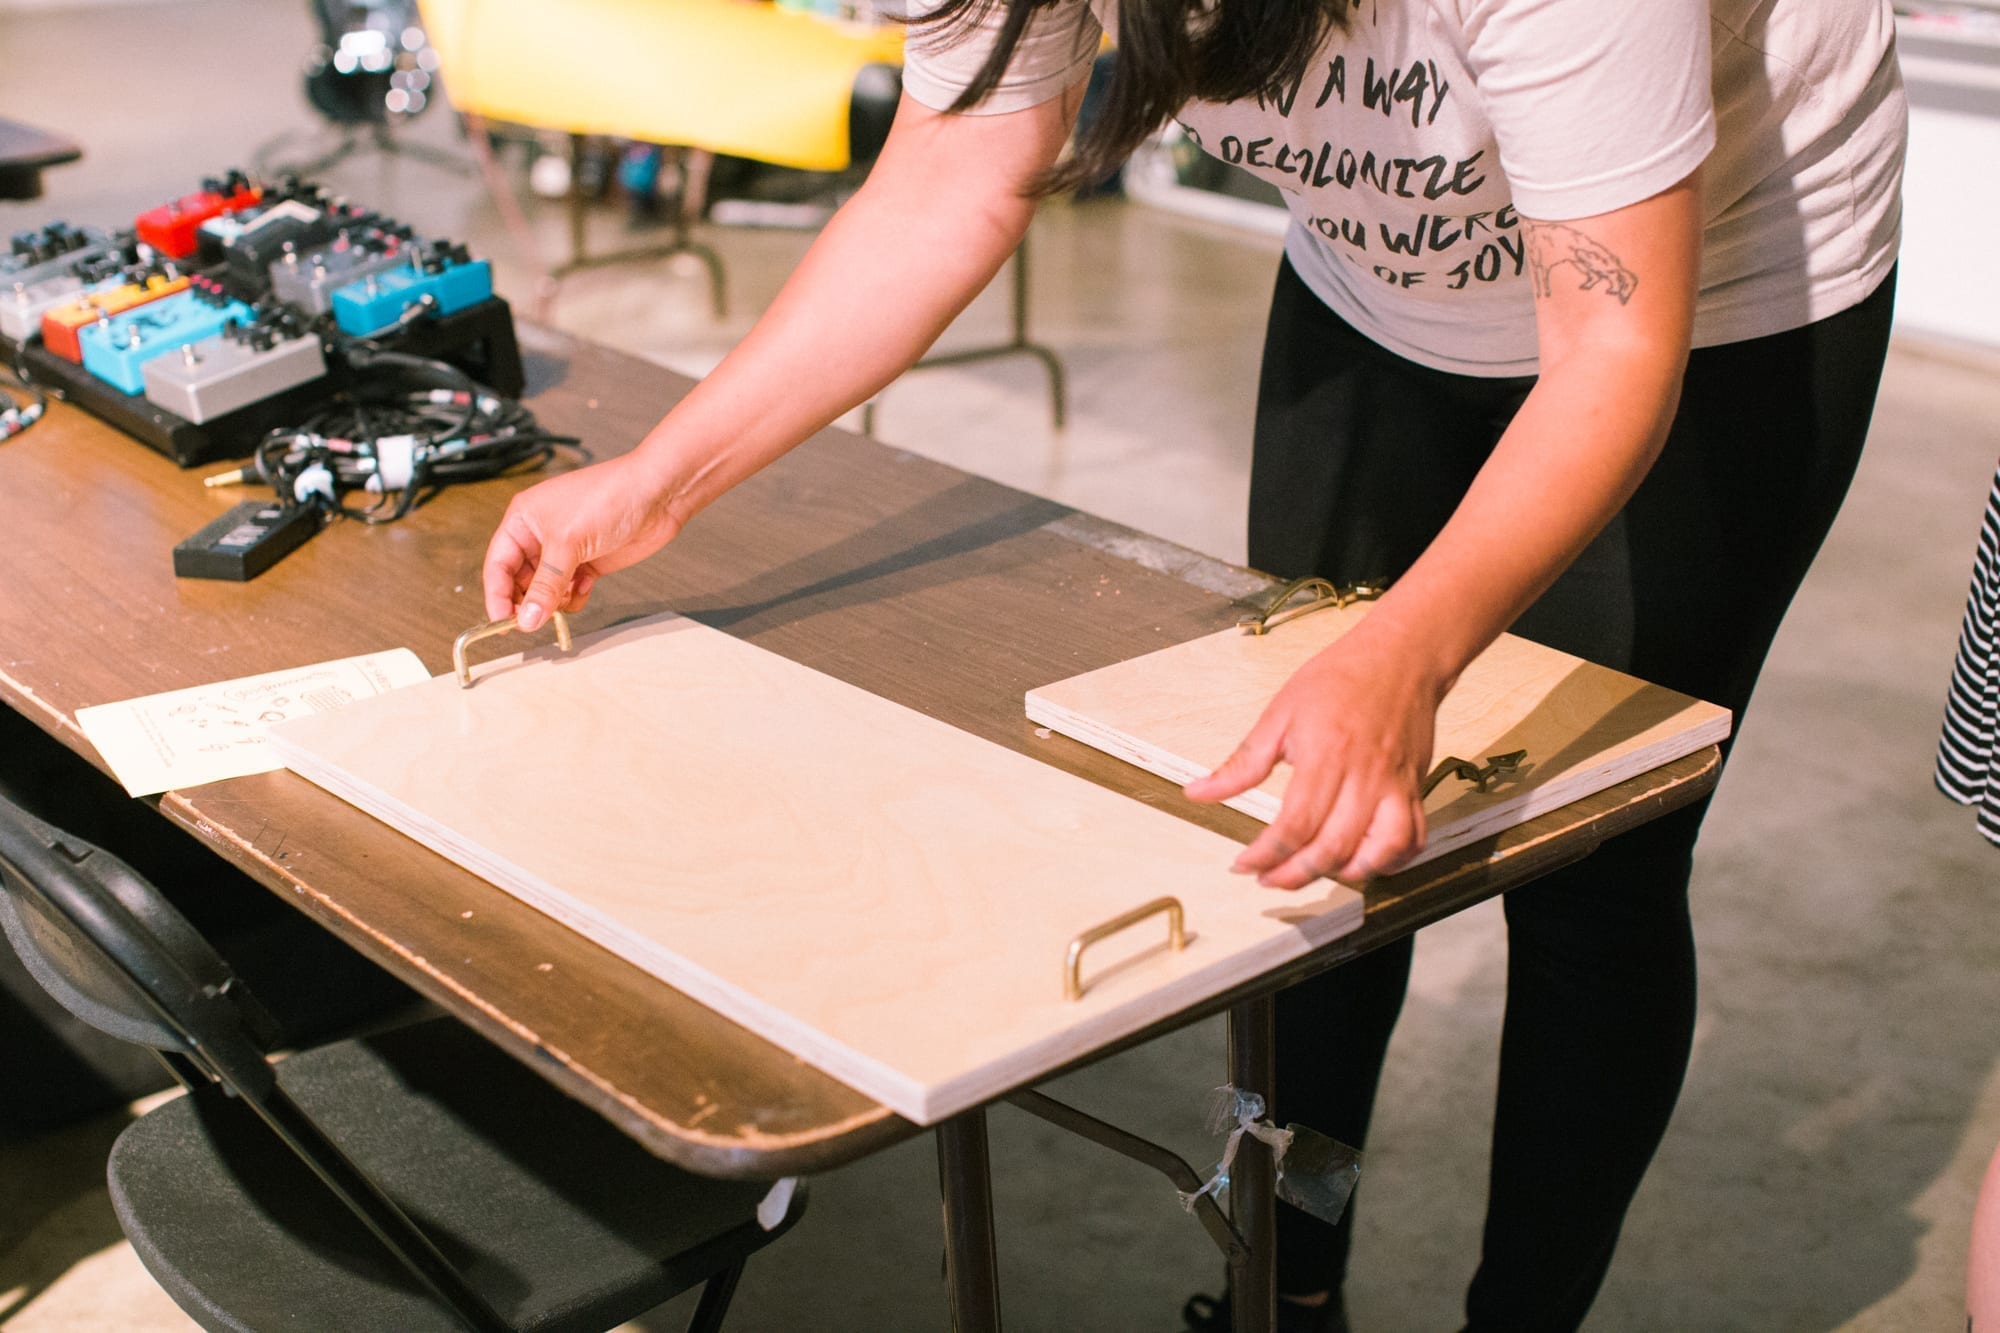
First: Get your drill and your drill bit (we’re using a drill bit sized 11/64) to make a hole through the wood before inserting the screw otherwise the screw might not go through the wood on its own.
Second: For where to place the holes, measure the distance from the center of each hole on the handle, then make marks on the wood with a pencil to know where to drill the holes. Mark and drill the first hole, then check the measurement to make sure you get the exact spacing before drilling the second hole.
*Note: We used 3/4″ thick plywood. The screw length needs to be exact for the type of handles we used, which depends on the thickness of the wood and the depth of the screw hole on the handle! We used 1″ screws.
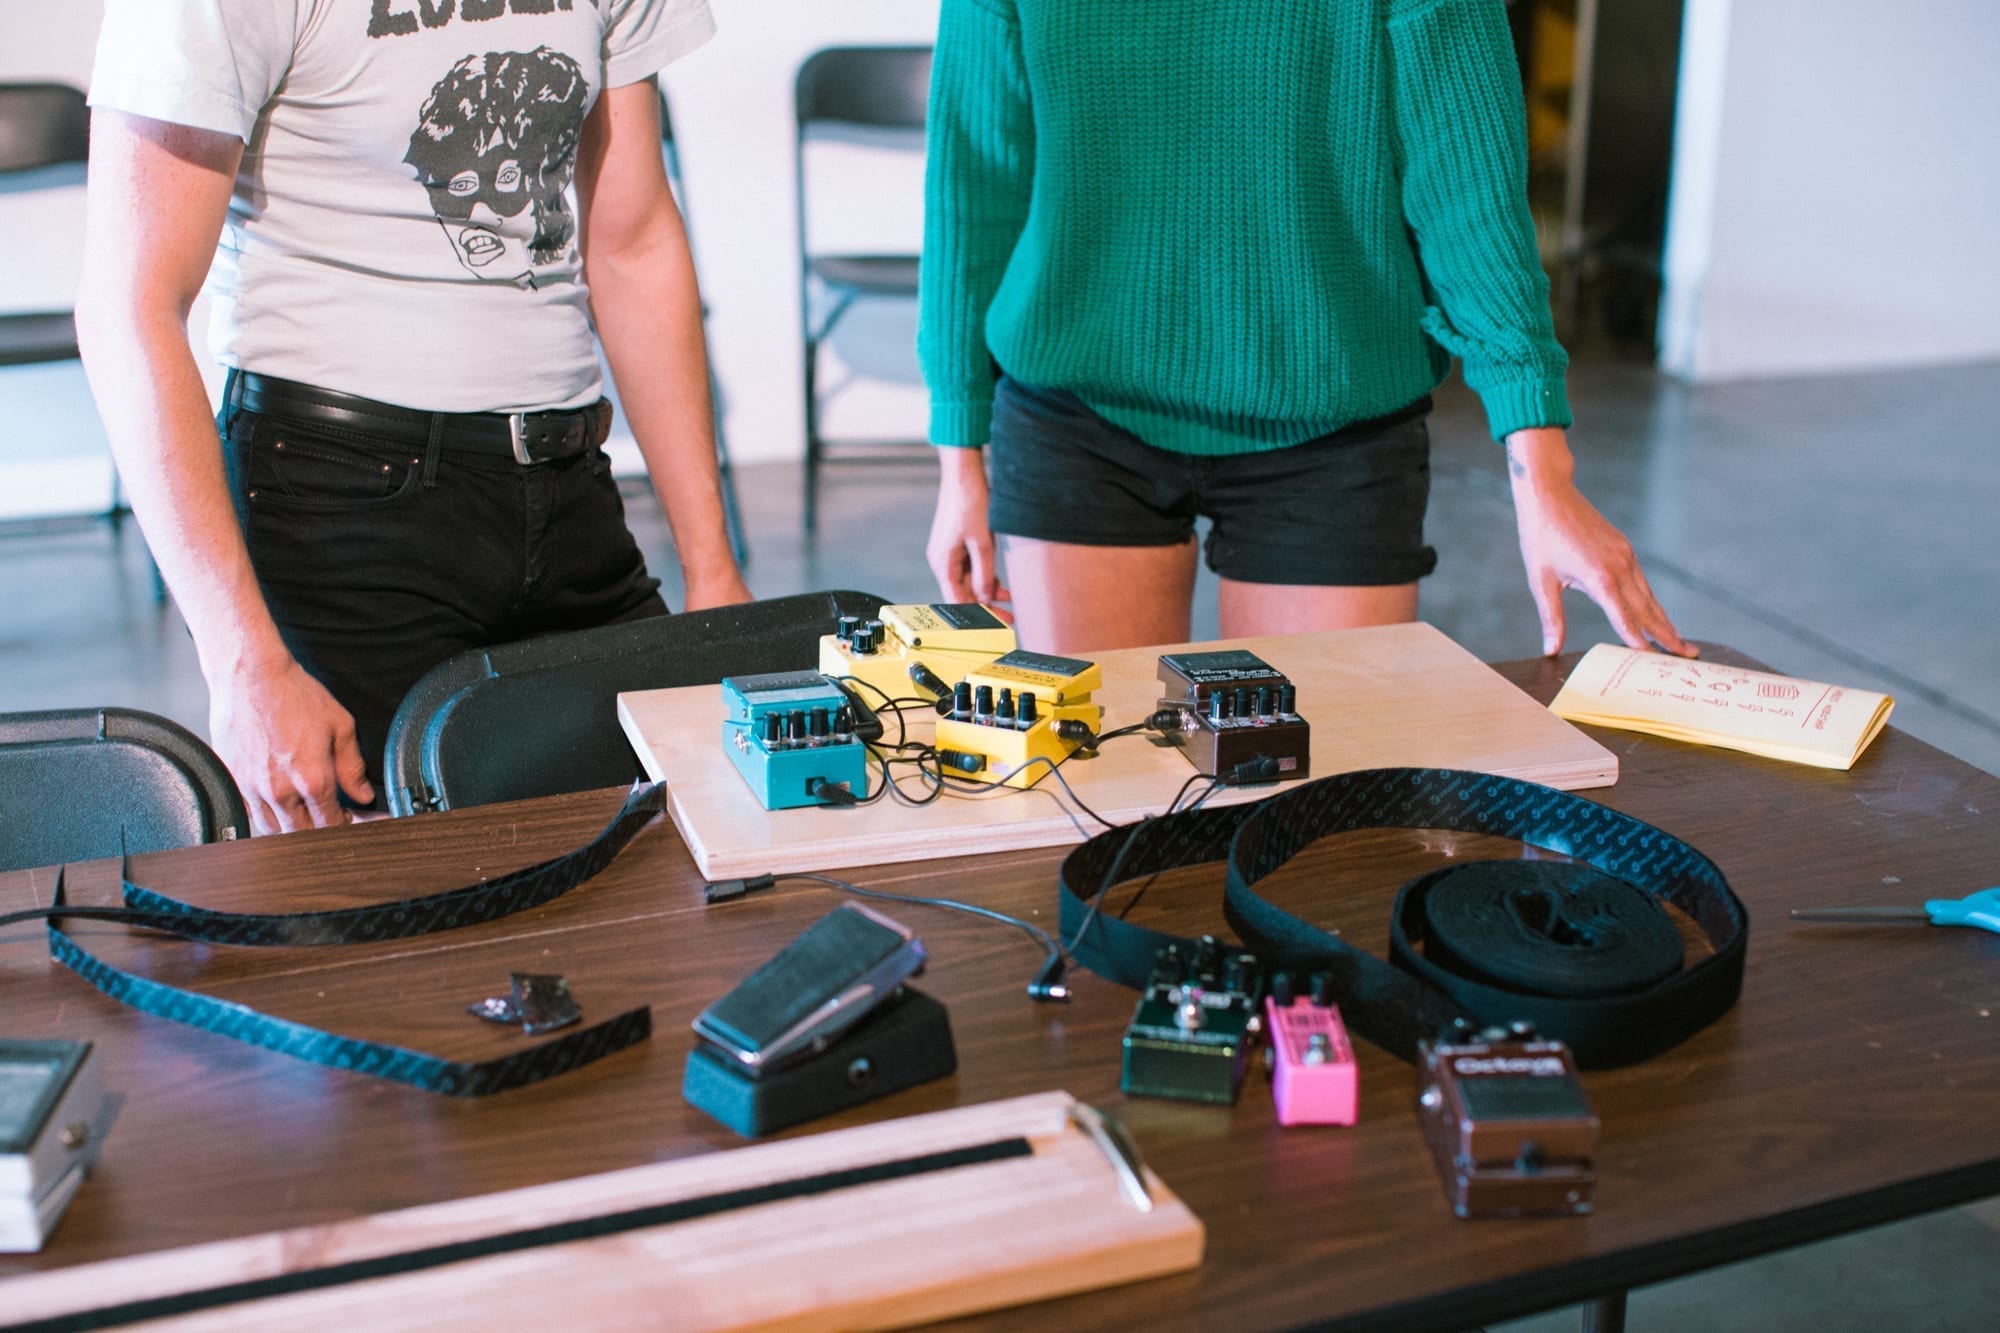
Ok SO, adding your velcro and how to do it truly depends on the aesthetic and *vibe* you’re looking for. Personally, I love for as much of the wood to show as possible so I won’t be telling you to cover your entire board with velcro. However, I also want to be able to move my pedals around and therefore I won’t be distributing the velcro in calculated pieces.
First: if you have a thick roll of velcro like the image above, measure the space between your handles with an inch of space on both sides (for your patch cables to fit!), and cut that amount from the roll of velcro.
Second: Simply take your scissors and cut that strip in half then place the two strips on your board with info room between them to evenly hold down your pedals.
If you haven’t already go back to lesson 4 and get that on lock!
To make sure you have the appropriate cables and power supply check out part two and part three!
Usually I find that velcro works best because you can change your pedal chain order more easily that way. Zip ties are great if your pedalboard has slats and you don’t want to get sticky velcro on your pedals. ALSO: Zip ties work great for cable organization on your pedalboard!
Gather your patch cables and power supplies into clean loops and bundles and tie them together with the zip ties for a cleaner look.
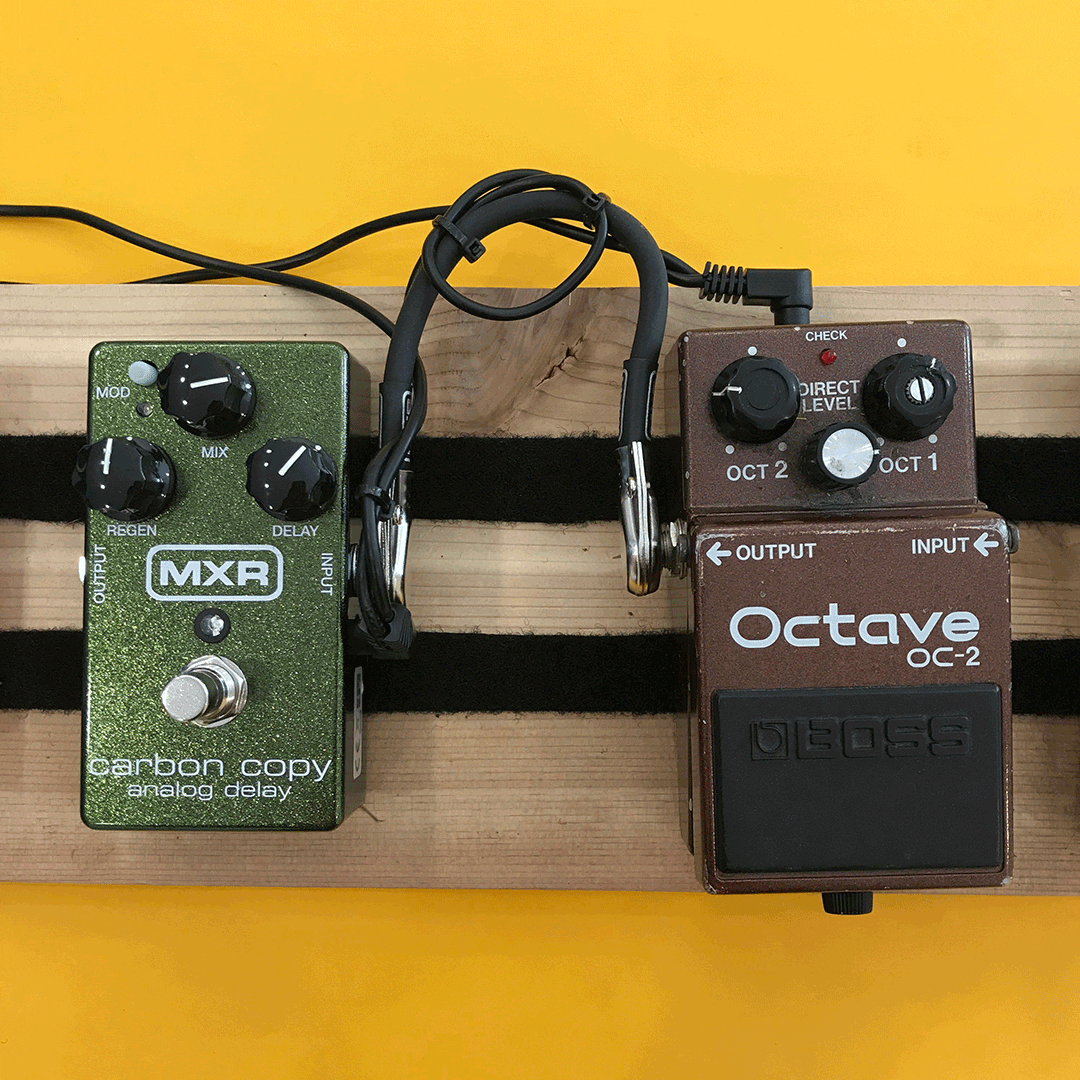
Just make sure to keep some wire cutters around to easily remove the zip ties in case of cable failure during your live show.
 Because this is about pedals and pedalboards, I won’t go very deep into rack gear, but I like to remind musicians and gear nerds that it’s there nonetheless.
Rack mount effects units are very similar to effects pedals in that they can be put into the signal path (such as the path between a guitar and amp) and effect the signal. They come in all the same varieties as effects pedals – reverb, tuners, EQ, etc. – but they are long rectangular units with wings on each end that have holes so you can screw them into racks, both portable and bigger more permanent studio setups. Many rack effects units allow for control pedals to be plugged in so you can still control the unit with your feet, too. These can be a good option for players who want all their effects in a rack that is easily portable and safe from whatever crazy stuff goes on onstage or around where you’re playing.

It’s official: you now know about effect types, power supplies dos and don’ts, cables and after this you will have been able to understand the placements of your pedals on your board better!
Let’s be honest: there’s really no right way to order your pedals, no matter how adamant people on the internet can get on the subject. That being said, pedals work in different ways depending on where they are in the chain.
Feel free to reference pt. 1 of our series to understand the effects below.
Tuner -> Wah -> Compressions/Limiters/etc. -> Dirt -> EQ -> Modulation (flanger, etc.) -> Ambiance (delay, etc.)

In this instance, you can either put the volume pedal before the chain, allowing you to cut signal before it goes to any pedals, or after the chain, allowing the signal to be affected by all pedals before you cut signal to the amp.
The important thing to remember is that whatever pedal you put AFTER another pedal is going to affect the pedal before it. So a good way to pick a pedal order is to think about what pedals you want to affect each other and how.
Say you have a chain that consists of Looper, Delay, and Distortion.
If you set up your chain Looper -> Distortion -> Delay:
Any loop you made would be affected by the pedals following it. That means that if you make a clean loop of a chord progression it would only be clean until you engaged any of the pedals following the looper. If you turned on the distortion, it would distort the loop that you had originally recorded clean.
If you, however, put the looper at the end of this chain:
Distortion -> Delay -> Looper
you could record a clean loop and that loop would stay clean even if you engaged the other pedals. In this instance, you could use distortion and delay on the loop only while it was being recorded, but not after. This is a good way to use a looper—at the end of the chain—because that allows you to make clean, non-effected loops and then add distorted or delayed leads and riffs over the clean background chord progression you recorded on the looper!
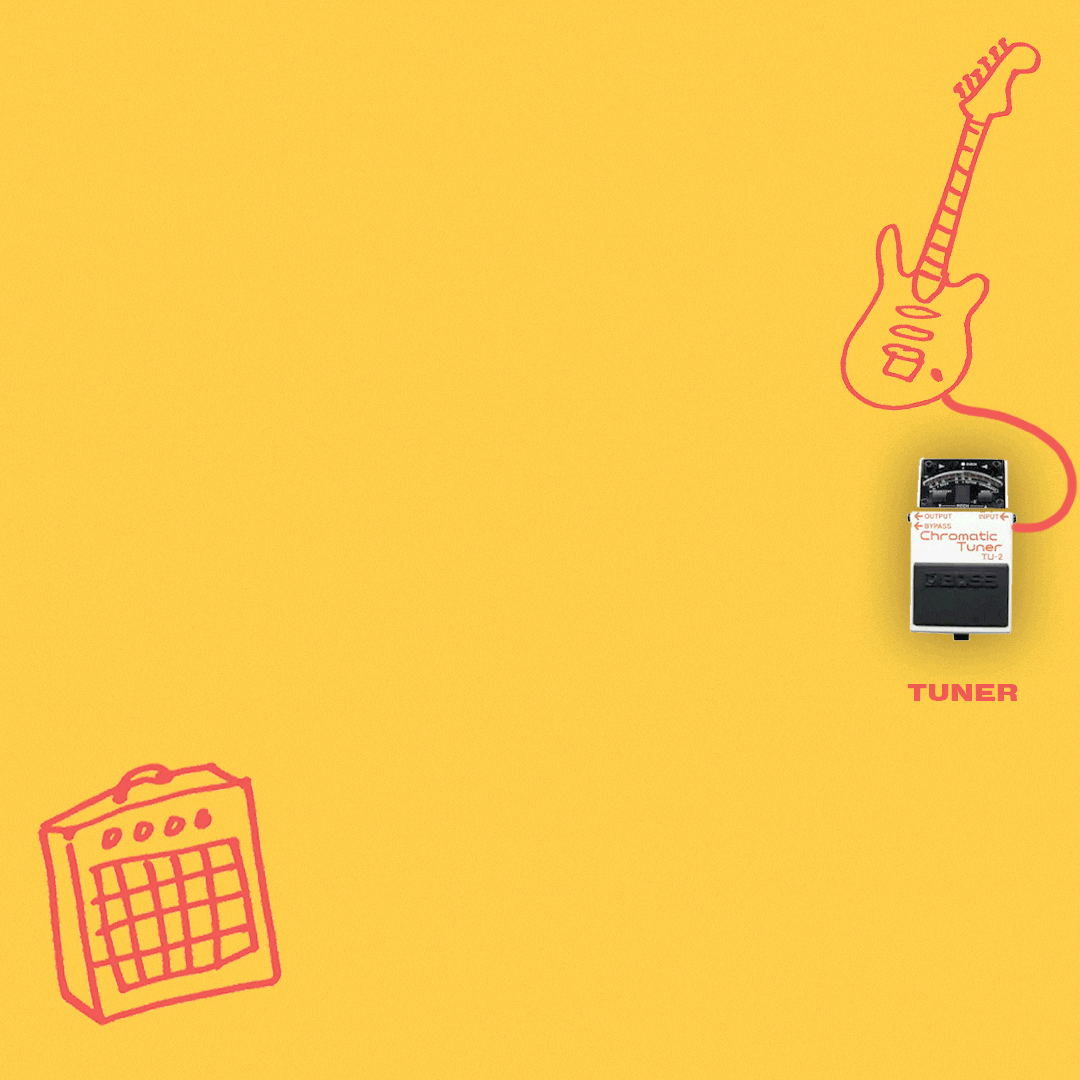
A note on tuners:
Because tuners need to hear your instrument very clearly in order to tune it effectively, tuners are best placed at the front of your chain. This way, the guitar isn’t going through any other pedals before it gets to your tuner. This rule is flexible if you find another way that works best for you, though! Many people use tuners as mutes, which work better at the end of your chain, and some pedals, like volume pedals, may have an output especially for a tuning pedal!
A note about effects loops:
Many amps have effects loops in the back, this should just look like an input and output, both labeled “effects loop.” Effect loops work by putting effects, in this case pedals, in between the preamp and power amp of the guitar amplifier. These can work great if you want the signal from your guitar to your amp to have less interference! Pedals like reverb and delay work especially good in the effects loop, while dirt pedals often work a little better in the guitar-to-amp signal chain.
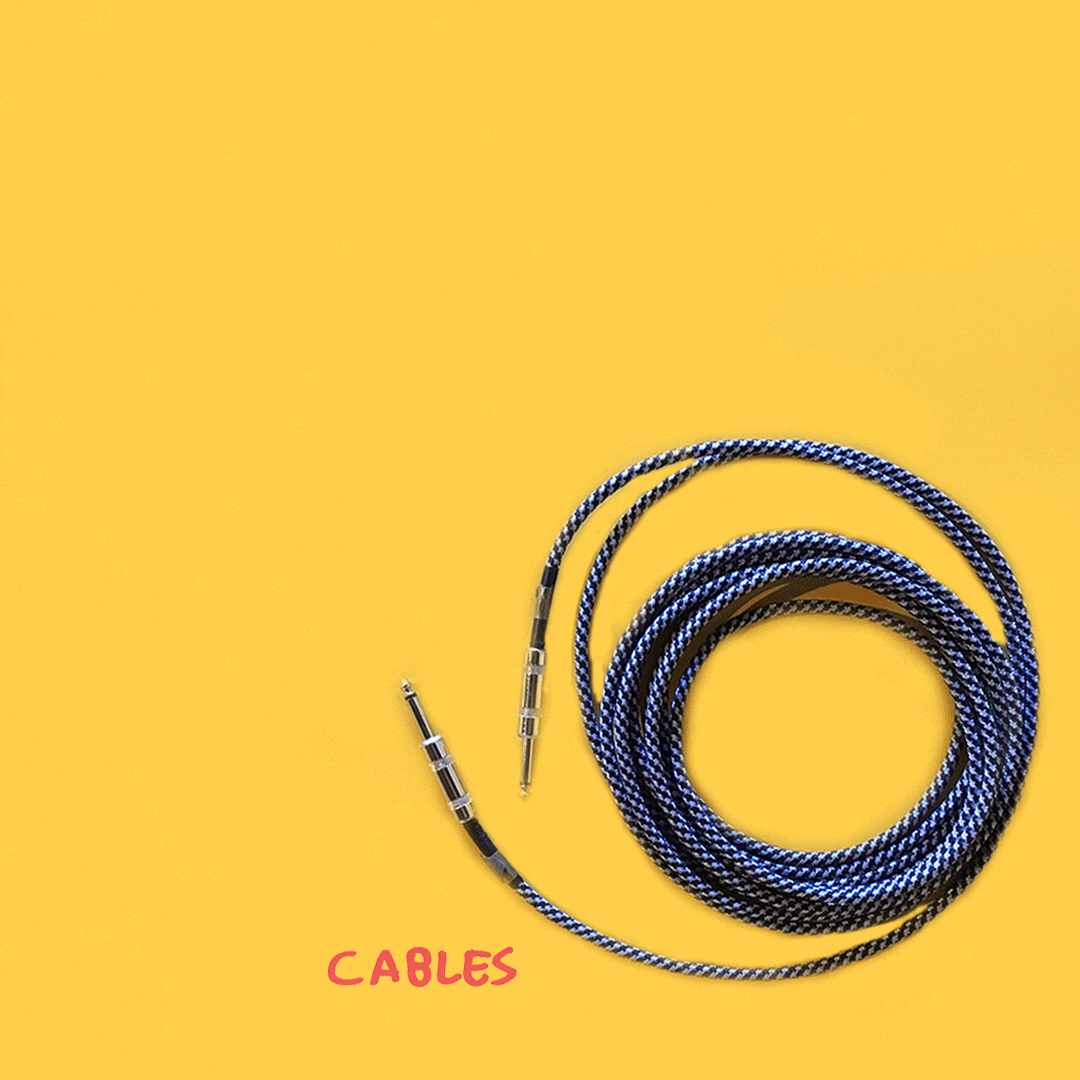
Now that you know about the types of pedals and how to power them, we’re going to get into the world of cables.
Like power supplies, cables are super important to your signal flow. Get cables that will last a long time and won’t break easily or create more noise in your chain! Also a lot of nicer cables companies offer lifetime warranties. This means that when and if your cables break, you can most likely send them in to get repaired or to get replacements.


Having your cables go out on you is a really good way to kill your momentum when playing music with friends or preforming. You can tell your cables are going bad if you lose signal (and the signal lost isn’t coming from a problem in your amp/guitar/pedals). Also, if there are any obvious breaks in your cable, chances are they’re not gonna be functional for much longer. There are a few ways to keep your cables from breaking quickly, though:
NO: Make sure to wrap them correctly! Wrapping your cables tightly through or around your hand. and around your elbow is bad form. This can make your cables break a lot quicker.
YES: Try looping your cables in lose coils and letting the cables guide you in the direction they want to be looped in.
NO: Don’t squish them! Try not to let heavy things, like amps on casters or drum pieces, sit on your cables. This will also make it easier for you to move around when your guitar is plugged in, as well as keeping your cables safe.
YES: Keep your cables in a safe place! When storing your cables, keep them out of the way so they don’t get jostled around too much. It’s also a good idea to have a good transportation system if you’re bringing cables to and from venues or other rehearsal spaces often.

A good tool to have around is a cable tester! Many of the cable testers on the market not only test quarter inch instrument cables, but also many other types of cables. You can find them starting at $30 or so new, which is worth it to eliminate the stress of having bad or breaking cables.
Sometimes a broken cable can be fixed easily! If you have access to a soldering iron and some solder, cable repair can be a fun adventure. Many better made cables have metal protectors over the ends (right above the jack) that easily unscrew (you may notice these covers getting loose sometimes when you use cables often).
A note on pedal couplers: Pedal couplers are hard metal adaptors that go between pedals without any malleable cable piece in between the end jacks. I don’t generally advise people use couplers because they can put unnecessary pressure on pedal inputs and break input jacks easily.
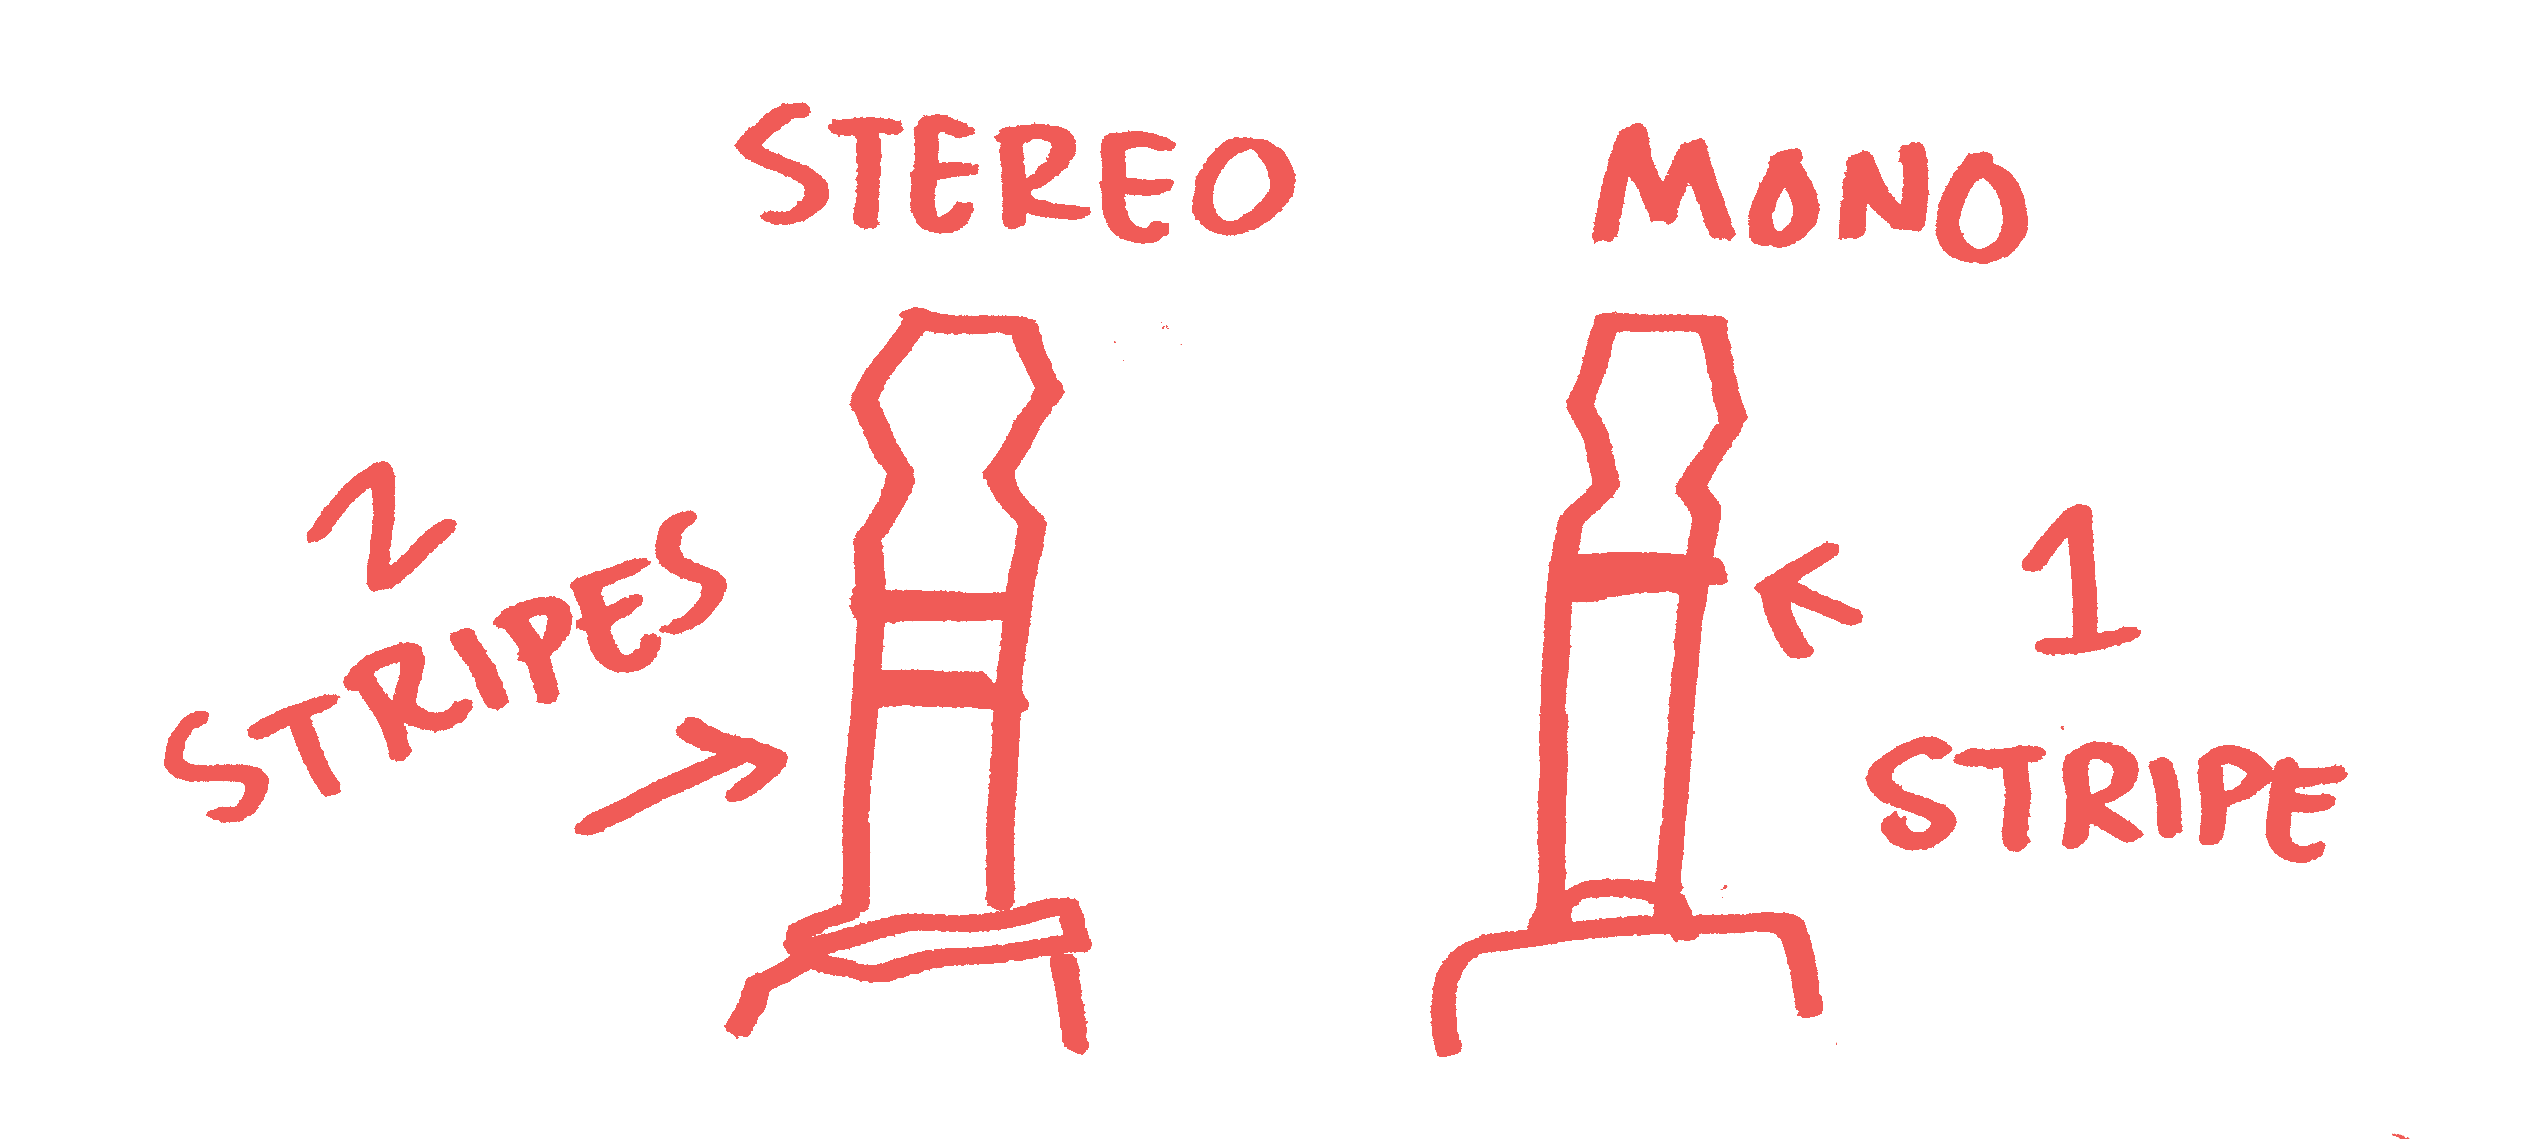
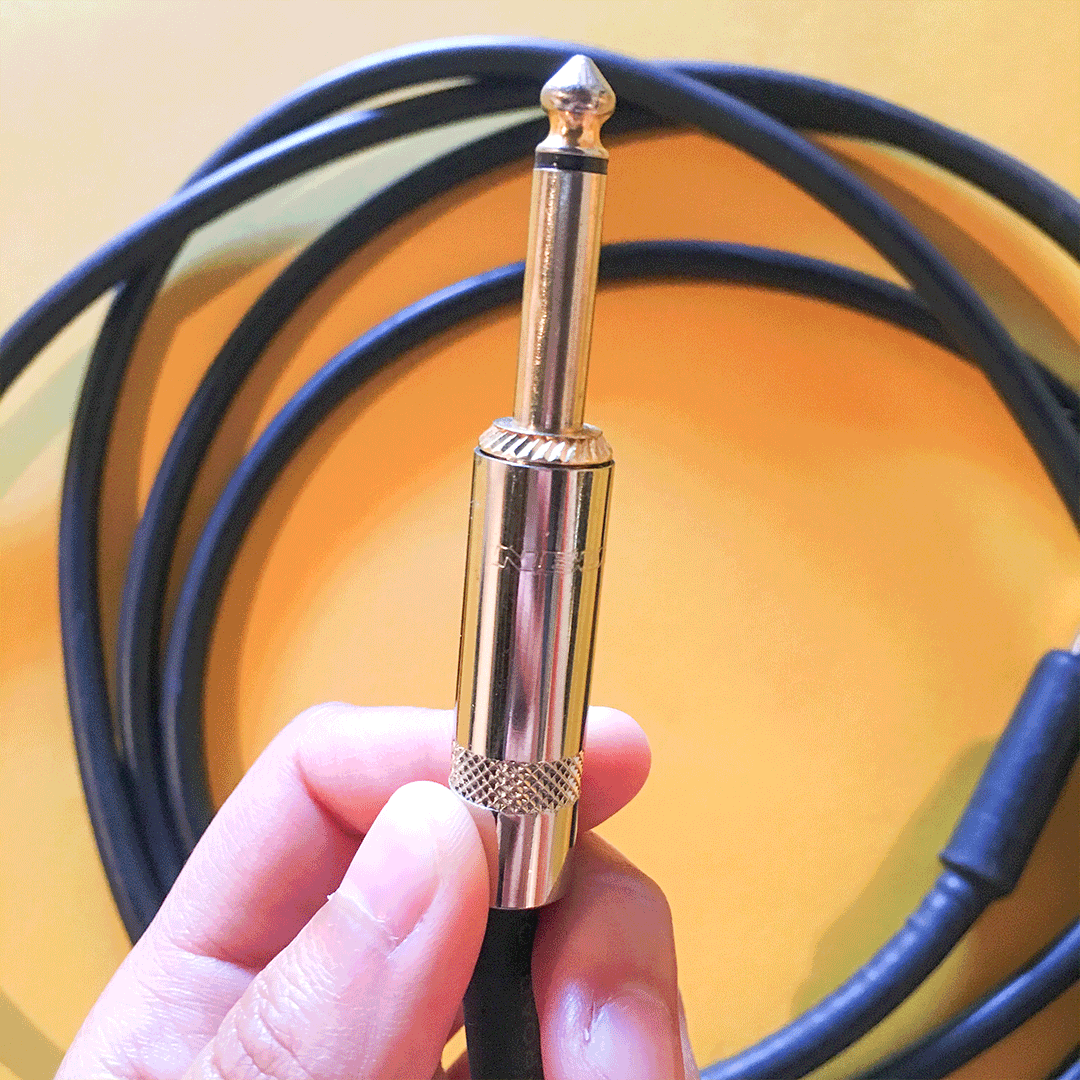
Another term that might come up when talking about cables is TRS, this stands for Tip Ring Sleeve. TRS quarter inch cables will have a jack that has two little bands on it! Separating the jack into a tip section, a small ring section, and a sleeve, which is the rest of the jack down to the end.
These two bands allow the cable to be stereo, which means the sound it carries can be directed into two separate signals or speakers instead of one. Most instrument cables aren’t TRS and only have one little band around the jack! So the jack doesn’t have that small ring portion that is sectioned off between the two bands. This makes them mono, so the signal that is sent through that cable is a single signal instead of a split signal.

They look a lot like instrument cables! But speaker cables carry an electrical charge. These cables are used to connect your guitar amp head to your speaker cabinet or a power amp or powered mixer to a set of speakers. These carry a charge because the speakers used in these setups are what is called passive, which means they can’t power themselves independently. The power amp or amp head powers them and runs the electrical charge through the speaker cable! Speaker cables are easy to spot because they are often just labeled “speaker cable” on the side. DO NOT USE FOR PEDALS!
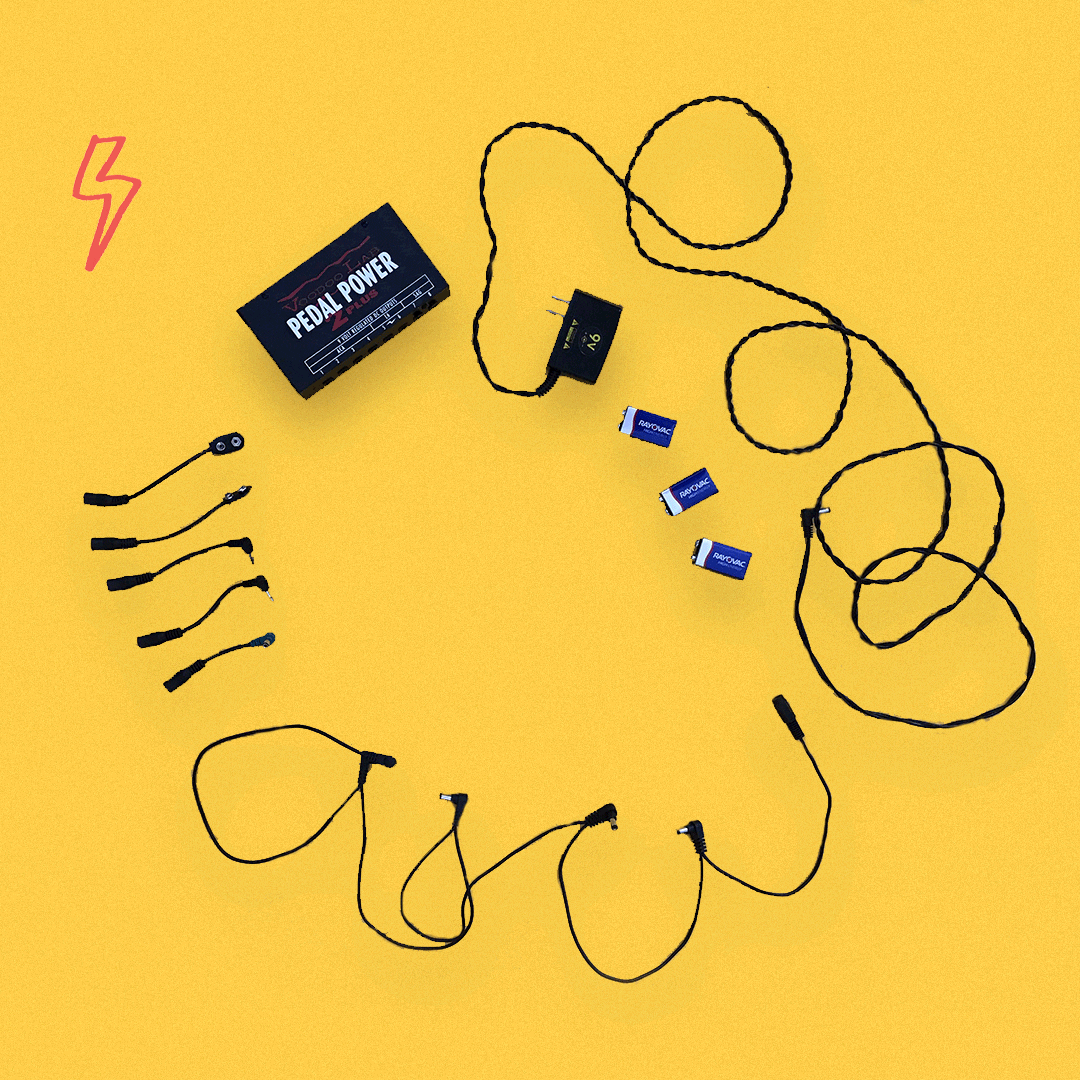
Power supplies are maybe the most important part of your effects arsenal! A bad power supply can make your signal noisy, weak, or even kill your pedals. While part one focused on the types of effects, part two of our pedal series will focus on defining and identifying the power supply of your pedalboard.
Different pedals take different power supplies and it’s important to check what power supply a pedal needs before using. Using the wrong power supply by mismatching volts or polarities can damage or break your pedals or make them not work correctly! Here are a few things to check:
Power supplies come in AC (alternating current) or DC (direct current). Some pedals use AC and some use DC! You can find which voltage your pedal requires by visiting the products site page but most pedals use the standard 9-volt DC adapter.
DC power supplies can either be a negative or a positive polarity, sometimes called a center. Make sure to check which one you need before using a DC power supply on a pedal! Here’s a picture of a negative vs. positive label:


Power supplies come in different voltages, so make sure to check that! If a pedal requires an AC adaptor that’s 12 volts, using a 9 volt AC adaptor can be harmful to it.
Pedals can require a different amount of amps, in this case milliamps (usually shortened to mA on adaptors and pedals). This is sometimes written on the back of the pedal and if it’s not there, you can do a quick internet search. Many pedals don’t require that many milliamps and will be fine, but it’s good to double check.
Some pedals take different size and shape tipped adaptors also! This is easy to figure out: if it doesn’t fit, it doesn’t fit. Find an adaptor with a tip that’s compatible to your pedal power input!
A popular power supply that works with a lot of pedals is the Truetone 1 SPOT power supply. This power adaptor is a 9V negative center DC adaptor that can power up to 1700mA.

Historically, many pedals were just powered with batteries (usually 9V, but I’ve also seen some powered with other types of batteries). This is a great option if you don’t mind being on top of having extras around in case your pedal starts running low on juice. Batteries keep the signal clean and take away any weird interference power supplies might bring into the mix. If you’re only using one or two pedals, this might be the best option!

Powering a bunch of pedals at once can be tricky! Think of those huge shoegaze pedalboards you sometimes see! How do they do it? There are a few ways…

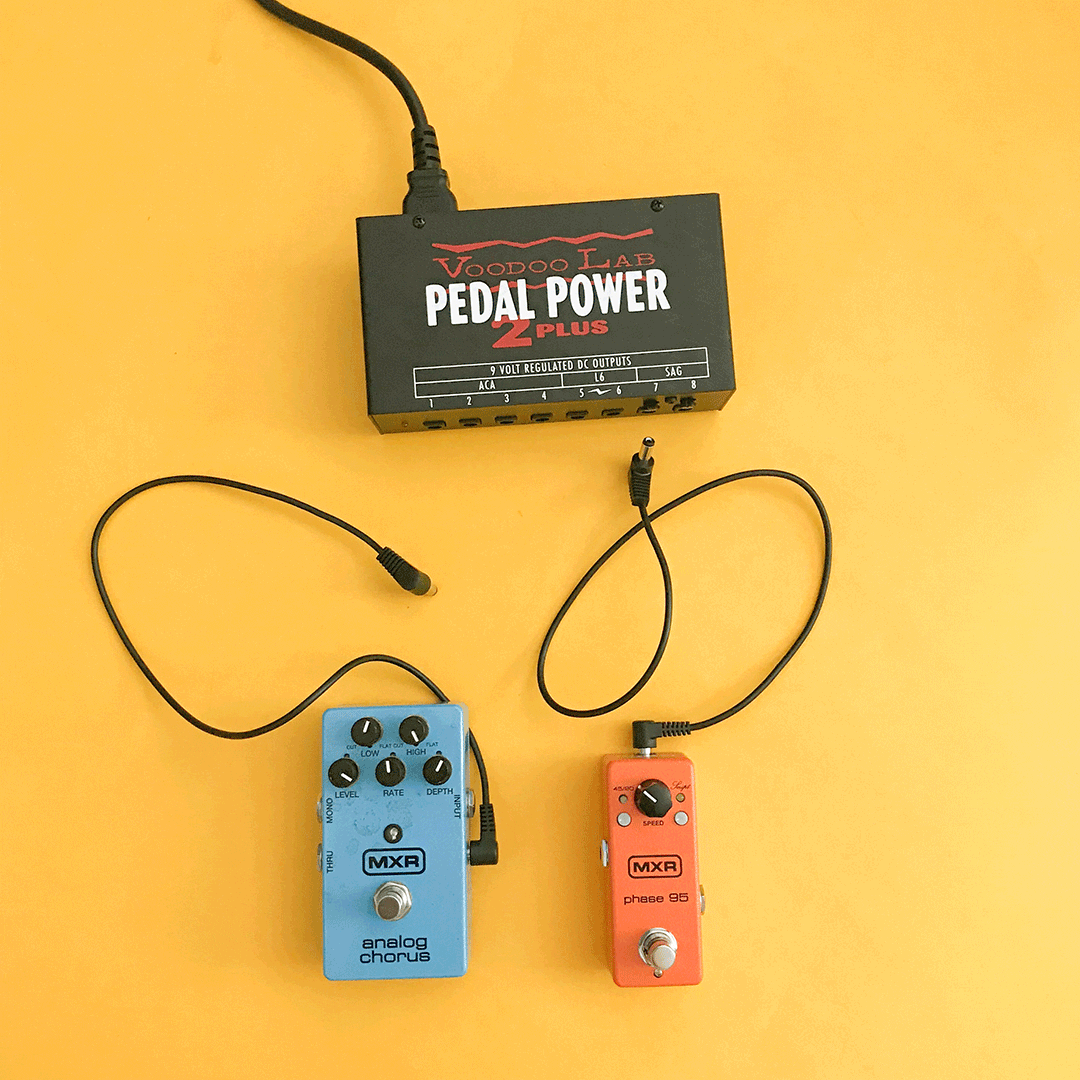
These bricks plug in and have multiple outputs for all your pedals. You can get different cables to match the inputs of your pedals and some power bricks even have different voltage outputs so you can power your 9V pedals through the same power supply brick as your 12V pedals! These also have seperate outputs for each power cable, making it so each pedal is powered separately and you usually don’t have to worry about reaching the power supply’s mA cap like you would with a daisy chain setup.
Example: Voodoo Labs Pedal Power

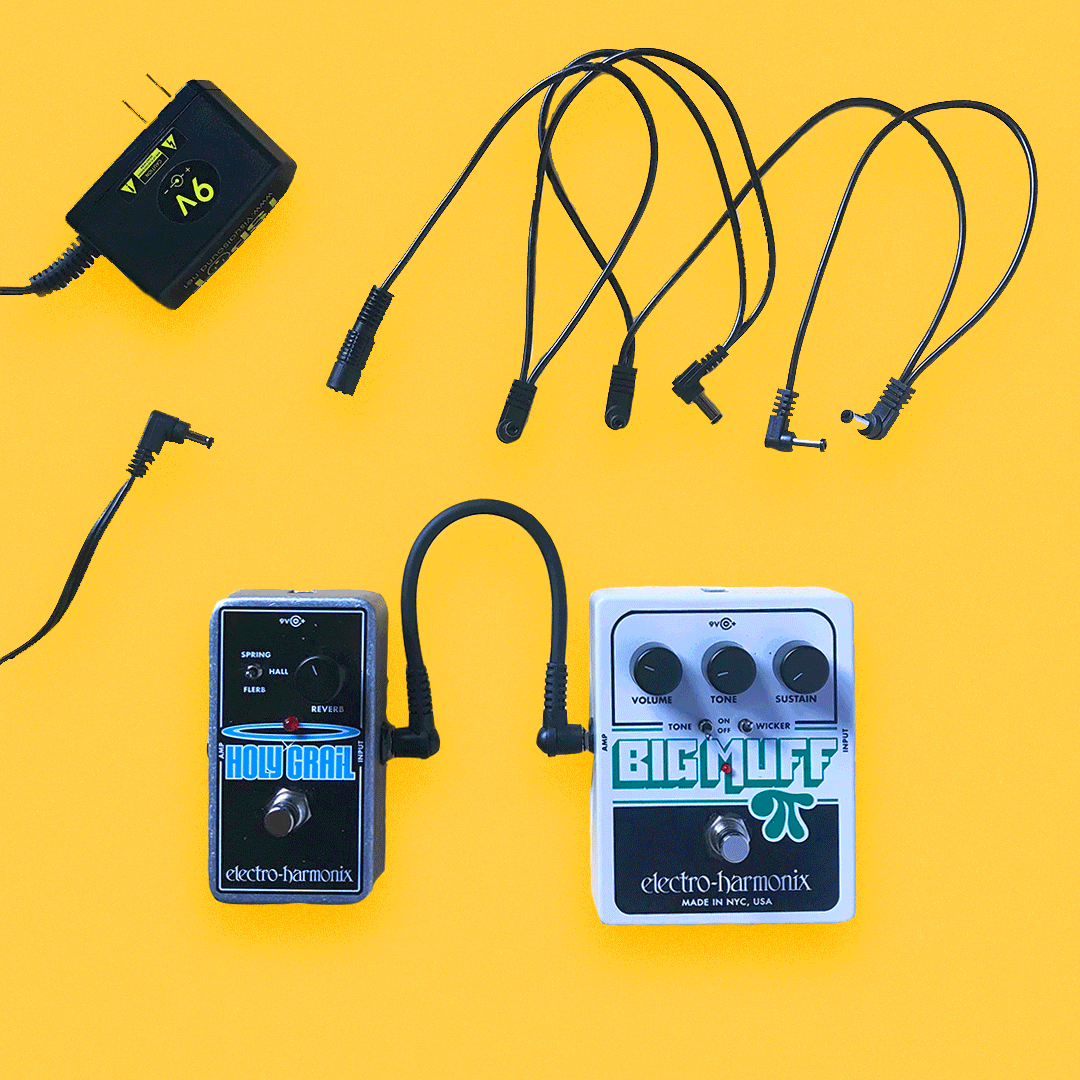
These adaptor chairs attach to the end of a traditional power adaptor, adding multiple plugs to the adaptor.
Example: Truetone 1 SPOT Multi Plug (attaches to 1 SPOT adaptor)

A good thing to remember is those milliamps from earlier. If you add up all the mA’s of your pedals together and it even comes CLOSE to the mA rating of your power adaptor, it’s time to think of a new way to power all those pedals! Or else you could risk them not working, being noisy, or even breaking completely. If you’re using a daisy chain style power supply attached to something like a 1 SPOT (1700mA limit) and all your pedals use close to 1700mAs in power, you should consider switching to a power brick.
In this online version of the workshop that was originally led by Janie Black, and hosted by Kathy Foster, we’re going to learn a little bit about pedals. We’ll explore how people use them, what kinds of pedals exist, how to use more than one at once, what order to put them in, and hopefully a lot more! We will outline how to make a simple pedalboard, which will help you easily organize and transport your pedal chain without disconnecting all the cables and/or power supply! Troubleshooting signal path problems (buzz, noise, or bad connections) will also be covered, hopefully giving you some tools to problem solve through signal issues.
In this six-part lesson series, you will need the following tools to leave with a fully functional pedalboard that you organized and built yourself! If you choose to follow the series, make sure to tag us during your process!
Learn and experiment with these pedals to better understand the sound you’re seeking and the tools necessary to get you there.

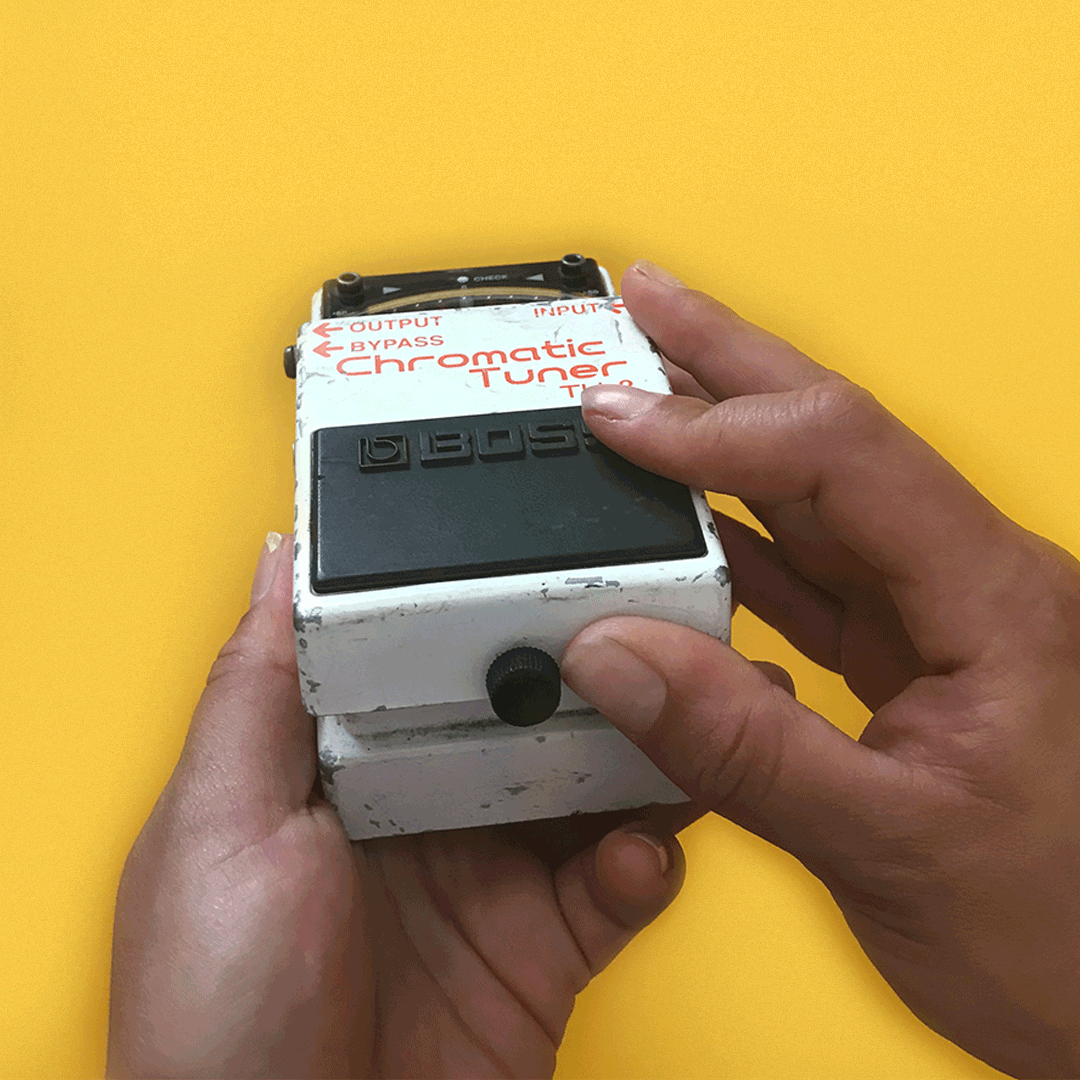
Tuning pedal
Guides you in tuning your instrument and sometimes can act as a mute if pedal has the option to cut signal while being used.
Example: Boss TU-2
Equalizer (EQ) pedal
Helps to lower/cut or raise certain frequencies. Can also sometimes be used as a clean boost if all frequencies can be turned up slightly.
Example: Boss GE-7
Volume pedal
A popular type of pedal that changes the volume of signal when manipulated.
Example: Ernie Ball VP Junior
Compression (or compressor) pedal
“Compresses” the signal that your guitar produces by normalizing the dynamic range of the audio input signal based on a threshold value. Can also increase sustain by controlling how loud or soft your signal gets, without distorting your tone.
Example: MXR Dyna Comp
Noise Gate pedal
Comparable to a compressor, a noise gate controls the volume of an audio signal.
Example: Behringer NR300
Limiter pedal
Allows signals below a specified input level to pass unaffected while lowering the peaks of stronger signals that exceed this threshold.
Example: Boss LMB-3 (bass limiter)
Wah (or wah-wah) pedal
Alters the tone and frequencies of the guitar signal to create a distinctive sound, mimicking the human voice saying the onomatopoeic name “wah-wah.”
Example: Jim Dunlop Cry Baby Wah
Boost pedal
Boosts or cuts the signal from one level to another, set, level. Like a volume pedal, but without dynamic capabilities.
Example: ETC Electronic Spark Booster
Chorus pedal
Creates a richer, thicker sound that simulates the slight variations in pitch and timing that occur in a vocal chorus.
Example: Electro-Harmonix Small Clone
Reverb pedal
Creates the effect of reverberation.
Example: Electro-Harmonix Holy Grail
Phaser (or phase shifter) pedal
Split the signal of your instrument into two exact copies, shift the phase of one copy, and then recombine the two as a single signal, creating a rippling, Doppler-like effect in your sound.
Example: MXR Phase 90
Flanger pedal
Similar to a phase shifter, a flanger splits the signal into two copies, then one of them is delayed in time very slightly. The delay time also changes at a constant rate, which can be manipulated with a knob. It sounds kind of like a jet plane!
Example: Mooer Eleclady
Delay pedal
Records a copy of your signal and plays it back after a delay, creating a repeating, decaying echo effect.
Example: Line 6 DL4
Tremolo pedal
As an effect, tremolo is a modulation effect that creates a change in volume. The “tremolo arm” on your guitar is actually vibrato, which lowers and raises the pitch, creating variation in tone. Example: EarthQuaker Devices Hummingbird
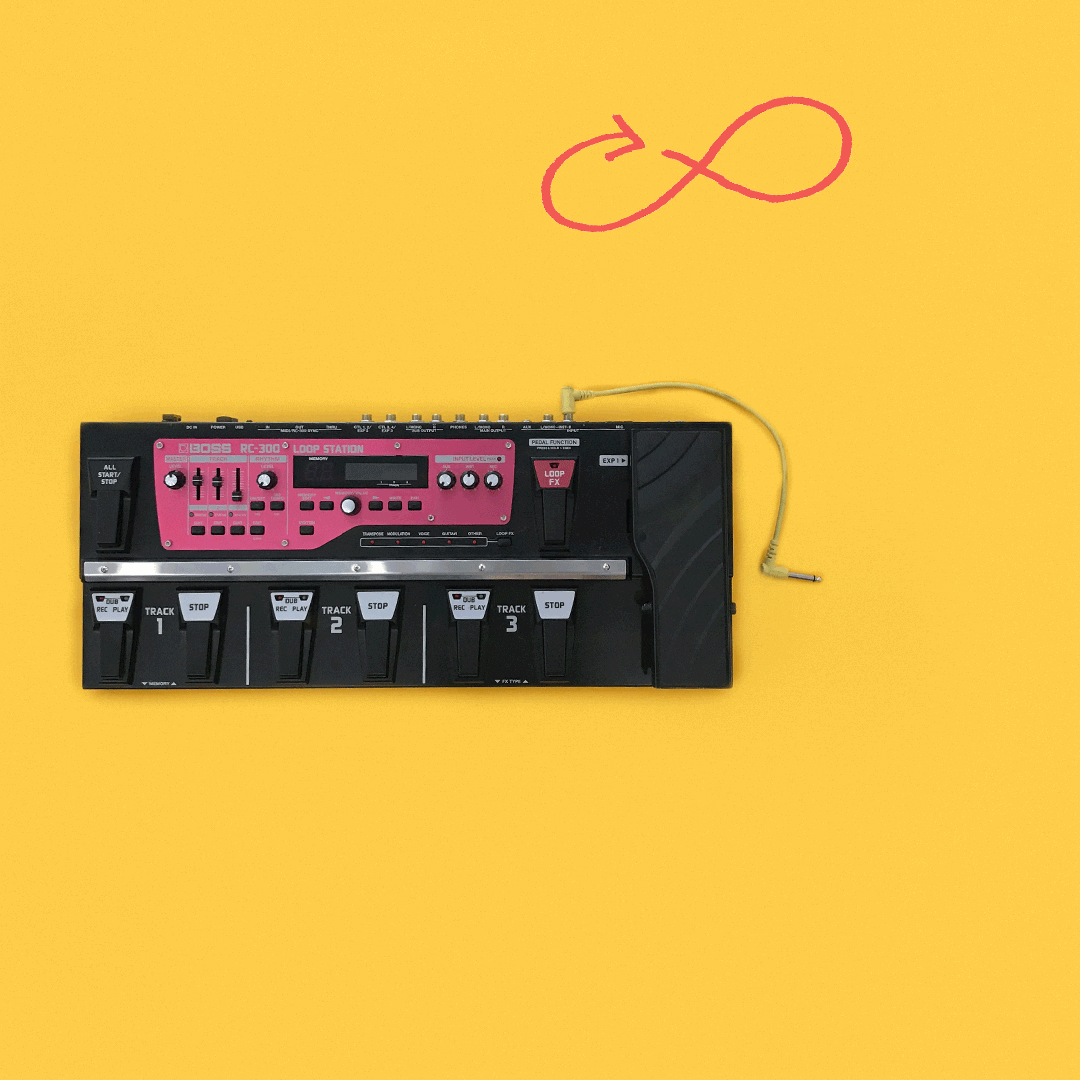
Loop (looper) pedal
Allows you to record short pieces of audio and loop, or repeat, them indefinitely. Sometimes loop pedals will have layering functions, allowing you to record one or more pieces of audio over the original track.
Example: Boss RC-2
Ring modulator pedal
A signal-processing function performed by multiplying two signals, where one is typically a sine wave or another simple waveform and the other is the signal to be modulated. Honestly, just makes your signal sound “wobbly.”
Example: Moog Moogerfooger
Fuzz pedal
One of the first guitar effects ever engineered, fuzz pedals change the guitar signal by using transistors (germanium or silicon) to amplify the signal to a point where it starts to sound distorted, fuzzy, and has very long sustain.
Example: Jim Dunlop Fuzz Face
Overdrive pedal
Provides a gain boost to “overdrive” a tube amp into distortion, or to approximate the mildly distorted sound of a slightly overdriven tube amp.
Example: Ibanez Tube Screamer
Distortion pedal
Whereas overdrive aim to create the sound of tubes pushed to their limit, distortions do what their name says and distort the signal tone. To do this, they use a network of transistors and clipping diodes.
Example: Pro Co Sound RAT

A note on dirt effects: Fuzz, overdrive, and distortion pedals often sound pretty similar, but they reach the goal of dirtying up the guitar signal through different methods. Some may work better for your setup than others! For example, an overdrive like the Ibanez Tube Screamer may sound better when used with a tube amp and you may find that a solid state amp responds better to a distortion pedal like a RAT. The only way to know is to try out different stuff!
Palm’s newest EP, “Shadow Expert,” was released in June, 2017. It offers a refreshing take on the broad spectrum of popular indie rock. The songs often feel as though they could fall apart at any moment, yet somehow Palm remains steady and constant.
For Palm, music is like a pleasant, yet complex machine, with everything working together as a cohesive unit. Even the vocals, which often alternate between the two guitarists and vocalists, Eve Alpert and Kasra Kurt, tend to drive the music as much as the other instruments. The band’s songs progress from often minimalist riffs, repeating and developing into something more complex, while remaining very rhythmic. The style is not unlike their previous releases, but the production is a lot smoother, making it more pronounced.
Guitarist / vocalist Eve Alpert has been playing guitar since she was twelve. She was inspired by a family friend from Peru, who lived with them for a year and a half when he was 16. “He was into punk rock and played drums in a band in Lima,” she says. “I’m an only child and he was like a big brother to me.” He showed her a few chords on his acoustic and she continued to learn from there. Palm formed after Alpert and some friends started playing music together in college, and expanded into a four-piece in 2012. “Before that, Kasra and I played the same four songs together in his dorm room most days for a year, blasting amps tucked under his raise single bed,” she recalls.
Although Alpert and her bandmates are adept at using uncommon time signatures and meters, their intention is not to make complex music. Alpert explains that sometimes during the band’s writing process, their drummer, Hugo Stanley, manipulates the rhythm to create a different feeling over the guitars. “After we get comfortable looping a particular idea we might look back and remark on the fact that it’s maybe in an odd meter,” she says. “But in general it’s not our intention to throw around different time signatures into our songs.”
Nevertheless, there is a mastery in how Palm is able to simplify complexities in their music. The songs on “Shadow Expert” are a smooth blend of pop and something leaning towards chaos, as the title track perfectly demonstrates. The songs bounce between mechanical-sounding riffs, gleaming vocals, and sharply driven rhythms, creating something much more organic.
Alpert offered us some tips on how to keep time and remain rhythmic while conveying emotion through different meters. The technique may be more intuitive than one might think; it just requires a little thinking outside your normal patterns of thought when it comes to music.
“Shadow Expert” is out now on Carpark Records.
Get a drum machine: “Preferably one that allows you to make beats in odd time meters. Play along. Sometimes we’ll make a drum pattern completely randomly, with no intention, just randomly hit buttons and then we’ll try and use that as a compositional tool. I.e I’ll play on all the high hats and Kasra will play on all the toms.”
Stop thinking in terms of meter: “Listen to sounds around you: cars, birds, people yelling. These things are rarely in ‘straight time,’ but we don’t think of them as “odd meter”. Thinking in terms of meter makes everything rigid.”
Speaking of listening to cars: “Most machines have a rhythm and often they’re pretty interesting. Escalators in malls, trains etc. We were all influenced by the CD player in my old car that would shred all our CDs because it was constantly skipping.”
Count until you find your flow: “Count initially if you need to but if it doesn’t start to flow naturally after a while it’s probably an idea you should move on from.”
Think about how rhythms interact with and reflect emotion: “In Palm, rhythms are often used to express anxiety or feeling unsettled, like there’s no ground beneath your feet. If you’re just jumping from time signature to time signature for the sake of it you’ll probably end up with something cold, calculated, and uncompelling on a human level.”
Explore styles of music from around the globe: “Listen to music with odd meters that isn’t western bro-y progressive or math rock. A lot of music from all around the world employ unusual rhythms, without toxic masculinity! Lots of music from Southeast Asia and West Africa use bizarre meters. Gerry from Palm used to Greek dance and apparently some of the pieces were in 13/8.”
Shouldn’t the right hand be doing all the important stuff? Who designed the guitar anyway? I soon figured out it’s because the right hand is providing the important rhythmic pulse in conjunction with the harmony. Basically the dominant hand is doing all the creative work while the left is a mere pattern template. For example, an E major chord will always be E, G#, and B no matter what instrument you play. So, might as well give the less creative hand the redundant shapes to memorize. Your dominant hand‘s choices will then define the song and pump life into it, lock it into the other instruments, create dynamics, and ultimately define the musical style. And we soon learn that everyone’s strum, fingerpick, flatpick, slap, or tap is as unique as their personal signature.
Just like the formula that makes up an E major chord, there are some formulas and rules for rhythm guitar too. These can be heard in and applied to thousands of songs. Learn the rules, break them, or both.
BEGINNERS:
A rhythmic motif is a short and repetitive strum or pick pattern. Practice just one bar (or measure) motif until it feels natural and like part of your muscle memory. Give yourself time for the muscles to learn! Sometimes the one-bar motif is repeated throughout an entire song, but most often it changes depending on movement from the verse to the chorus to bridge—or however you section the song up.
Start with truly understanding how to count your quarter notes and eighth notes. I can’t stress this enough. It’s much easier than it sounds. This is the necessary foundation for more syncopated or quirkier strums and picking styles to build off of later. And remember to count out loud. This is an important part of internalizing rhythm from ear to hand.
For example, a 4/4 rhythm counted in quarter notes is counted as “one, two, three, four.” Played in eighths, it is counted as “one and two and three and four and.” Every part of the measure is accounted for so you can’t rush it or skip any part of it. No more, no less. The rules. Boom.
Here are the most used time signatures in music:
4/4 time: One and three are characterized by strong beats that alternate with two weaker beats (two and four). The weaker beats are often light up-strums.
4/4 time with a backbeat: Same as above but with emphasis now on the two and four. This ubiquitous pattern creates a rockin’ sound.
3/4 time: Emphasis is on the one. (ONE-two-three.)
6/8 time: Emphasis is on the one and four. (ONE-two-three-FOUR-five-six.) Try creating your own mnemonic devices. I have a student that came up with “GLO-ri-a-VAN-der-belt” for a 6/8.
Practice both strumming and fingerpicking in all of the common time signatures for a versatile repertoire. Use a metronome whenever you can.
INTERMEDIATE:
Now, shouldn’t there be an accent? Most likely, yes. Beware the cheese-grater strum. There’s an often unspoken and unseen musical element to reading rhythm charts that is called the downbeat, the accent or emphasis, that is also known as the pulse. Chords need to sound like, well, music—so don’t scrub ‘em like you’re getting out a stain. Instead, get some style in your strumming hand and be creative.
Rhythmic displacement, otherwise known as syncopation, is a rhythm that’s been altered from the original downbeat rule. This adds flare and personality to your song. Pick another one-bar motif, this time with syncopation, and repeat it.
Utilize dotted eighth notes, ties, and emphasized upbeats. Remember to repeat patterns so unity is consistent throughout the song. You’ll find the same syncopated strumming patterns used over again in music of all different styles and genres. Get comfortable knowing a handful of them. And make up some of your own.
On the other side of the spectrum, and arguably just as important, is the punk power chord down-strum. This can be treated as an equally accented down-strum with no ups. It should sound heavy, almost like a solid bass line—a rhythm guitar driving the song, often in contrast to a jangly or melodic lead. Accents can certainly be used in the heavy down-strum style too, just be sure to practice locking in. With this style, you’ll want to work on getting tight with a metronome or drummer.
Staccato or legato? Play or listen to a strummed or picked measure. Is it made up of short sounds (staccato)? Examples of staccato rhythms are short dampened down-strums, driving, and/or often very percussive beats. Does the chord ring out with a long harmonized tail after a dramatic strum (legato)? Songs are made up of both, so get comfortable playing both styles with variations in between.
Remember this as far as syncopation: If you can hear it, you can play it. Don’t forget to take a moment, or several, to sing the rhythm out loud or tap it like a drum beat. If you’re playing along to a song and it just doesn’t sound right, chances are the accent is in a different place.
ADVANCED:
The hybrid picking style is a versatile cross-style technique which uses both the pick and the bare fingers. This is the style I cannot live without since I play both rhythm and lead in my band. The general guideline is to hold the pick between the thumb and index finger while the middle, ring, and pinky fingers hit strings one, two, and three alternately or simultaneously. Some people avoid the pinky at all costs and alternate using just the middle and ring fingers on the highest strings. In my experience, that’s a waste, and I believe it’s best to put the pinky to work. Why not? It’s just hanging around anyway, and with it we’ll have more harmonic options.Then, the pick hits strings six, five, and four—often the bass or lower notes of the chord. They can be struck singly or up to three strings at a time, depending on the song.
Hybrid style also comes in handy for volume control when playing without a bassist. You can aim for a solid, low, flat picked articulation, like a bass player using a pick, while the treble strings, when present, won’t be louder or interfere with the chord. This also allows for two different sounding tones at the same time; the bassy strike makes a nice contrast against the softer fingerpicked arpeggiated (when a chord’s strings and notes are played one at a time) plucks.
Practice playing hybrid style chords with accurate articulation, both with even volume between notes and with dynamic contrast. Aim for a steady rhythm throughout. Hybrid style also allows for playing ease with non-adjacent strings, inversion chords, or simply different voicings for a fresh sound. This is unlike the standard strumming technique in which all of the strings are played in succession.
Hands down, the most useful part of hybrid picking is that it allows you to quickly revert from strumming to finger picking in the middle of a song or set. Sometimes the verse is strummed and then sprinkled with a series of arpeggiated chords. Hybrid style allows for quick turnarounds into harmonic leads, double-note runs, and melodic jumps. These can be executed all the while effortlessly jumping back or simultaneously playing a solid strumming pattern. Sometimes a drone or pedal bass string sounds great ringing out while the treble strings are fingerpicked in a percussive staccato.
Mix and match your own one-bar motifs, from repetitive strumming patterns to complex single note lines. Internalize the rules by listening for 4/4, 3/4, 6/8, and other time signatures. Learn how to read rhythms in print or sheet music, listen for motifs in TV and film scores, and become aware of accents when you’re listening to music anywhere. Study rhythms from other instruments such as the drums, bass, and horns, as well as vocalists’ melodies, for new rhythmic ideas and motifs.
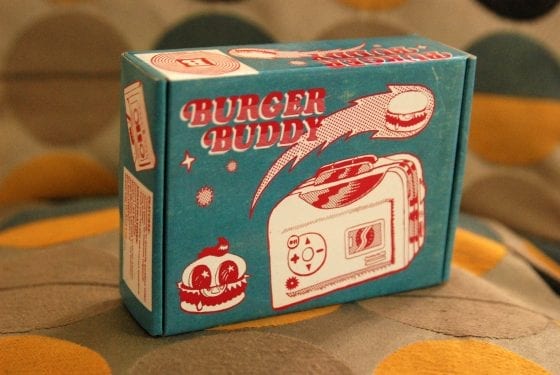
Since 2007, Burger Records founders Sean Bohrman and Lee Rickards have released 1,150 cassette tape titles from bands like La Luz, Ty Segall, and [my band] White Mystery out of their Fullerton, California storefront. They recently launched the Burger Buddy as a “Walkman”-style, handheld device so that more people can finally play the tapes they buy at shows, merch tables, or online.
The Burger Buddy is a sleek and groovy functional electronic novelty, branded with the blue Burger Records logo on a white plastic case and a package design by King Tuff artist Luke Thomas.
Beyond its retro look, what is most remarkable about the Burger Buddy is its innovative, 21st-century operation. It can be used as an on-the-go, battery-operated personal tape player (with bundled earbuds) or as a party gadget that can be plugged into speakers. Additionally, the 3.5 x 4.5 inch device can convert music from cassettes into MP3s directly onto your flash drive in a fairly simple fashion.
For DIY musicians, the value of tape-to-digital file conversion is priceless. Remember that drawer full of old practice tapes, precious mixtapes, and concert bootlegs? The Burger Buddy allows you to share that audio with the digital world.
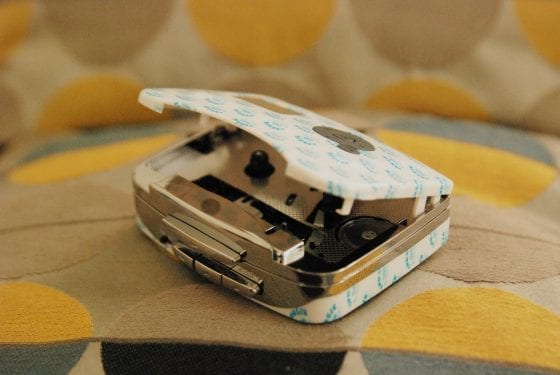
I was wary that this amazing process might require special software, so I was delighted to find that the Burger Buddy comes with a USB cord that connects directly to a flash drive. That means that all you have to do is insert a memory stick into the Burger Buddy’s chord, and press a couple buttons in either manual or auto mode to convert your cassette contents into digital tracks.
Another amazing feature of the Burger Buddy is that it powers up when plugged directly into your computer (via that same USB cord). You can still use AA batteries when you’re on the go, or save that battery life when the device is tethered to your computer.
For the price, the Burger Buddy is a fun electronic appliance that goes beyond standard tape playing to convert cassettes into digital files. Monetize those old demos on Bandcamp, yal! Plus, the bundle includes a limited edition compilation featuring feminist superhero Kathleen Hanna from Bikini Kill.
The player is currently sold out, but according to Burger Records, they’ll be back in stock by the holidays, with new art from Luke Thomas and a cassette compilation. More information can be found here.
Burger Buddy by Burger Records:
PROS
Design of the device and packaging is beautiful
Innovative features include straight to flash drive tape-to-MP3 conversion
Includes a limited edition tape cassette compilation of various artists
Ability to skip AA batteries and use the USB cord to charge it through a laptop
Sound quality is really good through headphones and speakers
Earbuds included are nice, and fit correctly with good sound quality
The green light is cute and alerts you when the device is working
CONS
Device itself is fragile so make sure you handle it carefully
Wish it had an eject button instead of the manual open and close
Be careful with the battery door because it is delicate
Play button text is upside down
No internal microphone or speakers
Manual recording method worked fine but auto mode was more challenging
In our monthly video series The Way, She Shreds celebrates every approach to guitar, and the diversity of experiences and perspectives of the musicians who play them. Each new episode features a artist who provides a closer look at her technique and artistry as she teaches us how to play an original song.

We recently met up with Jessica Dobson, guitarist and vocalist of Seattle-based indie band Deep Sea Diver, to learn how to play “Always Waiting,” off the band’s 2016 album Secrets (High Beam Records). A musician from a young age, Dobson was signed to Atlantic Records at age 19 and worked as a touring musician with artists the Yeah, Yeah, Yeahs, The Shins, and Beck before stepping away to start Deep Sea Diver in 2013.
Watch the video to get a better feel for Dobson’s personal style, and follow the TAB below for further instruction.
TABS: “Always Waiting” by Deep Sea Diver