Nuts and Bolts 6: How do I Improve the Playability of My Guitar? Truss Rod and Action Adjustments
The latest in our Nuts and Bolts series takes a look at adjustments you can make to your guitar for better playability.
Neck Tension and Truss Rods
A truss rod is a sturdy bar that runs through the neck of most guitars and controls the tension in the neck. They are usually adjustable, and truss rod adjustments can really impact the playability of your guitar.
Neck Relief vs. Back Bow: How straight is the neck?
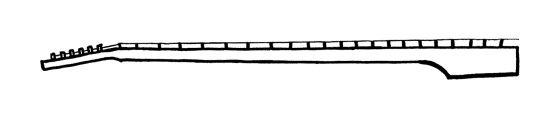
Sight the neck, looking down from the headstock toward the body of the guitar with it on its side. See if you can see any humps or a general bend in the neck.
Hold the guitar in playing position (not flat on its back!) and rest a straight edge on the fretboard. If you can rock it back and forth—headstock to tail—on a certain fret, the neck is in back bow.

Back bow often causes buzzing at certain frets, because it brings part of the neck closer to the strings. It can also affect the intonation of your guitar. It is almost never desirable.
Back bow is the opposite of relief, or up-bow.

If you look at where the straight edge meets the frets and see a gap, there is some relief in your neck.
The question of “how much relief is okay” is subjective. Many players want a little bit of relief in the neck, but getting your neck flat is a good place to start.
When your neck is flat, your straight edge will rest evenly across all the frets, no rocking back and forth, and no gap.
Essentially, you want enough tension on the neck to allow the strings to vibrate without hitting frets, but not so much necessarily high action (harder to play!) and can also cause intonation problems.
Truss Rod Adjustments:
For most guitars, you will need a nut driver or truss rod wrench to make this adjustment. The most common sizes you’d need are 1/4”, 9/32” and 5/16”.
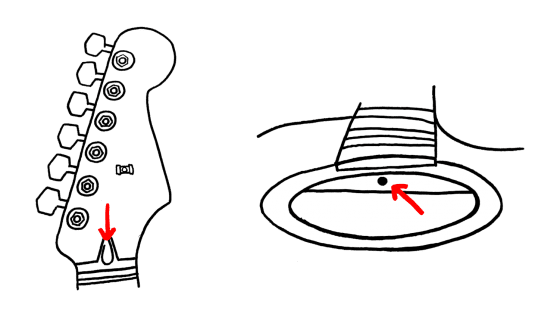
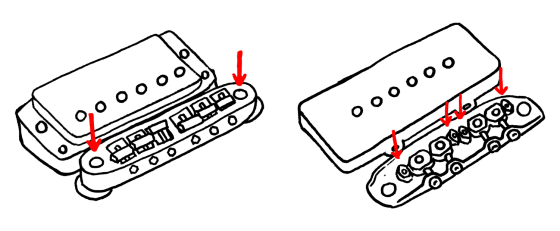
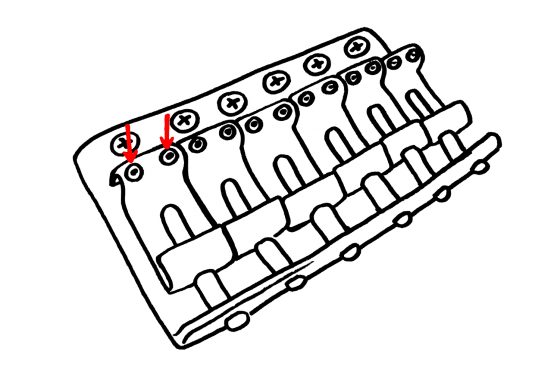
- Locate your truss rod adjusting nut. It is usually either at the top of the neck where it joins the headstock, or at the bottom where it joins the body.
- Always start by loosening the truss rod, turning the nut to the left! Over tightening can break the truss rod, so this step helps to avoid that risk.
- If you found back bow in your neck, the truss rod needs to be loosened to add relief. If you found excessive relief, the truss rod needs to be tightened to straighten the neck.
- Whatever direction you’re going, turn the nut only a 1/8 turn at a time, then check with a straight edge before turning more. This will prevent over adjustment.
Action
Action refers to how high the strings are off the neck. It is adjustable at the bridge, by raising or lowering the saddles. Some guitars have flat fretboards, but there is a wide degree of variation in neck radius, or how curved the fretboard is. A smaller radius means more curvature across the neck.

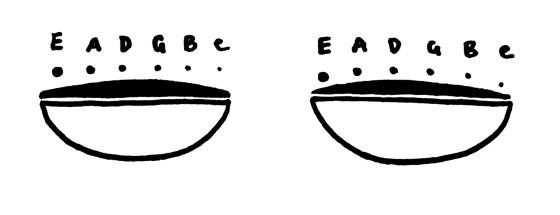
You can buy tools to measure the radius on the fretboard and then match string height to that, but you can also get pretty close by sight. Essentially, you want to adjust the height of all six saddles so that the curvature across the top of the strings matches the curvature of the fretboard – the action should reflect the radius. A common mistake is to give all strings equal action. This is terrible for playability! The first E string should be the same distance from the fretboard as the G or D string. The fretboard is convex: it is crests in the middle, under the G/D strings, and is lower at the edges, under the E strings. So, the middle strings will need to be higher than the outer strings.
If your action is too high, it will be hard to push the strings down; bar chords become especially difficult. If action is too low, you can get fret buzz and lose sustain. With a very small ruler, you can measure action at the 12th fret. A good place to start is 1/16 “ at the high E string and 3/32” at the low E string.
Some bridges only allow action adjustment at either end of the bridge, or are split with action adjustments for each half.
If your bridge has individually adjustable saddles, start with the E strings, then adjust the inner strings to reflect the curvature (radius) of the neck. Play and adjust to suit your comfort.
If you had been hoping to resolve a string buzz issue and none of these adjustments helped you, there may be a problem with the nut, the (usually whitish) slotted bar at the top of the neck near the headstock in which the strings rest. Sometimes nut slots need to be filled because they’re too deep; sometimes they need to be filed because they’re too shallow. There is an at-home fix for this involving baking soda, super glue and an X-acto knife, but I highly recommend seeing a professional unless you’d be okay without your guitar for a little while in the event that you mess up.
Bear in mind that players have different preferences for action and neck relief. I personally prefer a bit of relief, but that’s just me! Just maintain focus and patience when working on your guitar, and you’ll be surprised by how great of an effect a tiny adjustment can have on playability.

More posts
-
 By: Cynthia Schemmer
 -
Powered By: Fender
-
By: Cynthia Schemmer
-
By: Cynthia Schemmer
-
By: Leila Sidi
-
By: Leila Sidi
-
Powered By: Reverb
-
Powered By: Marshall Amps
-
Powered By: Positive Grid
-
By: She Shreds


Comments
[…] your neck is as strong, playable, and straight as can be. Fortunately, the mystery behind properly adjusting your own guitar neck becomes less and less daunting the more you know about the overall […]
Pingback by She Shreds Media on May 10, 2021 at 10:00 am